Tutorials · Cameras and Framing · Chapter 10
A map in the corner
By the end
- The project’s seventeen sorting layers named, back to front, and every node that draws picked onto its own, with nothing moved in the stack
- A Viewport under the watchman that sees
480units round him into a texture of its own, and a HUD panel that shows it in the screen’s top right corner, under a brass frame - The same map in the castle, pasted with a texture of its own, which shows the next room before the screen does
- A wooden door at the great hall’s west end that takes him back to the town
On this page
Seventeen named layers
A map should show where things are, and leave out the sky. A view is told which sorting layers to draw, by name, and so far the project’s layers have had no names: every node carries a bare Sort Layer number, from the sky’s -70 to the arrow’s 10, and the project’s list of names holds one row, Default. This chapter names them first.
- Open File → Project settings… and its Layers tab. Double-click the one row,
Default, typeSkyand press Enter. - Click the box beside Add layer, type
Cloudsand press Enter. The new row lands under the last: further down the list is nearer the camera. - Add the other fifteen the same way, in the order of the table below, from
MountainstoMarks. Drag the window’s bottom right corner down to see the whole list.
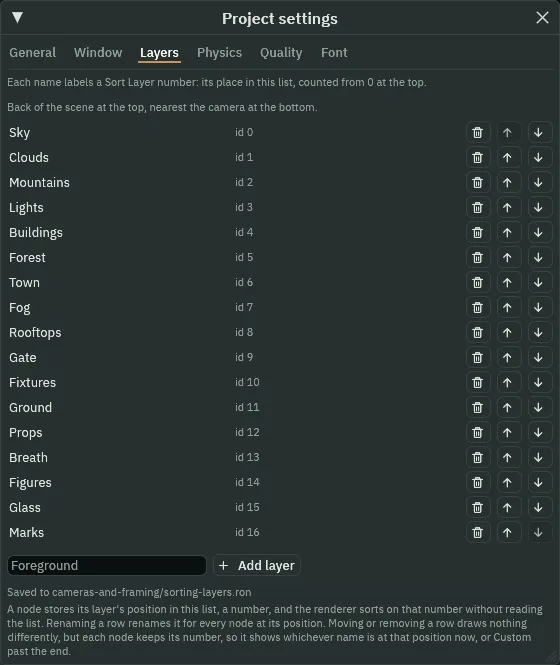
The note at the top of the tab says what a name is: each name labels a Sort Layer number, its place in this list, counted from 0 at the top. The game sorts on the number each node stores, and a view picks its layers by those numbers too, without reading the list. The names are what the Inspector shows for the numbers, in a node’s Sort Layer and in a view’s Layers.
| # | Name | In the town | In the castle | The number it had |
|---|---|---|---|---|
0 | Sky | sky | -70 | |
1 | Clouds | clouds | -65 | |
2 | Mountains | mountains | -60 | |
3 | Lights | lights | -59 | |
4 | Buildings | far-buildings | castle-wall | -50 |
5 | Forest | forest | -40 | |
6 | Town | townscape | -30 | |
7 | Fog | fog | -25 | |
8 | Rooftops | rooftops | -20 | |
9 | Gate | gate | town-door, made below | -2 |
10 | Fixtures | bars, pillar, beacon | -1 | |
11 | Ground | street | tiles | 0 |
12 | Props | lever | demon | 1, the lever’s; 3, the demon’s |
13 | Breath | breath | 4 | |
14 | Figures | watchman | watchman | 5 |
15 | Glass | none yet: chapter 12’s | ||
16 | Marks | arrow | 10 |
Seventeen, and not fewer, because two nodes on one layer are drawn in the order of their pictures’ ids, not the Hierarchy’s: put the clouds on the sky’s layer and they would be drawn behind it, and the lit windows behind the mountains. A layer holds more than one node only where they never overlap, or are never in one scene.
Now put every node that draws on its layer, by name.
- In the town, select each node the table names. In its Sprite, its Tilemap or, for
fog, its Particles, click Sort Layer and choose the name in its row:skySky,cloudsClouds, and so on toarrowMarks. - Press Ctrl+S. Open
scenes/castle.ronand do the same for its five:castle-wall,tiles,demon,breathandwatchman. Press Ctrl+S.
- Sort Layer, picked by name
- A node stores its layer’s place in the list, a number: Sky is
0, Marks16. Lower draws first. The renderer sorts on the number and never reads the list; the field shows the name at that number, and Custom for a number past the list’s end. - The Layers tab
- The project’s sorting layers, back to front, saved in
sorting-layers.ron. Renaming a row renames it for every node at that place. Moving or removing a row draws nothing differently: each node keeps its number, and shows whichever name is now there.
Every node’s number changes, the sky’s from -70 to 0 and the arrow’s from 10 to 16, but they keep their order, so nothing moves in the stack: both scenes draw exactly as they did. Until you have picked them all, a node still holds its old number and shows whatever is there: the street’s 0 reads Sky for a while.
The map’s eye
A Viewport draws the world again into a texture of its own, which a sprite or a panel then shows. The view looks from its node: the node is its camera. Put it under the watchman, and it goes where he goes.
- With
town.ronopen, selectwatchman, press + Add node and choose Viewport. It lands under him. Rename itmap-eyeand set its Position to0,-32:32above his feet. - In its Viewport, click Texture and choose New render target, the list’s first row. The field then reads
map-eye. - Set Size to
96,96and Zoom to0.2. Leave Update at Always, and Subtree and Drawn unticked. - Press the + beside Layers three times, and choose Ground, Props and Figures in the three entries.
- Click Clear Colour and, with the picker reading F, set it to
0.04,0.05,0.07, alpha1.
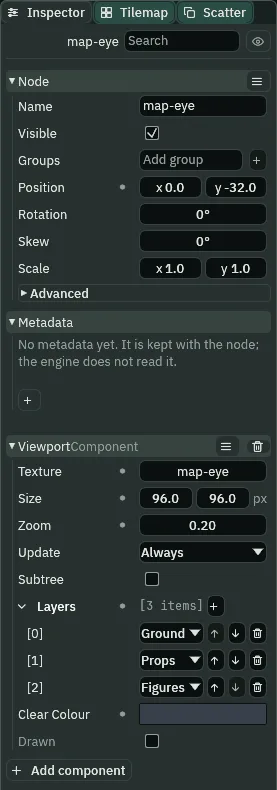
96 pixels square, and three layers.- The Viewport’s Texture
- The id the view draws into, which a Sprite’s or a Panel’s Texture then shows. New render target, first in the list, gives the view an id of its own, and the field names it by the node. Two views may not share one: Problems says so if they do.
- The Viewport’s Size
- The texture’s size in pixels:
96by96here. How big it looks on the screen is up to what shows it. - The Viewport’s Zoom
- How close it looks, as a Camera’s Zoom does: at
1a pixel of the texture is a unit of the world, and at0.2a pixel holds five units, so96pixels see480units each way. - Update
- How often the view draws into its texture. Always, as it comes, is the map’s; chapter 11 uses the other three.
- Always
- Draws in every frame, whether or not anything on the screen shows it: the mode for a map of a room things move about in.
- Subtree
- Unticked, as it comes, the view draws the whole scene, as a camera does. Ticked, it draws only the nodes under its own: chapter 11’s portrait.
- Layers
- The sorting layers the view draws, one entry each, picked by name; empty, as it comes, draws them all. The map draws Ground, Props and Figures: the stone, the lever and the demon, and him. At the Inspector’s usual width an entry shows its name alone, and the number it stores shows when you hover it.
- Clear Colour
- What the texture is filled with before the view draws. In F mode it is linear:
0.04,0.05,0.07draws as56,63,75, a slate a little lighter than the night. - Drawn
- Whether the view has drawn since this was last unticked. An Always view draws regardless; chapter 11 unticks it from a script to have a picture painted again.
At Zoom 0.2 the view sees 480 by 480 units, centred on map-eye, 32 above his feet: far more than the camera’s 320 by 180, so the map shows what lies past the screen’s edge. Its three layers keep the stone, the lever, the demon and him, and leave out the sky, the planes and the fog.
A panel in the corner
Nothing shows the texture yet. A HUD will: a Canvas over the screen, with a Panel on it that draws the map, and a second panel over that, the frame. art/map-frame.png, a brass ring on a dark riveted plate, is in the starter.
- Select
town, press + Add node and choose Canvas. It lands undertown, last. Rename ithud, and leave its Canvas as it comes: Reference Size1280by720, Scale Mode ScaleWithHeight. - Select
hud, press + Add node and choose Panel. Rename itmap. In its Rect, set Anchor Min and Anchor Max both to1,0; Offset Min to-208,16; Offset Max to-16,208; and Pivot to1,0. - In its Panel, set Color to
1,1,1, alpha1, click Texture and choosemap-eye, the view’s texture. Leave Border at0. - Select
hudagain and add another Panel. It lands aftermap, so it is drawn over it. Rename itmap-frame. In its Rect, set Anchor Min and Anchor Max to1,0; Offset Min to-224,0; Offset Max to0,224; and Pivot to1,0. In its Panel, set Color to1,1,1, alpha1, and dragart/map-frame.pngonto Texture. - Press Ctrl+S.
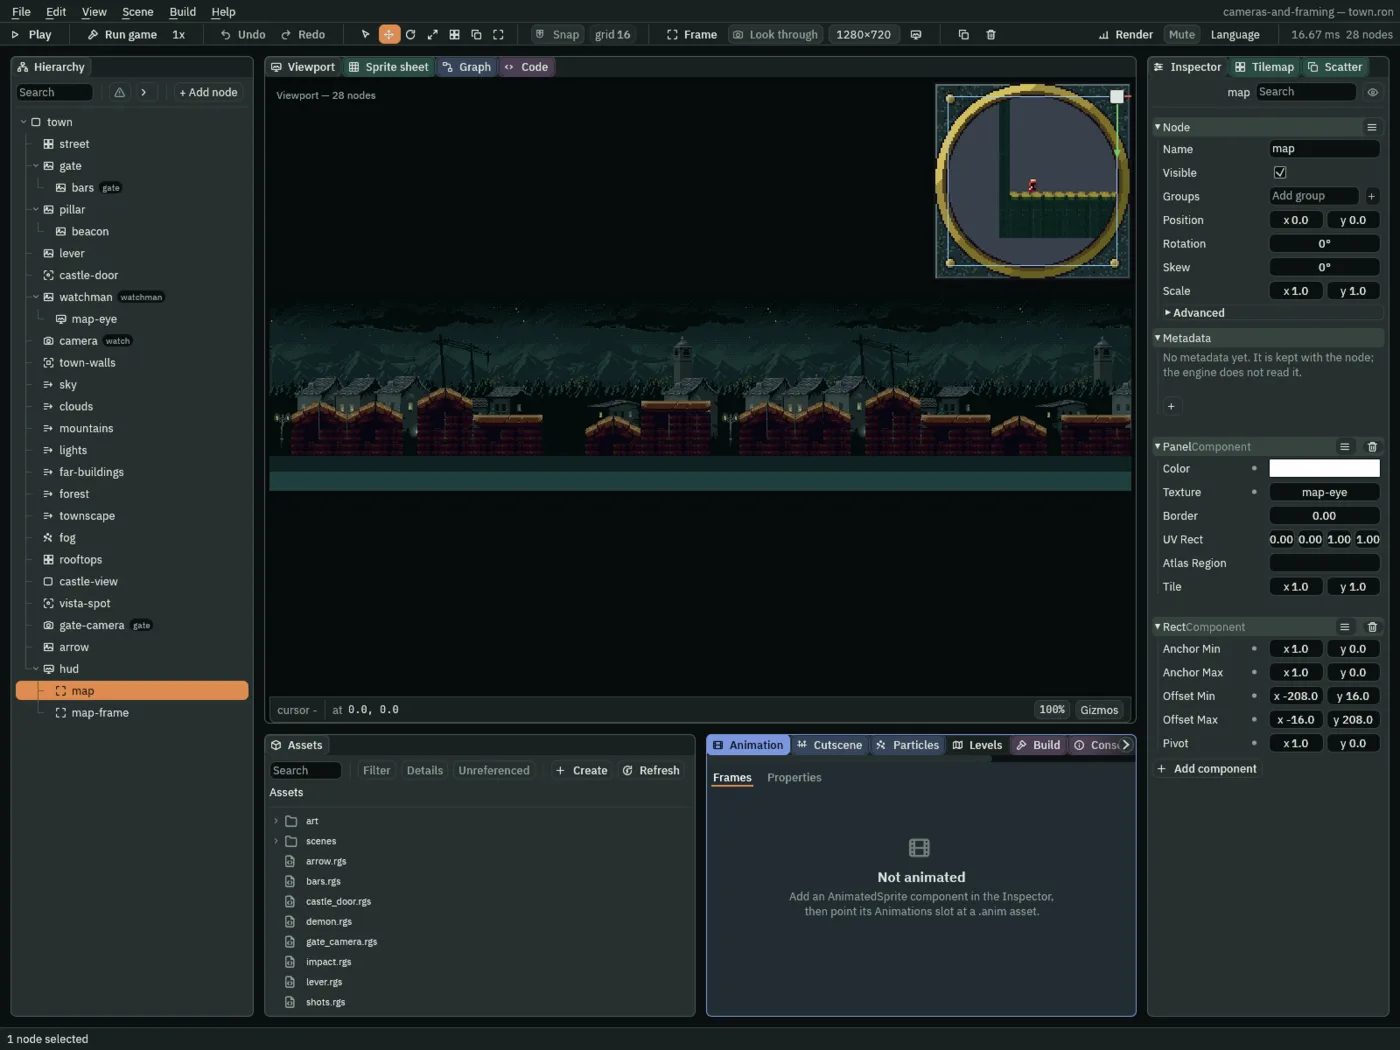
192 square, 16 in from the corner.- The Canvas’s Scale Mode ScaleWithHeight
- The canvas is
1280by720units, its Reference Size, scaled to the window’s height: at a window1080tall, a unit is1.5pixels. - Anchor Min, Anchor Max
- The Rect’s two points of the canvas it is held to, as fractions of its width and height:
0,0is the top left corner,1,1the bottom right. Both at1,0, the panel is held to the top right corner, whatever the window’s width. - Offset Min, Offset Max
- The Rect’s top left and bottom right corners, in the canvas’s units from the anchors:
-208,16and-16,208make the map192square,16in from the corner. - Pivot
- The point of the Rect, as fractions of its own size, that counts as its position:
1,0is its top right corner. - The Panel’s Color, Texture
- Texture is what the panel draws: a picture, or a view’s texture, picked by its node’s name. Color tints it; white leaves it as it is. A new Panel’s is half see-through black.
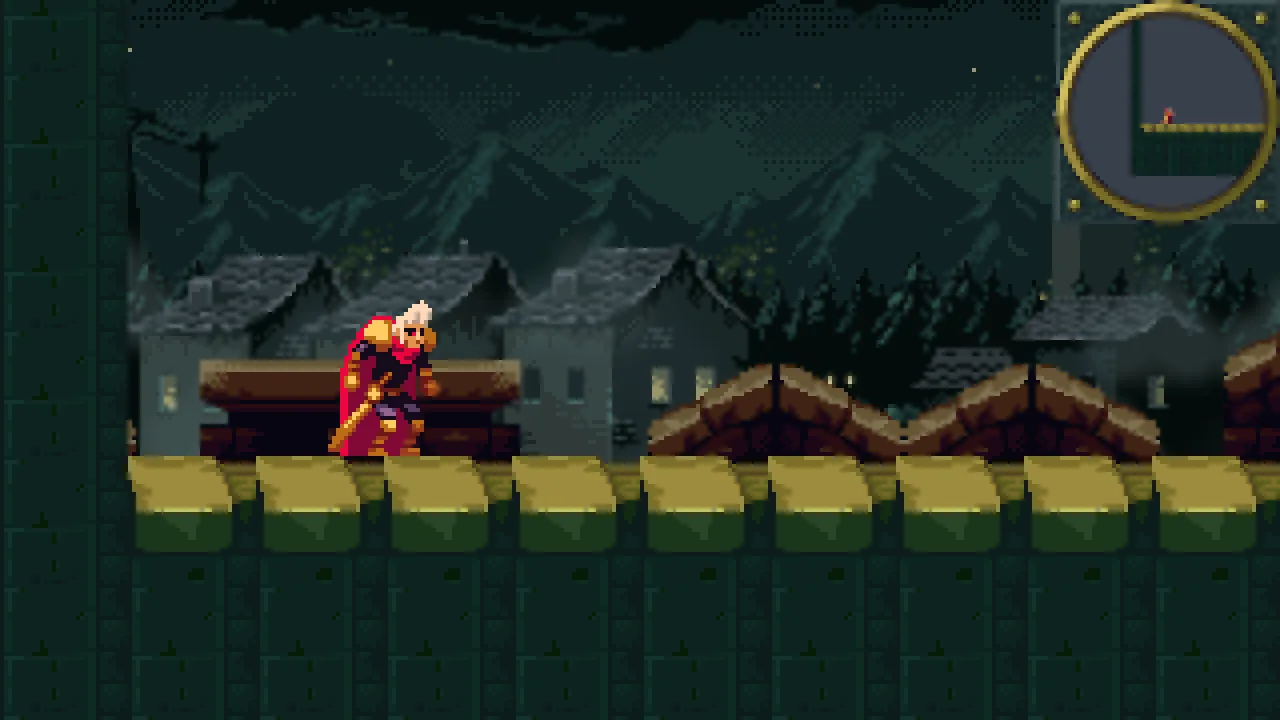
The panel shows the 96-pixel texture at twice its size, 192 square, just as the view drew it, so the Clear Colour’s slate is a disc lighter than the night round it. The frame’s plate is 224 square, in the corner itself, so it hides the map’s square corners, and its window is the map’s round middle. The map draws in every frame, a second pass beside the game’s, into a texture of its own; on a phone, each switch to another texture makes the graphics chip write out its tiles and start again. Chapter 11 has the whole of what a view costs.
The Canvas scales with the window’s height: at 1920 by 1080 the map is 288 square, 24 in from the corner. Under Pixel Perfect the HUD is laid out in the rectangle the game is cropped to: at 1366 by 768, that is 43, 24 to 1323, 744, and the map is 192 square, 16 in from that rectangle’s corner.
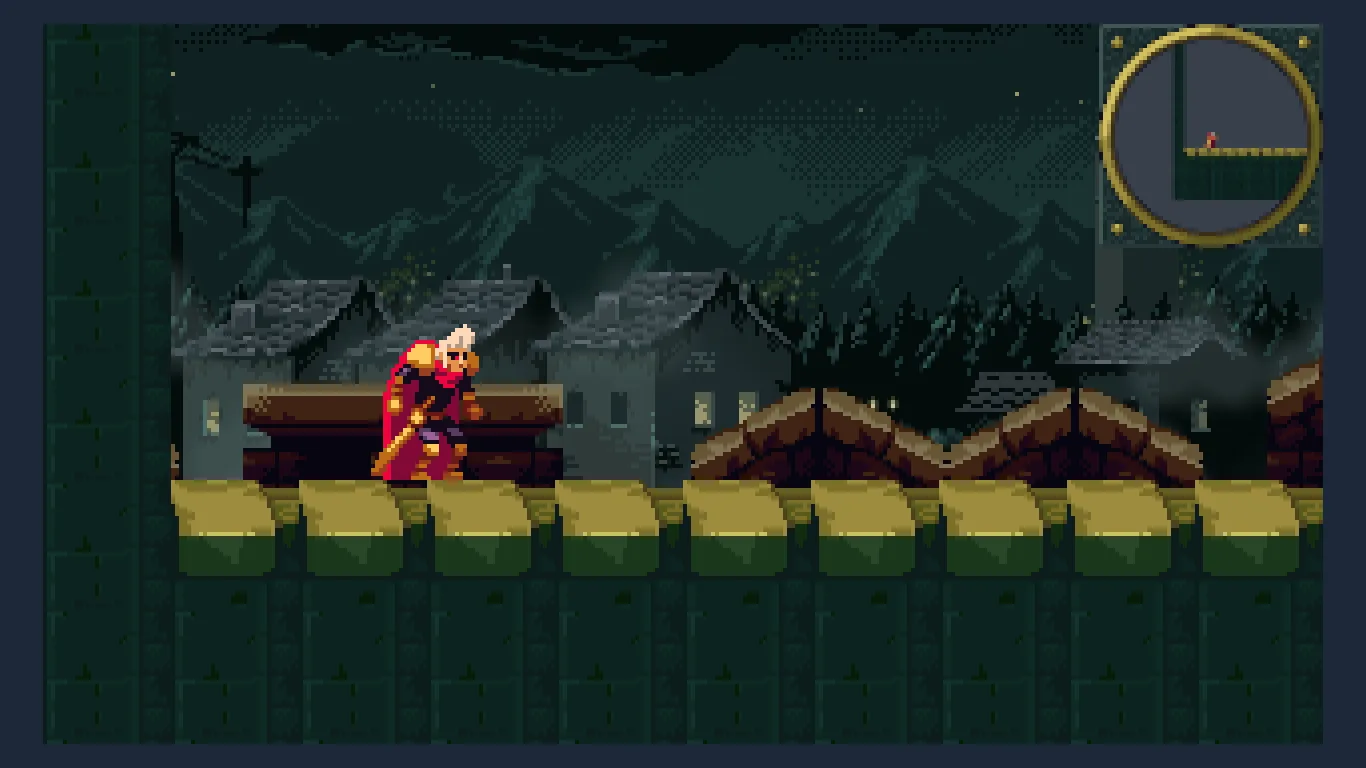
1366 by 768: the map in the corner of the picture, not of the window.The castle’s map
The castle gets the same map: copy the eye and the HUD together, and paste them.
- In the town’s Hierarchy, select
map-eye, then Ctrl-clickhud, and press Ctrl+C. - Open
scenes/castle.ron, right-clickcastleand choose Paste as child. Both land undercastle, last. - Drag the pasted
map-eyeontowatchman. It becomes his child, and keeps its Position of0,-32. - Press Ctrl+S.
The paste gives the castle’s eye a render target of its own and points the pasted map panel at it, since two views may not share one.
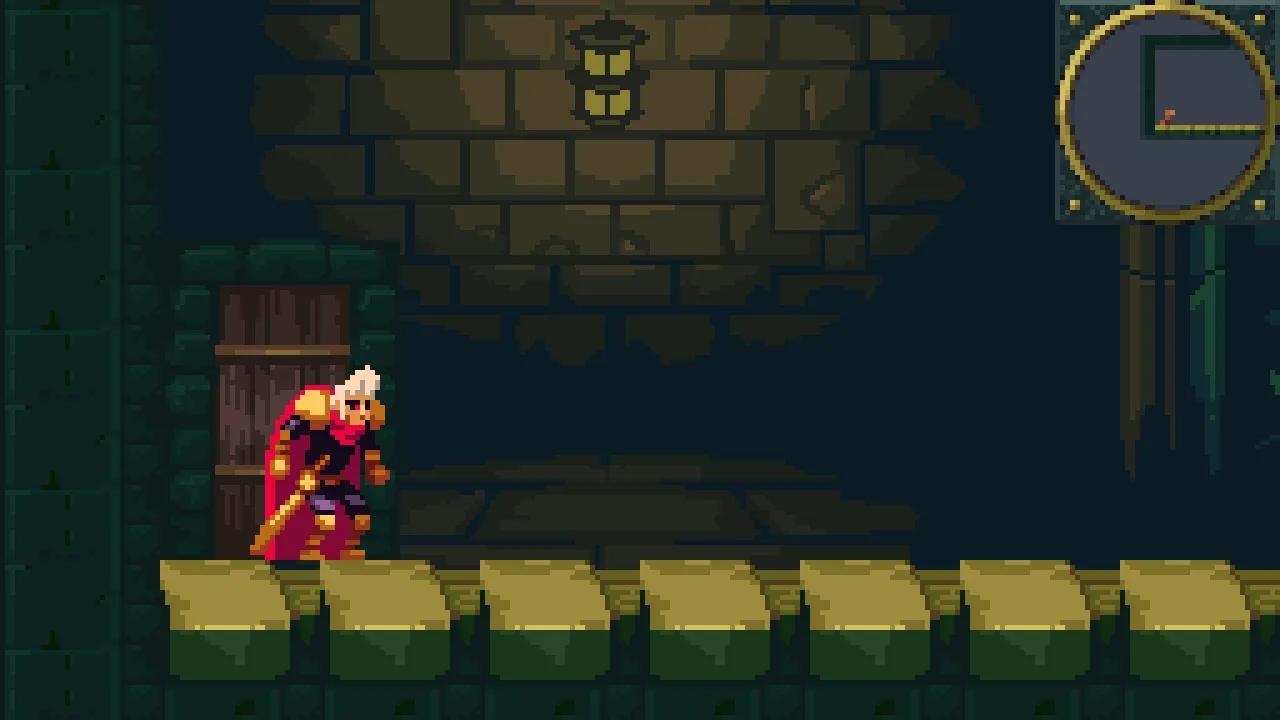
In the town the rig leads him, so the map sees only a little further ahead than the screen. In the castle each room holds the camera, and nothing holds the map. Near the great hall’s east end the picture stops at the hall’s edge, x 640, while the map, 240 east of him, already shows the stair shaft’s ledges and its east wall:

The door back
The gate leads into the castle, and nothing leads back. A door at the great hall’s west end will: the castle tileset’s own wooden door in its teal stone frame, cut out of the sheet as chapter 6 cut the castle’s wall.
- In Assets, double-click
art/old-dark-castle-interior-tileset.png. In the Sprite sheet tab, under Grid, set Cell to16and16and Margin to0and0. - Drag from cell
41, 3to cell43, 6: Selected 3 x 4. Hovering Name it reads48x64 at 656, 48. In the Regions band, click the Name box, typedoorand press Name it. - With
castle.ronopen, selectcastle, press + Add node and choose Sprite. It lands undercastle, last. Rename ittown-doorand set its Position to32,-64. - In its Sprite, drag the tileset onto Texture, click Atlas Region, type
doorand press Enter. Set Size to48,64, Anchor to0,0, and Sort Layer to Gate. - Press Add component and choose AreaComponent. In its Shape, set Size to
12,64and Offset to6,32.
/// The way back to the town, through the door at the great hall's west end.
/// The watchman stepping into it goes back out into the street.
component TownDoor : Area {
    fn on_enter(other: NodeId) {
        if in_group(other, "watchman") {
            change_scene("town");
        }
    }
}- Make
town_door.rgswith the script above, as in chapter 7: in Assets, click Assets in the path bar, then Create, New script,town_doorand Enter, the script in the Code tab, and Ctrl+S. - Select
town-door, press Add component and choose TownDoor. Press Ctrl+S.
change_scene("town")- Opens
scenes/town.ronin place of this scene, as a scene opens: everything in it as it was saved, so he is at his start and the gate is shut.
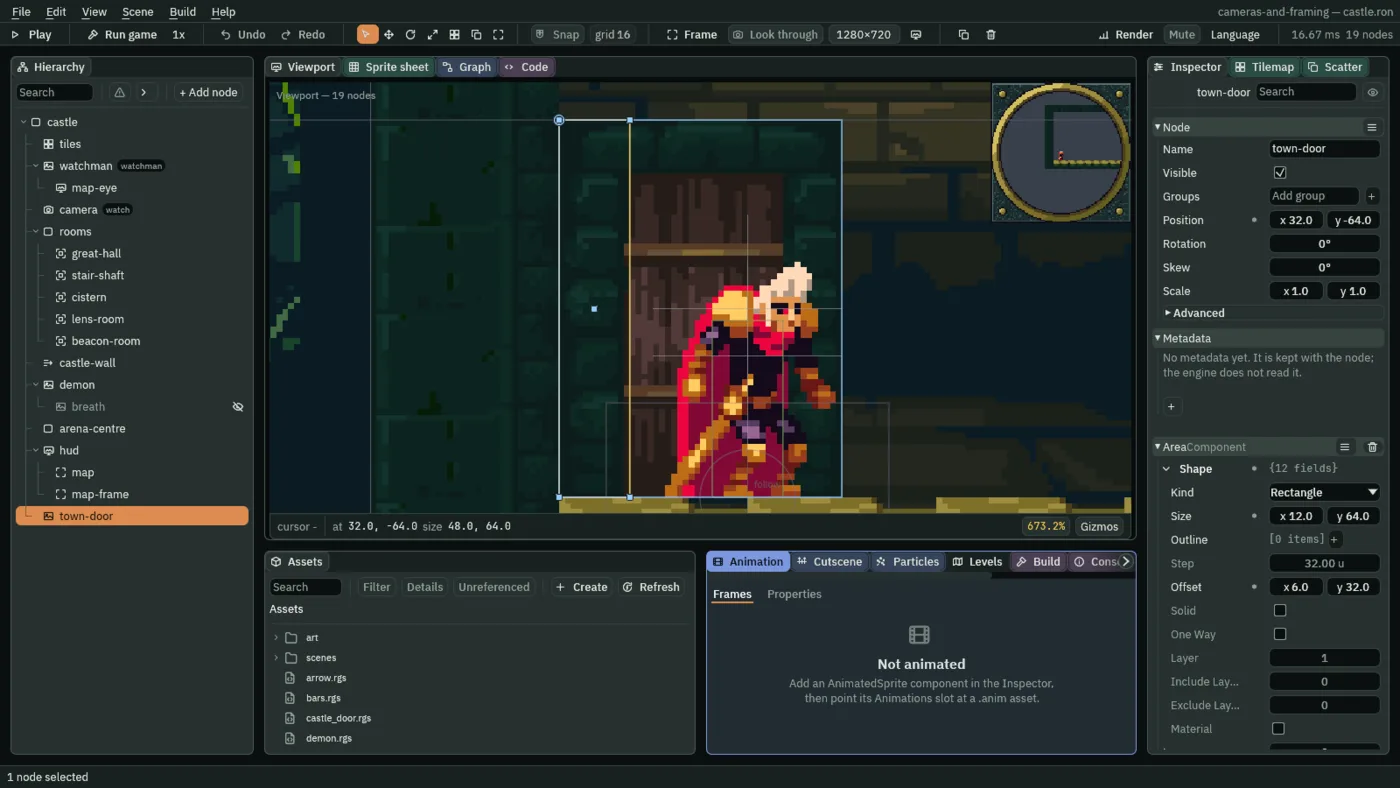
The door stands on the floor against the hall’s west wall, x 32 to 80, behind him where he comes in, at x 64, and behind the hall’s stone, which is on Ground. Its Area is the door’s west edge, x 32 to 44: he comes in clear of it, and reaches it only by walking west. Then, within a second, he is in the town. The map does not show the door: Gate is not one of its Layers.
Who moves the camera
Nothing new moves the game’s camera: the rig, every step, and the room holding it. The map has a camera of its own, its node. map-eye goes where he goes, as his child, and no rig and no room move it, which is why it shows what the room keeps off the screen. Naming the layers moved nothing either: the nodes’ numbers keep the order they had.
The layers, the map and the door
| Scene | Node | Component | Field | Value |
|---|---|---|---|---|
| project | Layers tab | rows | Sky to Marks, the seventeen of the table above | |
| town, castle | every node that draws | Sprite, Tilemap or Particles | Sort Layer | its name in the table above |
| town | map-eye, under watchman | Node | Position | 0, -32 |
| Viewport | Texture | New render target | ||
| Size, Zoom, Update | 96, 96; 0.2; Always | |||
| Layers | Ground, Props, Figures | |||
| Clear Colour | 0.04, 0.05, 0.07, 1 | |||
hud, last under town | Canvas | as it comes | ||
map, under hud | Rect | Anchor Min, Anchor Max | 1, 0; 1, 0 | |
| Offset Min, Offset Max, Pivot | -208, 16; -16, 208; 1, 0 | |||
| Panel | Color, Texture | 1, 1, 1, 1; map-eye | ||
map-frame, under hud, after map | Rect | Anchor Min, Anchor Max | 1, 0; 1, 0 | |
| Offset Min, Offset Max, Pivot | -224, 0; 0, 224; 1, 0 | |||
| Panel | Color, Texture | 1, 1, 1, 1; art/map-frame.png | ||
| castle | map-eye, hud | the town’s, pasted under castle; map-eye dragged onto watchman | ||
town-door, last under castle | Node | Position | 32, -64 | |
| Sprite | Texture, Atlas Region | art/old-dark-castle-interior-tileset.png, door | ||
| Size, Anchor, Sort Layer | 48, 64; 0, 0; Gate | |||
| Area | Size, Offset | 12, 64; 6, 32 | ||
| TownDoor | the script | |||
| project | art/old-dark-castle-interior-tileset.png | region | door | 656, 48, 48 by 64 |