Tutorials · Animation and Cutscenes · Chapter 12
The opening
By the end
- A Camera Rig on
camerawith three framings,follow,stageandmarionette, and the camera moved out from under the knight opening, a cutscene of seven tracks and ten seconds: footlights, music, curtain, cloth, the camera’s markers, the marionette’s and the knight’s slash- The marionette’s bow, a clip of its own on the base layer’s graph, started by a marker its script turns into a trigger
- A director that plays the opening and an operator that takes the camera’s shots by name, with a shake and a cut
- The show exported, opening on its opening
On this page
A camera rig
Since chapter 1 the camera has been the knight’s child, a plain Camera hanging 108 units above him, and the hall’s Confiner has kept it inside the walls. That is a camera that can do one thing. The opening needs three: the stage, with the curtain, then the marionette, close, then the knight. A Camera Rig is a component on the camera that holds several shots, called framings, and blends between them. Each framing is a subject to look at and a way to look at it. Which one is live is decided by which are switched on and which of those has the highest priority.
- In the Hierarchy, drag
cameraout from underknightand drop it ontheatre. It goes to the end oftheatre’s children, and its Position now reads160,180: the editor keeps a node where it stood when you give it a new parent, so the picture does not change. - Select
theatre, click + Add node and choose Node. Rename itstage_markand set its Position to320,180: the middle of the stage, a point for the stage shot to look at. - Select
camera, click Add component and choose CameraRigComponent. Enabled is ticked, as it comes. - Press
+beside Framings three times. Three rows appear,[0],[1]and[2]. Open the first by its arrow. - In
[0], set Name tofollow, and the row reads1 follow, its place and its name. Set Subject toknightby choosing him from the list or dragging him from the Hierarchy. Set Duration to1, Dead Zone to24,0, Soft Zone to160,0, Offset to0,108, Damping to0.3,0.5, Time to0.35, Smoothing to0.4and Limit to48. Active, Priority0, Zoom1, Rotation0and Ease EaseInOut stay as they come. - In
[1], set Name tostageand Subject tostage_mark. Set Priority to2, Zoom to1.25, Duration to0.8, Ease to Cut and Damping to0,0. The rest stays as it comes. - In
[2], set Name tomarionetteand Subject tomarionette. Untick Active. Set Priority to3, Zoom to2, Rotation to2.86, Duration to1.2, Ease to Linear and Offset to0,60. The rest stays as it comes.
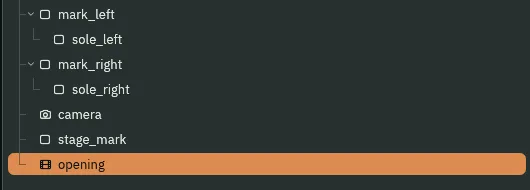
camera and stage_mark are children of theatre now, and so is opening, which comes next.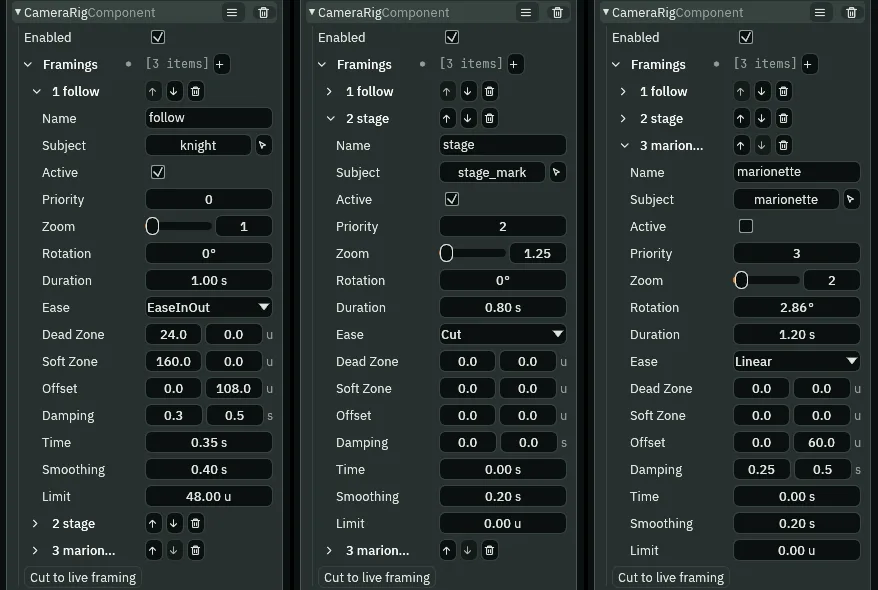
follow, stage and marionette.- Enabled
- The Camera Rig’s Enabled: whether the rig drives the camera. Ticked, as it comes. Unticked, the rig holds the camera where it is and keeps its springs running, so a cutscene that takes the camera by hand and gives it back does not lurch on the way. Chapter 13’s boss holds a shot that way.
- Framings
- The Camera Rig’s shots, one row each, in no particular order: which one is live is decided by Active and Priority, not by position in the list. The Cut to live framing button under them lands the camera on the winning shot at once, abandoning any blend, so you can nudge a priority and see the result without waiting out the move.
- Name
- A framing’s Name: what to call it. A script switches a framing by its name, as the operator does below:
framings.stage.activeis the Active of the framing calledstage. - Subject
- The node a framing follows:
knight,stage_markandmarionette. Empty, it holds a fixed point.stage_markis an empty node that never moves, so the stage shot holds still however the knight runs. - Active
- Whether a framing is in the running.
followandstageare;marionettestarts out of it, and the opening switches it on and off by name. - Priority
- Who wins: of the active framings, the higher number takes the camera.
stage,2, beatsfollow,0, for as long as it is active, so the show opens on the stage and the knight’s shot waits.marionette,3, beats both once it is switched on. - Zoom
- A framing’s magnification, matching the Camera’s own Zoom. At
1the view is the whole640wide;1.25shows512of them, a closer stage;2shows320, the marionette filling the picture. - Rotation
- A framing’s roll, a Dutch angle; zero is level. The Inspector shows it in degrees: the marionette’s
2.86°leans the picture about three degrees, so the close shot feels staged. Every other framing is level. - Duration
- A framing’s blend time: seconds to get into this shot from whatever was live. It belongs to the shot being arrived at, so
followtakes a second to come back to the knight andmarionettetakes1.2to get to the wings. - Ease
- The shape of the blend into a framing: Cut is no blend at all, Linear is constant speed, EaseInOut speeds up out of the old shot and slows into the new, and Overshoot carries a little past the mark and settles back.
stageis a Cut: its Duration,0.8, is kept but not used while it is, so that switching the shot to an ease does not lose the number.marionetteis Linear: a dolly on rails. - Dead Zone
- How far the subject may move from where it is supposed to sit, per axis, in world units, before the camera follows: the middle of the picture moved by the Offset.
follow’s24,0lets the knight run24units either way of his place before it moves, and has it follow his height at once. - Soft Zone
- The half-size of the box the subject may not leave, per axis; the camera lags behind him by at most that.
0on an axis is no limit there.follow’s160,0keeps the camera from ever being more than160units behind him sideways, whatever Damping says, and puts no such limit on his height. - Offset
- Where in the picture the subject sits, relative to its middle.
follow’s0,108puts the knight108units below the middle, which is where he stood when the camera hung108above him;marionette’s0,60puts the marionette’s feet60below it, so the whole figure, cross and feet, fits in the picture. - Damping
- Seconds the camera takes to close nine tenths of the gap to its subject, per axis.
follow’s0.3,0.5is a little slower going up and down than along, so a jump is mostly ignored and a run is tracked. A new framing’s is0.25,0.5;stageholds a fixed point, so its0,0is only tidy. - Time
- A framing’s look-ahead: seconds of the subject’s motion the camera leads by.
follow’s0.35puts the camera where the knight will be a third of a second from now, so it shows more of where he is running.0is no lead, and is what the other two have. - Smoothing
- Seconds over which the look-ahead itself is damped. Without it the lead would flip the instant the knight turned round, snapping the camera across him.
follow’s is0.4; a new framing’s is0.2. - Limit
- The largest look-ahead, in world units:
48.0is uncapped.

stage, marionette and follow.The cutscene
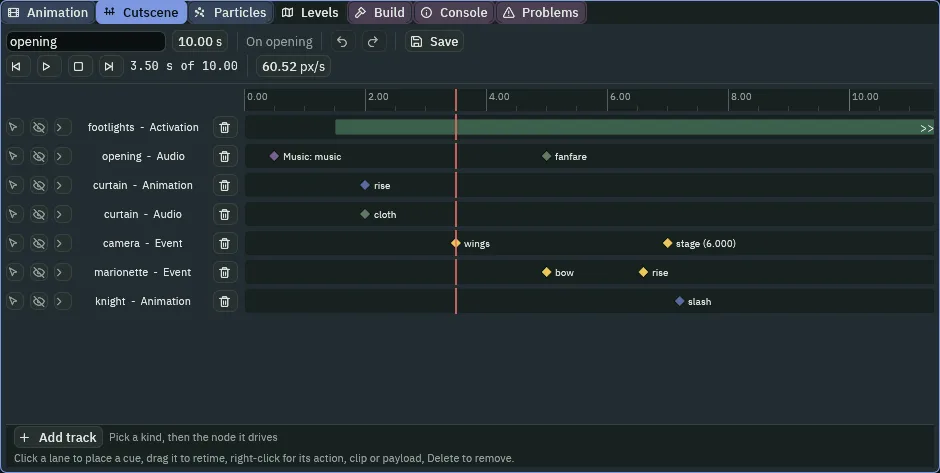
A cutscene is a .timeline file: tracks of cues, all on one clock. A Timeline component on a node plays it. The opening is ten seconds of seven tracks, and the Cutscene tab is where you build it. Before that, three things on the cast need to be ready for a cutscene to run them.
- Select
curtain. Chapter 3 saved it standing up, at96,-240, where itsriseends. Set its Position to96,48: it hangs down, and the cutscene will raise it. - In its Property Animation, untick Playing: the cutscene will start
rise, so the curtain should not start it itself. - In its Audio Source, untick Autoplay, so that
cloth1.oggstops playing as the game starts. Press+beside Triggers, open the new row, and set Name toclothand Clip tocloth1.ogg. The cutscene will play it by that name.
The music and the fanfare are two sounds from two more downloads: the castle loop, by StarNinjas, and a steel jingle from Kenney’s Music Jingles. Copy them before the next steps.
- Select
theatre, click + Add node and choose Cutscene. Rename itopening. It comes with a Timeline component, its Timeline slot empty. - On
opening, click Add component and choose AudioSourceComponent. Set Bus to Music, untick Positional, and leave Autoplay off. Add two Triggers: Namemusicwith Clip the castle loop, and Namefanfarewith Clipjingles_STEEL07.ogg. - Add a SignalComponent to
opening. Press+beside Connections, open the new row, and set Signal toshowand To tocamera. The director, below, saysshowwhen the opening is over, and the camera’s operator hears it. - With
openingselected, open the Cutscene tab and press New cutscene. It writesscenes/opening.timeline, beside the scene, named after the node, and points the Timeline at it. - In the bar, set the length, the box that reads
0.00 s, to10.
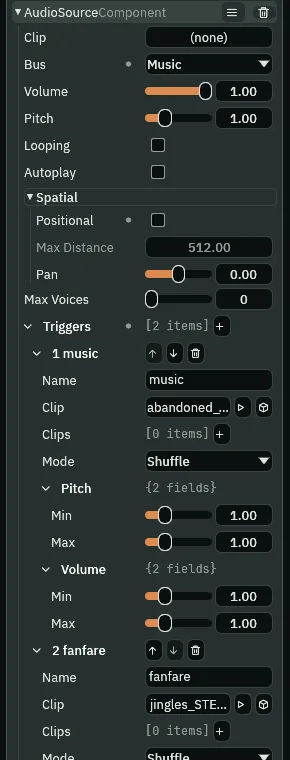
music and fanfare.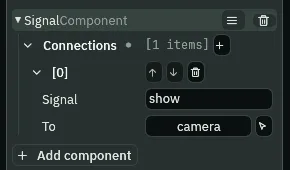
show, to camera.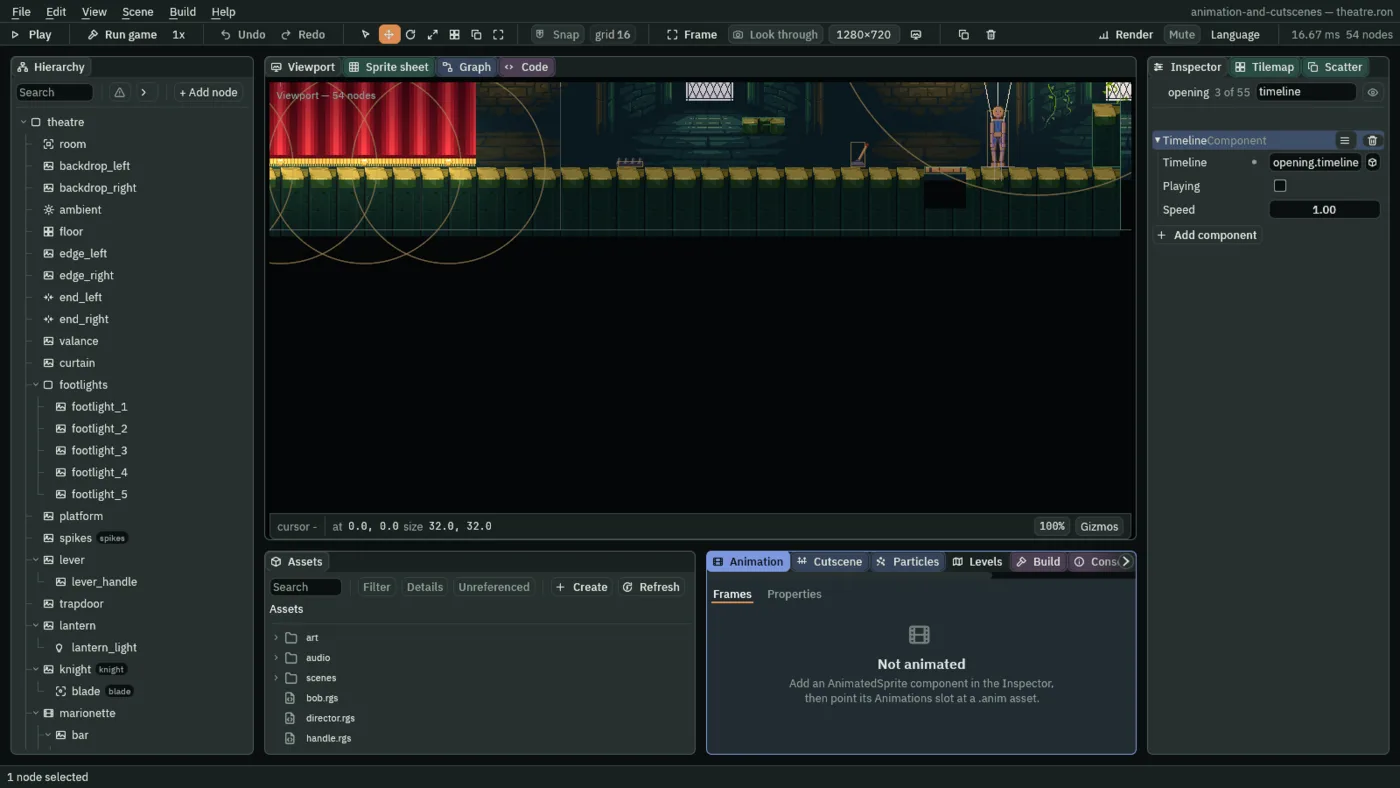
- Positional
- An Audio Source’s Positional: whether its sound is placed in the room. Ticked, as a new Audio Source has it, the sound is quieter the further the node is from the camera, to nothing at its Max Distance,
512, and leans to the left or right of the picture. Unticked, it plays at full volume, centred, wherever the camera is: the Inspector hides Blend, Rolloff and Min Distance, which only a placed sound uses, and dims Max Distance, which a sound that is not placed does not read. The opening’s is unticked.
- Timeline
- A Timeline Component’s Timeline: the
.timelineasset this node runs, hereopening.timeline, the file New cutscene wrote. Its tracks and cues are what the Cutscene tab edits. - Playing
- A Timeline’s Playing: whether its playhead advances. Unticked, as it comes: a cutscene starts only when something begins it, not when the room loads. The Director script below begins this one by calling
play_cutscene. Set on a cutscene that has ended, it plays again from the start. - Speed
- A Timeline’s Speed: how fast its clock runs against the game’s.
1is as authored. Negative plays it backwards from its end, silently: markers and sounds never fire backwards. Chapter 13 rewinds one.
A track belongs to one node and holds one kind of cue. The Cutscene tab has four kinds, and the opening uses each:
- Activation
- Shows its node for a stretch, or from a time on. Before its first stretch the node is hidden, so the footlights are dark until their cue.
- Audio
- Does something with sound, by the name of a trigger the node’s Audio Source has. Play sound plays it once, through the node’s Audio Source: placed in the room if Positional is ticked, centred if not. Play music hands it to the Music bus as the room’s music, looping, the same everywhere, replacing whatever music played before. Stop music names no sound and stops the room’s music.
- Animation
- Starts a clip on the node: a sprite clip from its Animated Sprite, a property clip from its Property Animation, or both if both have the name. It starts from the clip’s first frame.
- Event
- Names a moment, with a number or word if you like, for a script to hear. It plays nothing itself.
- Press Add track, choose Activation, press Pick a node and choose
footlights. Add the other six the same way, in this order: Audio onopening, Animation oncurtain, Audio oncurtain, Event oncamera, Event onmarionette, and Animation onknight. - To place a cue exactly, click the ruler at its time first: the readout beside the transport shows the playhead,
3.50 s of 10.00, and the red line runs down every lane. Then click the lane on the red line. A cue lands on the nearest sixtieth of a second, which is as exact as the file keeps; drag it if it is a frame off. - On
footlights, click the lane at1.5. A bar a second long appears. Right-click it and tick Open end: it runs to the end, drawn with>>. The lights come on at 1.5 seconds and stay on. - On
opening’s Audio track, click at0.5: a green cue namedmusicappears, a Play sound cue for the node’s first sound. Right-click it and, under Action, press Play music. The cue turns purple and readsMusic: music. Click at5, right-click the new cue and, under Sound, choosefanfare; leave Action on Play sound. - On
curtain’s Animation track, click at2, right-click the cue and chooserise. On its Audio track, click at2: the cue iscloth, its only sound. - On
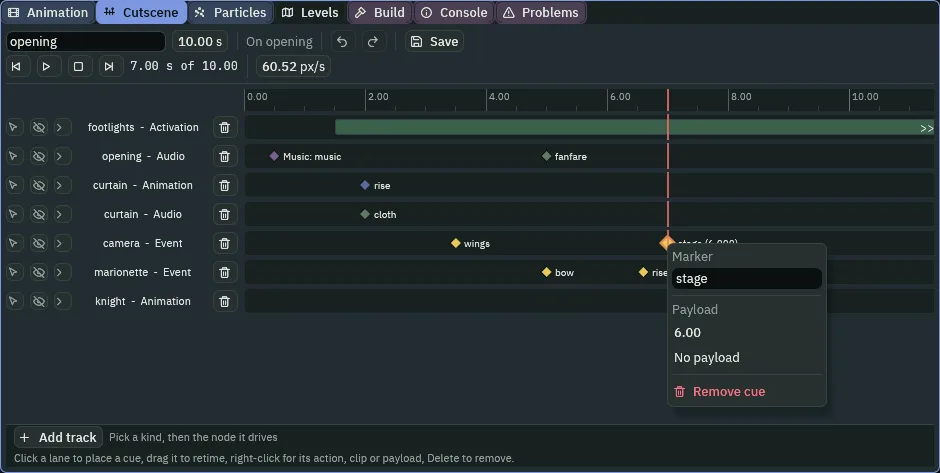
camera’s Event track, click at3.5, right-click the marker and typewingsinto its Marker box. Click at7, name itstage, and under Payload choose Float and set it to6. - On
marionette’s Event track, click at5and name itbow; click at6.6and name itrise. - On
knight’s Animation track, click at7.2: the cue namesknight, his first clip. Right-click it and chooseslash. Press the bar’s Save to write the file.
wings marker.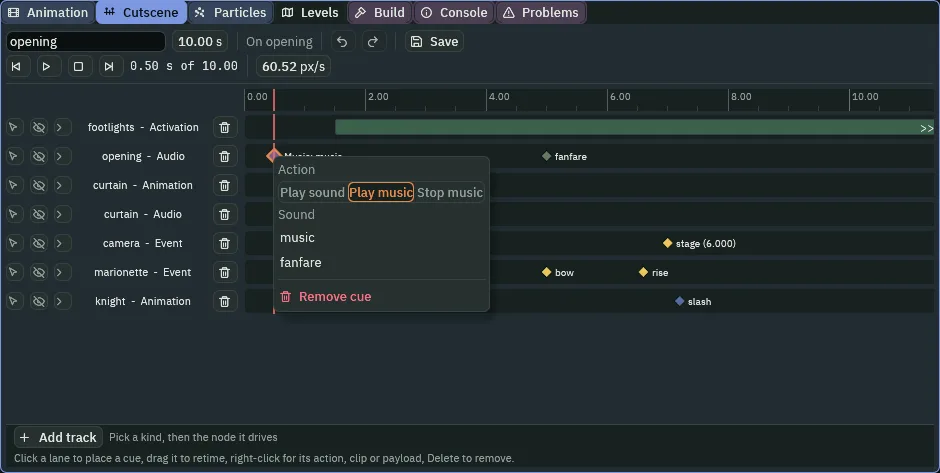
stage marker’s menu: its name, and the number it carries.The lane says which kind each audio cue is, in its label and in its colour. A green name, fanfare, is a Play sound cue: the sound plays once. A purple Music: is a Play music cue, the room’s music, which loops until something replaces it or a grey Stop music cue stops it. The music keeps going under the fanfare and after the opening is over.
The Cutscene tab’s own Play button is a moving scrub: it runs the playhead and poses the scene as it goes, so the curtain rises and the knight swings in the Viewport, but it fires no marker, no sound and no script. To hear and see the whole opening, press F5, and when it is over, press F5 again to stop: what Play changes is not kept.
The marionette’s bow
The marionette’s bow marker at five seconds should make it bow. It does so through its layers, as everything the marionette does has since chapter 9, and not through a cue. A bow is a clip, a graph state for the clip, and two triggers.
- Select
marionette. In the Animation tab’s Properties mode, press the + beside the clip tabs, typebowand press Enter. - Turn Record on. Key the middle time first. Move the playhead to
0.6, selecttorso, set its Position to0,-45.3, and the clip keys it there. Do the same onbar(0,-95.3), onupper_arm_right(its Rotation,-51.57, typed in degrees, as the Inspector takes them) and onhead(157.08). The torso and the bar dip10; the head tips and the right arm sweeps. - Move the playhead to
0and set each of the four back to where it stood:torsoto0,-55.3,barto0,-105.3,upper_arm_rightto0andheadto180. Do it again at1.6. At the ends the clip lays the0.6pose, so putting the value back is an edit, and the clip keys it; a key at the value the node already had would be no edit, which is why the middle goes first. The bow’s table at the end of the chapter has every key. - At
0only, selectlower_leg_left,lower_leg_right,foot_leftandfoot_rightin turn and set the Weight of its chain to1, as the idle keys them, so the soles stay on their marks while the knees fold. - On the right arm’s row and the head’s, open the interpolation menu and choose Linear (angle). On the four weight rows choose Step. The two translation rows stay Linear.
- Click Ease on the
torso translationrow. A box shows a straight line from the bottom left to the top right. Double-click the line to add a point, and drag it to about0.3across and0.8up. Do the same on thebar translationrow. The bow starts fast and settles slowly. Turn Record off and press Save in the Properties bar, which writesmarionette.propanim. - Select
marionetteand open the Graph tab. It opens onLayer: base, chapter 9’s graph. In the Parameters list, typebowinto the name box, choosetriggerin the list of kinds beside it and press Add. Do the same forrise. - In the row over the canvas, type
bowinto State andbowinto Clip, and press Add state. Drag the new box belowidleanddance. - Click the Any State box, press Link and click
bow. Choose Trigger in its row, typebowin the name box under it and set its blend to0.3. Press the up arrow at the row’s left until the number at its left reads0: transitions are tried in order, and this one must not wait behindidletodance. - Click
bow, press Link and clickidle. Choose Trigger, typeriseand set the blend to0.3. Press Save in the Graph tab’s bar, and Ctrl+S.
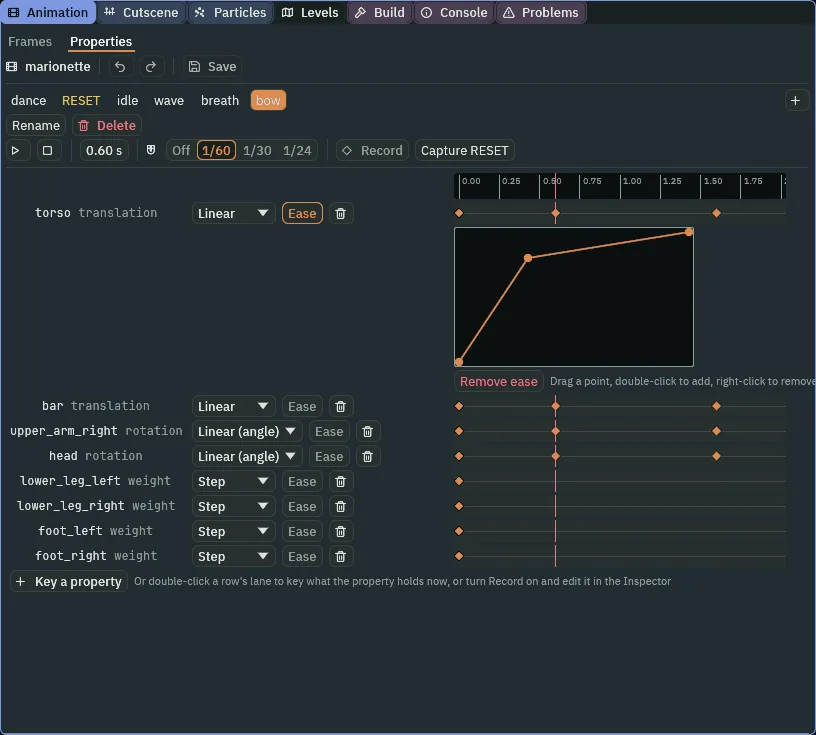
bow clip, the torso’s Ease open: a drawn curve, not one of the named ones.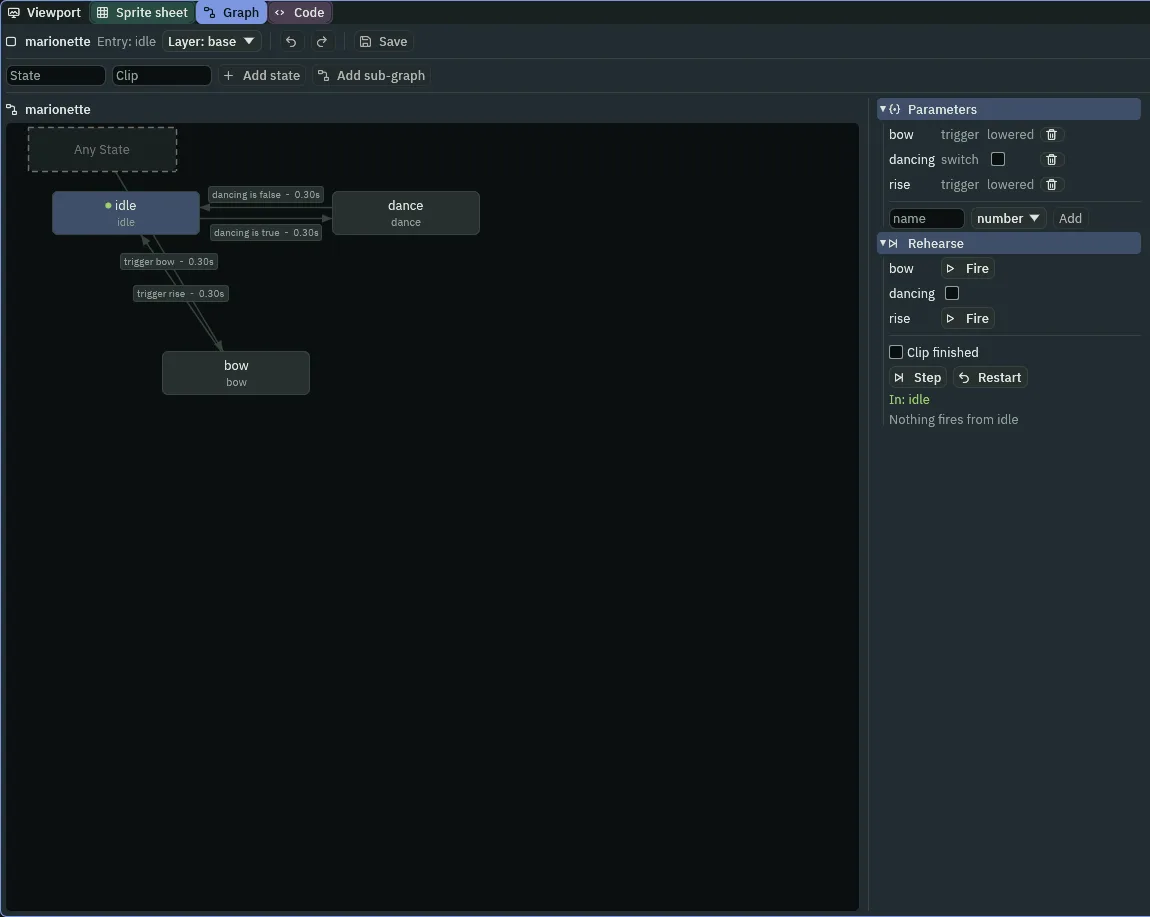
idle and dance, and bow off Any State, whose arrow runs behind idle.Last, the marionette’s script turns the cutscene’s two markers into the graph’s two triggers. Open marionette.rgs, add this hook between on_enter and loop, and press Ctrl+S. In the comment over the component, after turn and turn about, you can add , and bows when the opening calls for it.
    fn on_signal() {
        if heard("marker:bow") {
            trigger("bow");
        }
        if heard("marker:rise") {
            trigger("rise");
        }
    }
on_signal runs on a step when a signal reached the node’s inbox, and heard asks which. The Event track on marionette puts marker:bow there at five seconds and marker:rise at six and six tenths, and the script raises trigger, which lives for one step of the graph and is gone after it, whether an edge took it or not. The marionette goes from idle, or from wherever the dance has it, to bow on the first, and from bow back to idle on the second.
Who plays it
Two small scripts run the opening. The director starts the cutscene and says when it is over. The operator takes the camera’s shots as the cutscene’s markers call for them.
- In Assets, press Create, choose New script, type
director, and press Enter. Replace its text in the Code tab with the script below, and press Ctrl+S. Selectopening, click Add component and choose Director. - Make
operatorthe same way, and add Operator tocamera.
/// The opening: it plays as the show starts, and when it has played, it
/// tells the camera the show is the knight's.
component Director {
    fn on_create() {
        await play_cutscene();
        emit("show");
    }
}
/// The camera operator: takes the shots the opening calls for, by their
/// names, and hands the picture to the knight once the opening is over.
component Operator {
    fn on_signal() {
        if heard("marker:wings") {
            set_flag("CameraRigComponent", "framings.marionette.active", true);
        }
        if heard("marker:stage") {
            set_flag("CameraRigComponent", "framings.marionette.active", false);
            cut();
            shake(heard_value("marker:stage"), 0.4);
        }
        if heard("show") {
            set_flag("CameraRigComponent", "framings.stage.active", false);
        }
    }
}
The director’s on_create runs once, on the first step the node exists. play_cutscene starts opening from its start, and with await in front it waits until the cutscene ends. Then emit, from chapter 5, sends show down the wire you made, to camera, and the operator hears it on the next step.
The operator’s on_signal reads three signals. A marker is a signal named marker: and its name, which reaches the node its track belongs to: the camera track’s two markers reach camera, where the operator is, and the marionette track’s two reach marionette. At marker:wings it switches the marionette’s framing on; the rig blends to it over the framing’s own Duration. At marker:stage it switches it off, cuts, and shakes the picture by the number the marker carried. At show it switches stage off, and the highest framing left is follow: the camera eases back to the knight.
- play_cutscene
- Plays the Timeline on this node from its start. With
awaitin front, the hook waits until it ends: on the step the cutscene reaches its end. If the node has no Timeline, or the file cannot be loaded, the call is said once in the Console and still ends on the next step, so anawaitnever hangs. - set_flag
- Writes a true or false onto another component on this node: here
"CameraRigComponent", the path"framings.marionette.active", andtrue. A path segment on a list that is not a number reaches the first row whose Name is that word, soframings.marionette.activeis the Active of the framing calledmarionette, wherever it stands in the list. - cut
- Cuts the game’s camera straight to its live framing, with no blend, on the next step.
- shake
- Shakes the game’s camera by up to
strengthworld units forseconds; a weaker shake during a stronger one changes nothing. The picture moves, not the camera: the shake is drawn on top of the Camera component’s own Offset, never written into it or into a framing, and the room’s Confiner, which holds where the camera rests, never swallows it. - heard_value
- The number a signal carried into this node’s inbox this step:
marker:stagecarries the6you typed into its payload, soshake(6, 0.4)is a shake of up to six units for four tenths of a second. marker:wings- Heard on the step the cutscene’s playhead passes a marker called
wingson an Event track of this node: at3.5. The same goes formarker:stage, at7, and, on the marionette,marker:bowandmarker:rise.


1.2 seconds, to 4.7 s.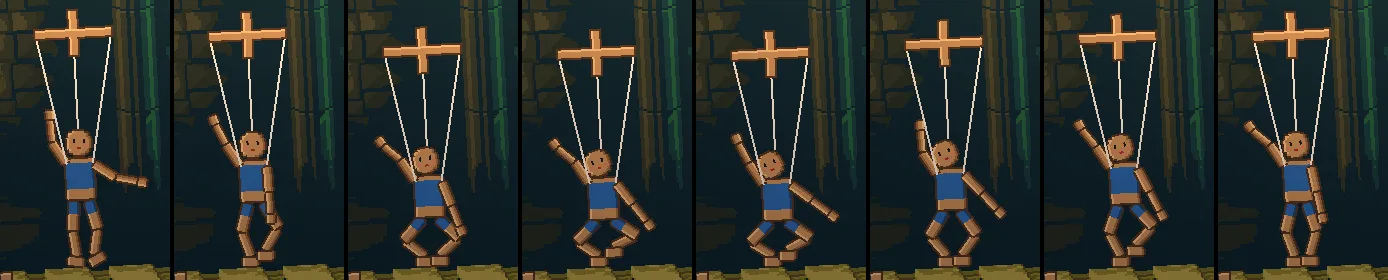

The cutscene’s keys are the knight’s. If you hold D from the first step, he runs on while the show plays: out of the stage shot, into the marionette’s close shot, to the hall’s end, and at ten seconds the follow framing takes the picture to him.

The show, exported
The show is finished, and a finished show is one you can hand to someone who does not have the editor. Export writes the game to a folder of its own: your project, with its pictures and sounds prepared for the game to load, and a copy of the player that came with Rengy, named after your project’s folder. Nothing is compiled: the scripts run as they are. Exporting has the whole of it, and Crypt Knight’s export walks through the same steps.
- Save with File → Save all: Export copies the files as they are on disk.
- Click the Build tab, or choose View → Panels → Build if it is not there.
- In its Export section, a line under Export says where the game will be written, ending in
animation-and-cutscenes/dist/animation-and-cutscenes/animation-and-cutscenes: your project’s folder, thendist, then a folder and a file both named after it. - Press Export. When it is done, the editor opens the new folder in your file manager.
- Double-click
animation-and-cutscenes, oranimation-and-cutscenes.exeon Windows. On Linux, if double-clicking does not start it, run./animation-and-cutscenesin a terminal in that folder.
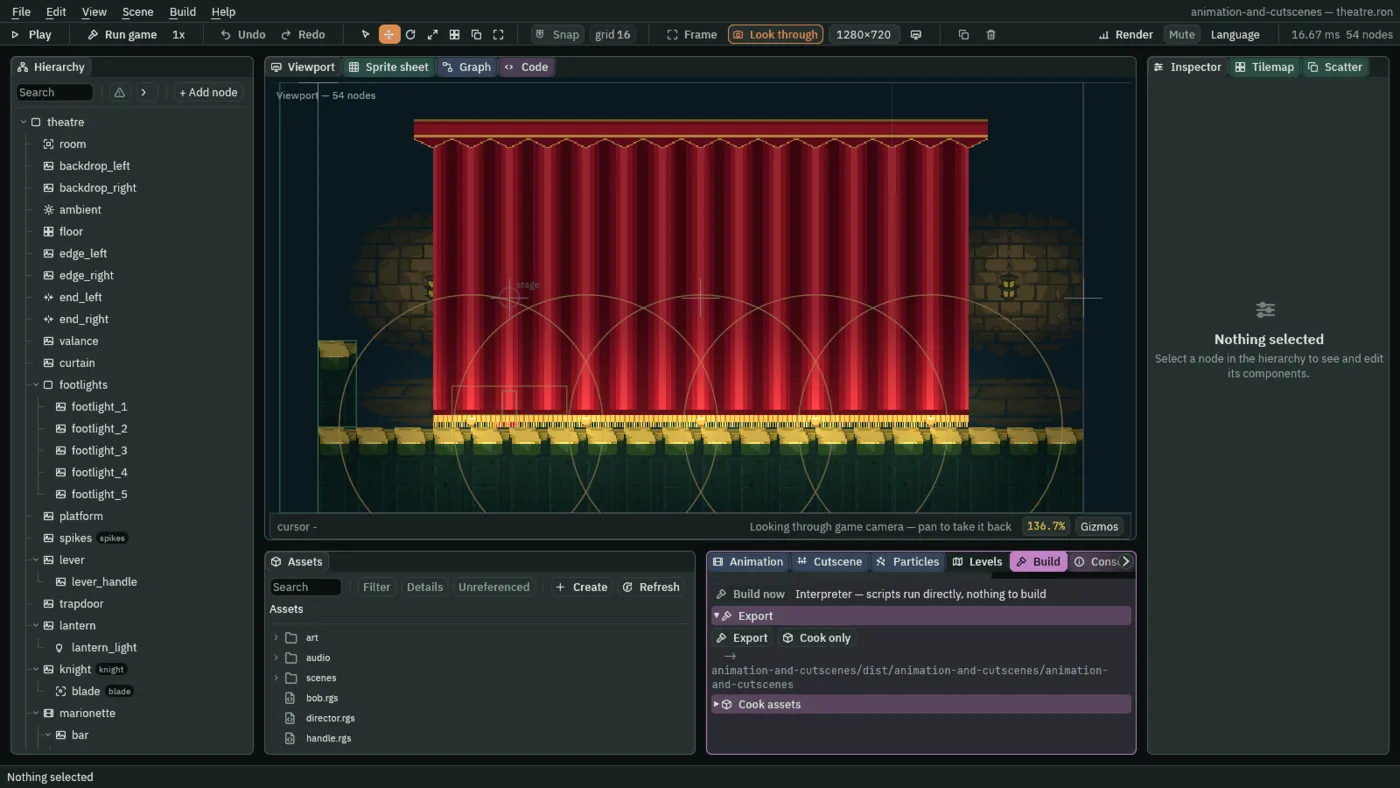
The export is the same player running the same files, so the opening plays in it exactly as it plays when you press F5: the music from half a second in, the curtain, the camera’s shots, the marionette’s bow at five seconds, and then the knight. Nothing about a cutscene needs the editor.
The rig, the cutscene and the bow
The camera and its rig
| Node | Component | Field | Value |
|---|---|---|---|
camera | Parent | theatre, at the end of its children | |
| Position | 160, 180 | ||
| Camera Rig | Enabled | ticked, as it comes | |
stage_mark | Parent | theatre | |
| Position | 320, 180 |
| Framing | follow | stage | marionette |
|---|---|---|---|
| Name | follow | stage | marionette |
| Subject | knight | stage_mark | marionette |
| Active | ticked | ticked | unticked |
| Priority | 0 | 2 | 3 |
| Zoom | 1 | 1.25 | 2 |
| Rotation | 0° | 0° | 2.86° |
| Duration | 1 | 0.8 | 1.2 |
| Ease | EaseInOut | Cut | Linear |
| Dead Zone | 24, 0 | 0, 0 | 0, 0 |
| Soft Zone | 160, 0 | 0, 0 | 0, 0 |
| Offset | 0, 108 | 0, 0 | 0, 60 |
| Damping | 0.3, 0.5 | 0, 0 | 0.25, 0.5 |
| Time | 0.35 | 0 | 0 |
| Smoothing | 0.4 | 0.2 | 0.2 |
| Limit | 48 | 0 | 0 |
The curtain
| Node | Component | Field | Value |
|---|---|---|---|
curtain | Position | 96, 48 | |
| Property Animation | Playing | unticked | |
| Audio Source | Autoplay | unticked | |
| Triggers, Name | cloth | ||
| Triggers, Clip | cloth1.ogg |
The opening
| Node | Component | Field | Value |
|---|---|---|---|
opening | Parent | theatre | |
| Timeline | Timeline | opening.timeline | |
| Audio Source | Bus | Music | |
| Positional | unticked | ||
| Triggers, Name | music | ||
| Triggers, Clip | abandoned_castle_music_-_starninjas_6.ogg | ||
| Triggers, Name | fanfare | ||
| Triggers, Clip | jingles_STEEL07.ogg | ||
| Signals | Signal, To | show, camera | |
| Director | no fields | ||
camera | Operator | no fields |
| Time | Track | Cue |
|---|---|---|
0.5 | opening, Audio | Music: music |
1.5 | footlights, Activation | from here, open end |
2 | curtain, Animation | rise |
2 | curtain, Audio | cloth |
3.5 | camera, Event | wings |
5 | opening, Audio | fanfare, Play sound |
5 | marionette, Event | bow |
6.6 | marionette, Event | rise |
7 | camera, Event | stage, carrying 6 |
7.2 | knight, Animation | slash |
The cutscene is 10 seconds long, its seven tracks in the order the steps add them: footlights Activation, opening Audio, curtain Animation, curtain Audio, camera Event, marionette Event, knight Animation.
The bow
| Row | Interpolation | At 0 | At 0.6 | At 1.6 |
|---|---|---|---|---|
torso translation | Linear, a drawn ease through 0, 0, 0.3, 0.8 and 1, 1 | 0, -55.3 | 0, -45.3 | 0, -55.3 |
bar translation | Linear, the same drawn ease | 0, -105.3 | 0, -95.3 | 0, -105.3 |
upper_arm_right rotation | Linear (angle) | 0° | -51.57° | 0° |
head rotation | Linear (angle) | 180° | 157.08° | 180° |
lower_leg_left, lower_leg_right, foot_left, foot_right weight | Step | 1 | no key | no key |
The clip is 1.6 seconds long.
| From | To | Condition | Blend |
|---|---|---|---|
| Any State | bow | trigger bow | 0.3 |
idle | dance | dancing is true | 0.3 |
dance | idle | dancing is false | 0.3 |
bow | idle | trigger rise | 0.3 |
The base layer’s graph gains the state bow, on the clip bow, and the declared triggers bow and rise. Every other field of every node is as it comes.