Tutorials · Animation and Cutscenes · Chapter 13
A gallery of animation
By the end
- Six scenes in
scenes, each opened from Assets and played on its own:outfit,slow-motion,rewind,tank,ghostandboss - Five new sheets with their clips:
outfit,flame,tank,ghostanddemon, and a sprite library,dresser.spritelib - The six Animated Sprite fields the show did not need: Culling, Tick Mode, Library, Resolver, Category and Label
- Eight new scripts, each short, and for each case its values in a table and what to change in your own game
On this page
Six cases
The first twelve chapters built one show. This one builds six small things the show did not need, each a case you will meet again in a game of your own: an outfit swap, slow motion, a rewind, a toy tank made of two sprites, a ghost that appears and vanishes, and a boss that drops into an arena. Each is a scene of its own in scenes, opened from Assets and played with F5. The startup scene stays theatre.ron.
Between them they use the six fields of the Animated Sprite that nothing in the show touched: Culling, Tick Mode, Library, Resolver, and the Category and Label inside it. Each is defined where a case first sets it, and so is every other control no earlier chapter has defined: the Camera’s, the Variants band’s, a Sprite’s Flip, and a Light’s and an Ambient Light’s Color and Radius.
| Case | What it is for | What carries it |
|---|---|---|
| An outfit swap | A hero in a new cloak, a scorched variant, a sword found on the way. | One set of clips, a sprite library of replacement pictures, a Resolver that names which, and a script that changes the label. |
| Slow motion | A finishing blow, with something that must keep real time beside it, and a crowd that costs nothing while nobody sees it. | set_time_scale on a swish, a candle on Tick Mode Unscaled, and Culling on the crowd, brought into view by a panning camera. |
| A rewind | A replay, a time-reversal puzzle, a lamp that goes out as the clock runs back. | Speed -1 on a sprite, and on a cutscene that plays again each time it reaches its start. |
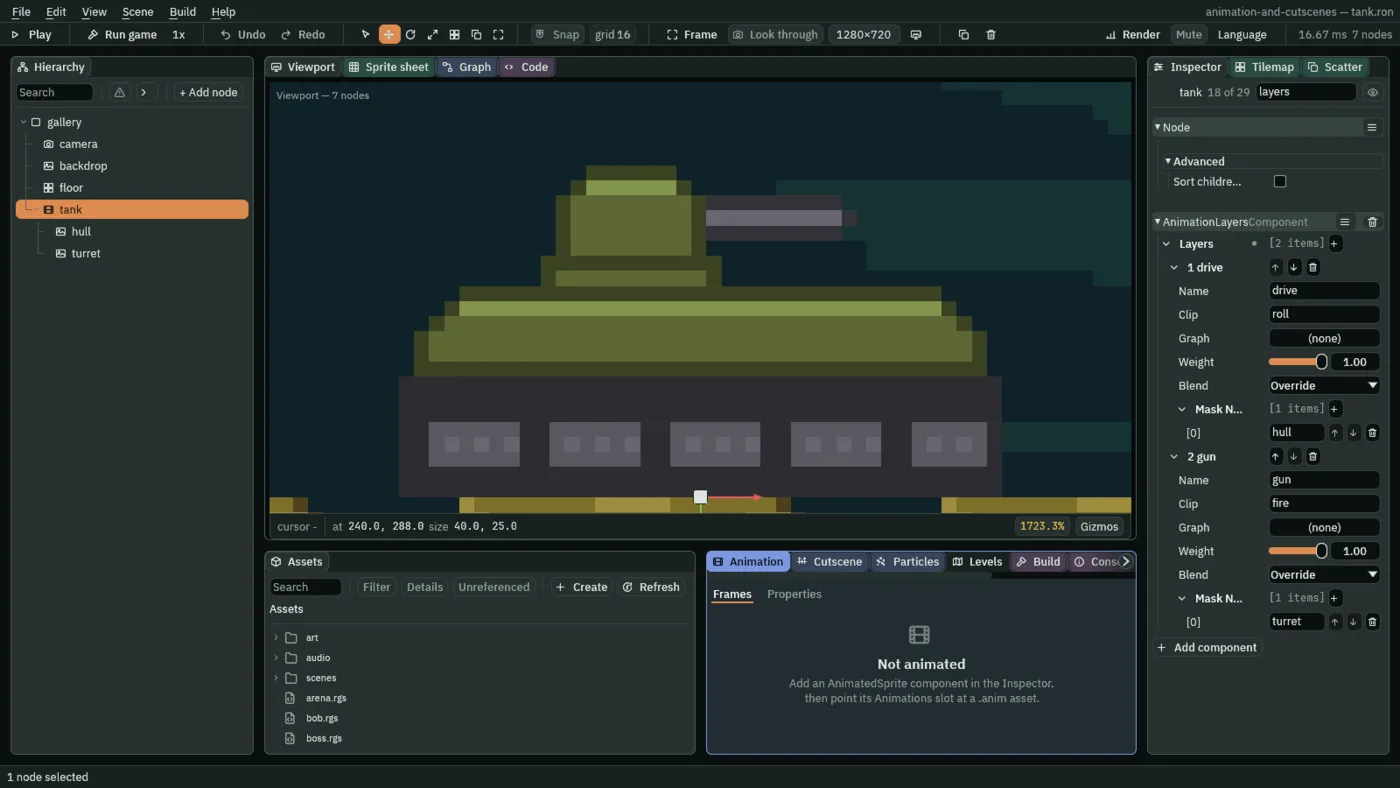
| A tank | A character made of parts, each part its own node: a turret on a hull, a rider on a horse. | Two Animated Sprites, each cut by node by a layer of its own. |
| A ghost | An enemy or a stranger that fades in, haunts a place and leaves, and comes back. | Clips that play once and chain by the signal each sends when it finishes, Playing off for a beat, and a flicker keyed with Nearest. |
| A boss entrance | A dramatic landing and a shot that swings in on it. | A camera rig held off until a signal, a shake of the picture, and a blend with Overshoot. |
Every case reads the same way: what it is for, the steps, the script whole where it has one, the new fields defined, its values in a table, who decides the clip, and a note on which field to change in your own game.
The room every case stands in
All six scenes start from the same empty room: a root, a camera that shows 640 by 360 world units, the hall’s wall behind and its floor. You make it once and save it six times.
- Choose File → New scene. Click + Add node, choose Node, and rename it
gallery. - Select
gallery, click + Add node and choose Camera. Rename itcamera. Set its Position to320and180, the middle of the view. In its Camera, set Scaling to Letterbox and Background to0.005,0.016,0.022, alpha1, in the colour picker’s F mode, as chapter 3 showed. Extent stays360and Width stays640. - Select
gallery, click + Add node and choose Sprite. Rename itbackdrop. Dragold-dark-castle-interior-background.pngfrom Assets onto its Texture, and set Size to960and304, Anchor to0and0, and Sort Layer to-20. - Select
gallery, click + Add node and choose Tilemap. Rename itfloor. Dragold-dark-castle-interior-tileset.tilemaponto its Tilemap and untick Collision: nothing in these rooms stands on it. - Press Ctrl+S and save the scene in the
scenesfolder asoutfit.ron. - Choose File → Save as… five times, and save the copy each time in
scenes, asslow-motion.ron,rewind.ron,tank.ron,ghost.ronandboss.ron. Each save leaves the editor holding the copy, which is why the room is made before any case is.
- Scaling
- The Camera’s Scaling: how it works out how much of the world to show when the window is any shape. Letterbox shows exactly Width by Extent units whatever the window, and fills what is left of the window with bars of the Background colour. The theatre’s camera is a Letterbox, which is why the picture of every chapter is the same 640 by 360.
- Extent
- The Camera’s Extent: how tall the view is, in world units, for a Letterbox:
360, as it comes. - Width
- The Camera’s Width: how wide the view is when Scaling is Letterbox:
640, as it comes. With the Extent the view is 640 by 360 units, which a 1280 by 720 window draws twice as big. - Background
- The Camera’s Background: the colour behind everything it shows, and in the bars of a Letterbox.
0.005,0.016,0.022is a very dark blue-green. - Collision
- The Tilemap’s Collision: whether the layers marked solid become collision shapes. Ticked, as it comes, a body would stand on the floor. These rooms hold no body, so it is off.
| Node | Component | Field | Value |
|---|---|---|---|
gallery | Node | no other field | |
camera | Position | 320, 180 | |
| Camera | Scaling | Letterbox | |
| Background | 0.005, 0.016, 0.022, alpha 1 | ||
backdrop | Sprite | Texture | old-dark-castle-interior-background.png |
| Size | 960, 304 | ||
| Anchor | 0, 0 | ||
| Sort Layer | -20 | ||
floor | Tilemap | Tilemap | old-dark-castle-interior-tileset.tilemap |
| Collision | unticked |
The six scenes now exist, each a copy of the room. From here, every case opens its own scene: double-click it under scenes in Assets.
An outfit swap
What it is for. A hero finds a cape, takes a burn, picks up another sword. None of it changes how he moves: the frames, their timing, their pivots and their events stay as they are. Only the pictures differ. A second copy of every clip for every outfit would mean mending every timing once for each outfit. So the pictures go in a sprite library, a table of replacement pictures, and the Animated Sprite names which to draw.
One sheet for two knights
The starter came with knight-blue.png, the knight’s idle strip with his cloak recoloured. Make Animation packs it beside the red one, so that both lie on one sheet and a frame of the blue is a rectangle a fixed distance from the same frame of the red.
- In Assets, open
art, right-clickgothic-hero-idle.png, and choose Make Animation…. Tickknight-blue.pngunder it. Set Name tooutfit, leave Frames a second at12and Loop ticked, and press Create. - It writes
art/outfit.png, a sheet of 512 by 64 with the red strip at its left and the blue one154along, andart/outfit.anim, with one clip,outfit, which plays the two strips as two whole frames.
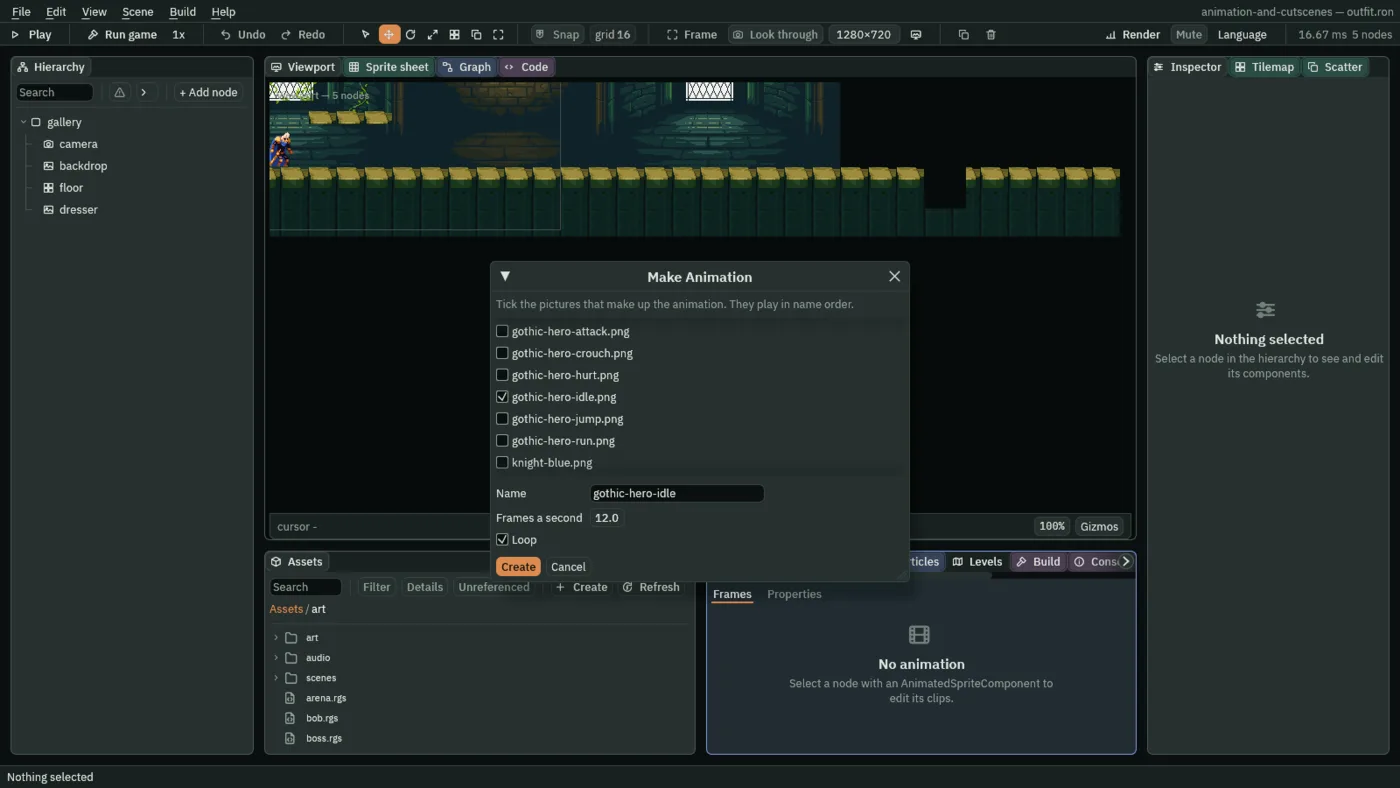
gothic-hero-idle.png. Tick knight-blue.png in its list, and type the name, before pressing Create.The dresser
The knight who changes cloak is a node called dresser. It is an Animated Sprite like the knight of chapter 1, on the new sheet.
- Double-click
scenes/outfit.ronin Assets. Selectgallery, click + Add node, choose Animated Sprite and rename the nodedresser. Set its Position to320and288. - In its Sprite, drag
art/outfit.pngonto Texture, set Anchor to0.5and1, and Sort Layer to5. - In its Animated Sprite, drag
art/outfit.animonto Animations and tick Frame Size. Clip staysidle: the clip the next steps cut. - With
dresserselected, double-clickart/outfit.pngin Assets. The Sprite sheet tab opens on it. Set Cell to38and48, with Margin and Spacing at0. Drag across the first four cells of the top row, from cell0, 0to cell3, 0: the red knight’s four frames, Selected 4 x 1. - Under Clips, press From selection. Name the clip
idle, set its rate to8 fpsand its loop to Loop, and press Generate 1. The clip goes intooutfit.anim, which the Animation tab has open: it listsoutfit (2)andidle (4). Press Save there. The Sprite sheet tab hangs each frame at the pivot0.5,1, the middle of its bottom edge.
| Clip | Frames | Rate | Loop |
|---|---|---|---|
outfit | Make Animation’s own: cells 152 by 48, two, from 0, 0, spacing 2 | 12 | Loop |
idle | cells 38 by 48, four, from 0, 0; every frame’s pivot 0.5, 1 | 8 | Loop |
The library
A library is a table: for a category, a label and a frame number, it names the rectangle of a sheet to draw. The blue knight’s four frames are the red one’s four, 154 along the sheet.
- In Assets, click the
scenesfolder, so that Create writes into it, then press Create, choose New sprite library, typedresserand press Enter. It writesscenes/dresser.spritelib, beside the gallery’s scenes, with no library in it yet. Drag it onto the dresser’s Animated Sprite, onto Library. - In the Animation tab, in its Frames mode on
idle, open the Variants band. Typeoutfitsinto New library and press its +: the library is made, and the band offers it. - The category row offers
idle, the clip’s own name. Typeblueinto New variant and press its +: the label is chosen, and the strip below it reads0 of 4 frames. A label with no pictures cannot be stored, so it begins to exist at the first frame you assign. - Set the row’s frame to
0, press Copy from clip, which fills the boxes with what that frame draws now,x 0,y 0,w 38,h 48, set x to154and press Assign. Do the same for frame1, with x192, for frame2with230, and for frame3with268. The strip reads4 of 4 frames. - Press the band’s own Save, which writes the
.spritelib, and then the Animation tab’s Save and Ctrl+S. - Select
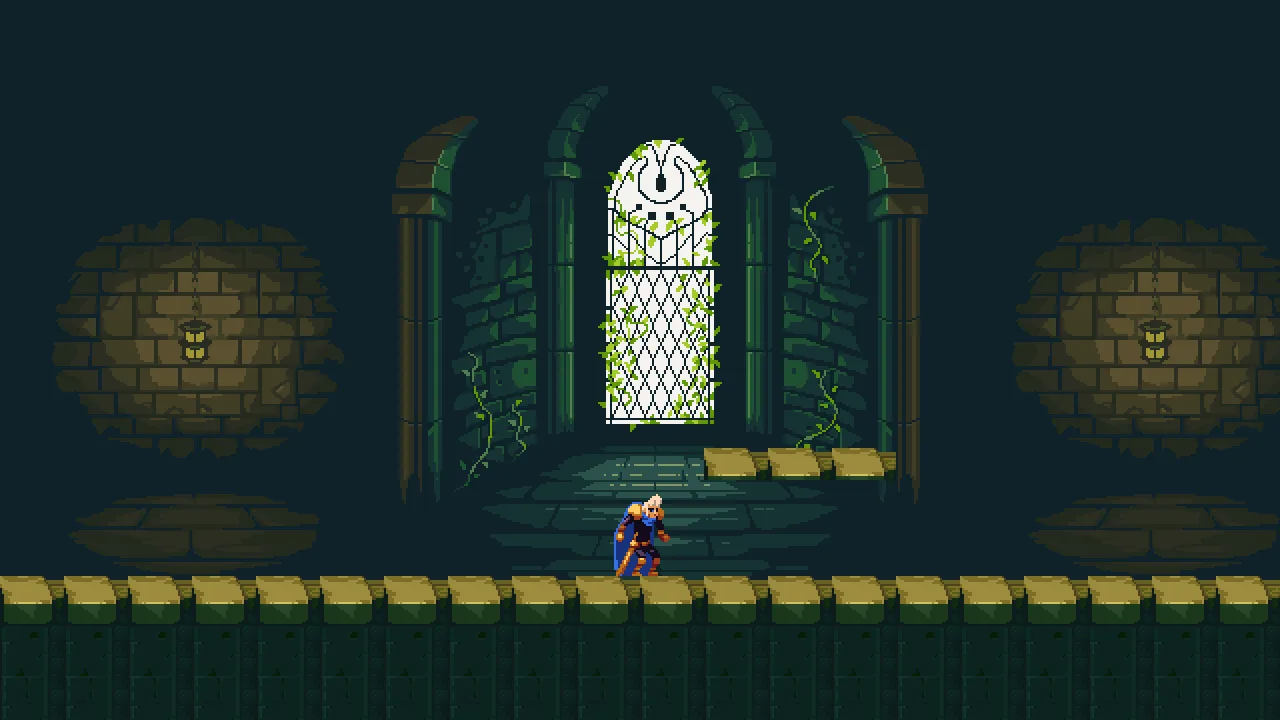
dresser. In its Animated Sprite, set the Resolver’s Category toidleand its Label toblue. The Viewport shows the knight in the blue cloak.
- New library
- The box in the Variants band’s top row, and the + after it: the name of a library to start in this
.spritelibfile. A file can hold several, and the list at the row’s left chooses which the band shows. - New variant
- The box in the band’s second row, after the lists of categories and labels, and its +: the name of a label to start under the chosen category. It only chooses the label. Nothing is stored until a frame is assigned, since a label with no pictures has nothing to keep.
- frame
- Which frame of the open clip the row below acts on,
0for the first. A click on a cell of the strip chooses it too. - Copy from clip
- Fills the four boxes after it with the rectangle that frame draws now, so a variant starts as a copy of the picture it replaces and you only move it.
- x, y, w and h
- The rectangle of the sheet the variant draws on that frame, in pixels: where its left and top are, and its width and height.
- Assign
- Writes the rectangle into the library for that frame, under the chosen category and label. The frame’s cell in the strip fills in.
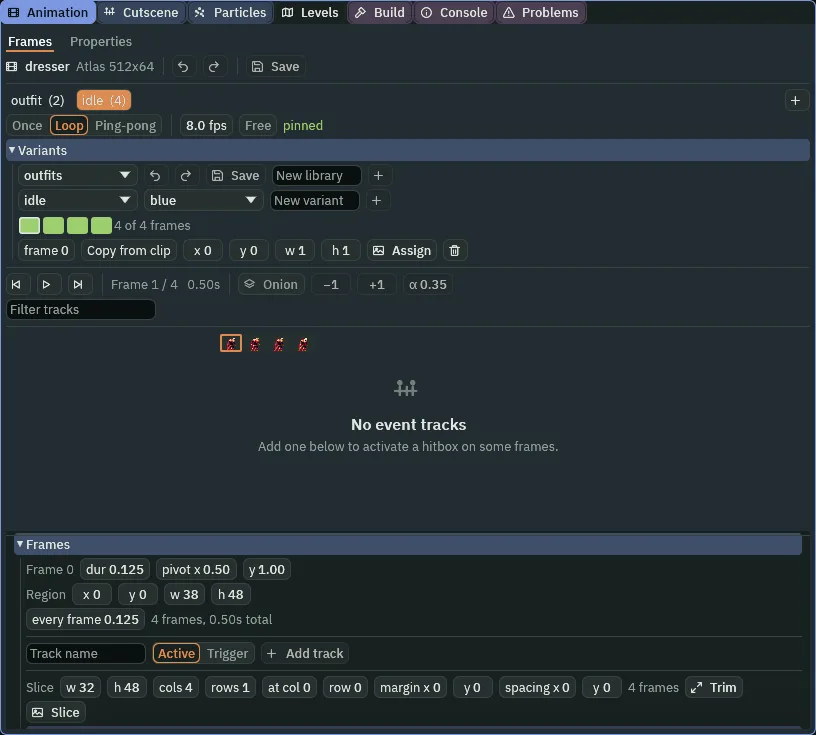
outfits, category idle, label blue, all four frames replaced. The row under the strip is where each frame is assigned.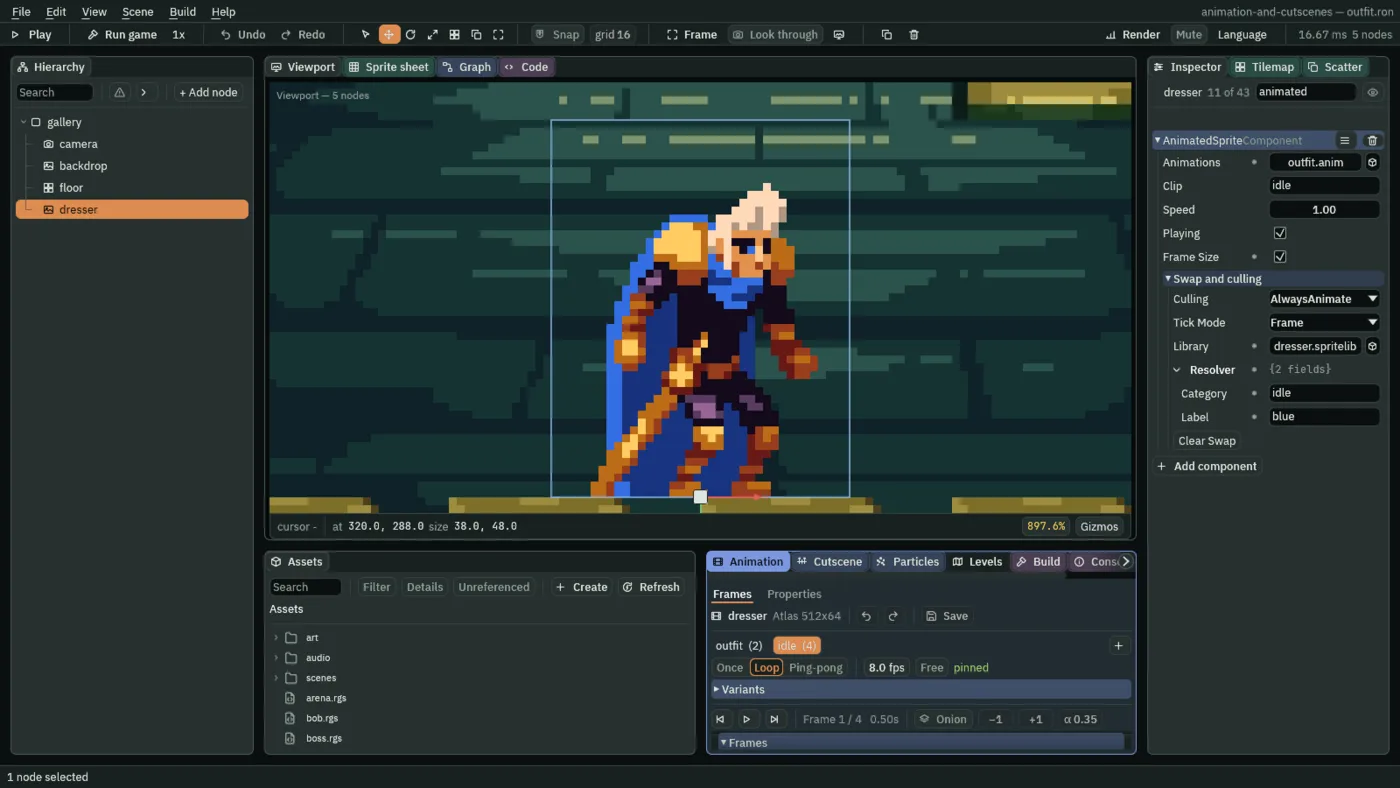
- Library
- The Animated Sprite’s Library: the
.spritelibfile it can swap pictures from, heredresser.spritelib. A library is a table of replacement pictures: a category, a label, a frame number and the rectangle of a sheet. Empty, as it comes, nothing is swapped. The file is made by Create → New sprite library in Assets and filled in the Variants band. - Resolver
- The Animated Sprite’s Resolver: which set of pictures of the library to draw, by two words, its Category and its Label. The clip picks when, the Resolver picks which, and neither knows about the other. Both empty, as they come, draws the clip’s own pictures.
- Category
- The Animated Sprite’s Category, the first of its Resolver’s two words: where in the library to look. Empty, as it comes, means the name of the clip that is playing, so the library’s
idleservesidle. The dresser names it,idle, which says the same thing. Name it when two clips show the same drawings and should share one set of entries. - Label
- The Animated Sprite’s Label, the Resolver’s second word: which variant of the category to draw,
blue. This is the field a script writes to change the outfit. Empty draws the clip’s own pictures, the red cloak. A label the library lacks, or a frame it does not hold, falls back to the clip’s own picture too, so a half-drawn outfit shows the wrong coat on a character who is still there.
The swap group of the Animated Sprite has one button, Clear Swap. It empties Library, Category and Label together, and the clip’s own pictures draw again.
The script
- In Assets, press Create, choose New script, type
dresserand press Enter. In the Code tab, replace everything indresser.rgswith the script below, and press Ctrl+S. - Select
dresser, click Add component and choose Dresser.
/// Changes the knight's cloak every second and a half: blue, then his own
/// red, and blue again.
component Dresser {
    /// Seconds since the last change.
    #[hidden]
    clock: f32 = 0.0,
    /// Whether he wears the blue cloak now.
    #[hidden]
    blue: bool = true,

    fn loop() {
        clock += dt;
        if clock >= 1.5 {
            clock = 0.0;
            blue = !blue;
            if blue {
                set_text("AnimatedSpriteComponent", "resolver.label", "blue");
            } else {
                set_text("AnimatedSpriteComponent", "resolver.label", "");
            }
        }
    }
}
clock- The script’s own count of seconds since the last change.
clock += dtadds the step’s length to it on every step, and past1.5it starts again at0.#[hidden]keeps it out of the Inspector, where it is a number nobody sets. - set_text
- Writes text onto another component on this node. Here the component is the Animated Sprite, and the property
resolver.labelreaches inside its Resolver. The wordblueputs the cloak on and the empty word""takes it off, so the clip’s own pictures draw. It acts on the next step.
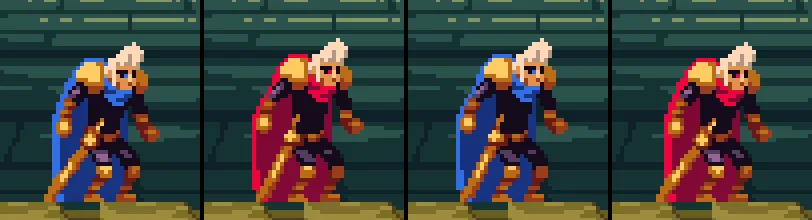
45, 135, 225 and 315, 0.75, 2.25, 3.75 and 5.25 seconds: blue, red, blue, red. The script flips the label every 1.5 seconds. The pose is the same in each: all four steps fall on the idle’s third frame, and only the label changes.| Node | Component | Field | Value |
|---|---|---|---|
dresser | Position | 320, 288 | |
| Sprite | Texture | outfit.png | |
| Anchor | 0.5, 1 | ||
| Sort Layer | 5 | ||
| Animated Sprite | Animations | outfit.anim | |
| Frame Size | ticked | ||
| Library | dresser.spritelib | ||
| Category | idle | ||
| Label | blue | ||
| Dresser | clock and blue, hidden: the script’s own | 0 and on |
| Library | Category | Label | Frames |
|---|---|---|---|
outfits | idle | blue | cells 38 by 48, four, from 154, 0 |
Slow motion
What it is for. A finishing blow that slows the whole game for a moment, with something beside it that must not slow: a flame, a ribbon on a pause menu, a damage number. And a crowd in the background that costs nothing while nobody can see it. The scene has a knight who swings, a candle, and three knights standing off to the right, beyond the edge of the view, which a camera pans across to meet.
The candle
- Double-click
scenes/slow-motion.ronin Assets. Inart, right-clickcandle.png, which came with the starter, choose Make Animation…, set Name toflameand press Create. It writesart/flame.png, 64 by 32, andart/flame.animwith one clip,flame, the candle’s four flames as one whole frame of32by16. - Select
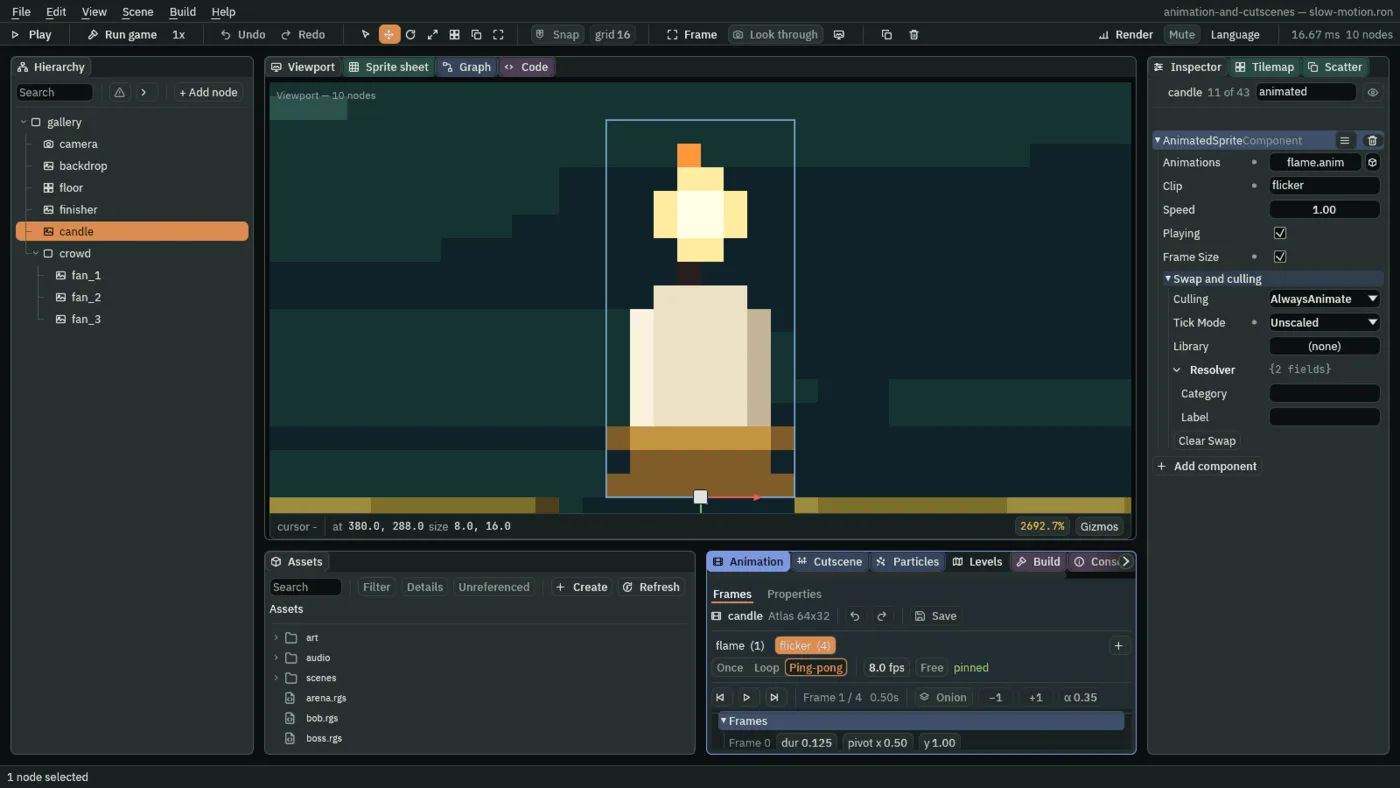
gallery, click + Add node, choose Animated Sprite and rename itcandle. Set its Position to380and288. In its Sprite, dragart/flame.pngonto Texture, set Anchor to0.5and1and Sort Layer to5. In its Animated Sprite, dragart/flame.animonto Animations, set Clip toflicker, tick Frame Size, and set Tick Mode to Unscaled. - With
candleselected, double-clickart/flame.png. In the Sprite sheet tab set Cell to8and16, and drag across the first four cells of the top row: Selected 4 x 1. Press From selection, name the clipflicker, set it to8 fpsand Ping-pong, and press Generate 1. Press Save in the Animation tab.
| Clip | Frames | Rate | Loop |
|---|---|---|---|
flame | Make Animation’s own: cells 32 by 16, one, from 0, 0 | 12 | Loop |
flicker | cells 8 by 16, four, from 0, 0; every frame’s pivot 0.5, 1 | 8 | Ping-pong |
The finisher and the crowd
- Select
gallery, click + Add node, choose Animated Sprite and rename itfinisher. Set its Position to260and288. In its Sprite, dragart/knight.png, the knight’s sheet from chapter 1, onto Texture, and set Anchor to0.5and1and Sort Layer to5. In its Animated Sprite, dragart/knight.animonto Animations, set Clip toslashand tick Frame Size. - Select
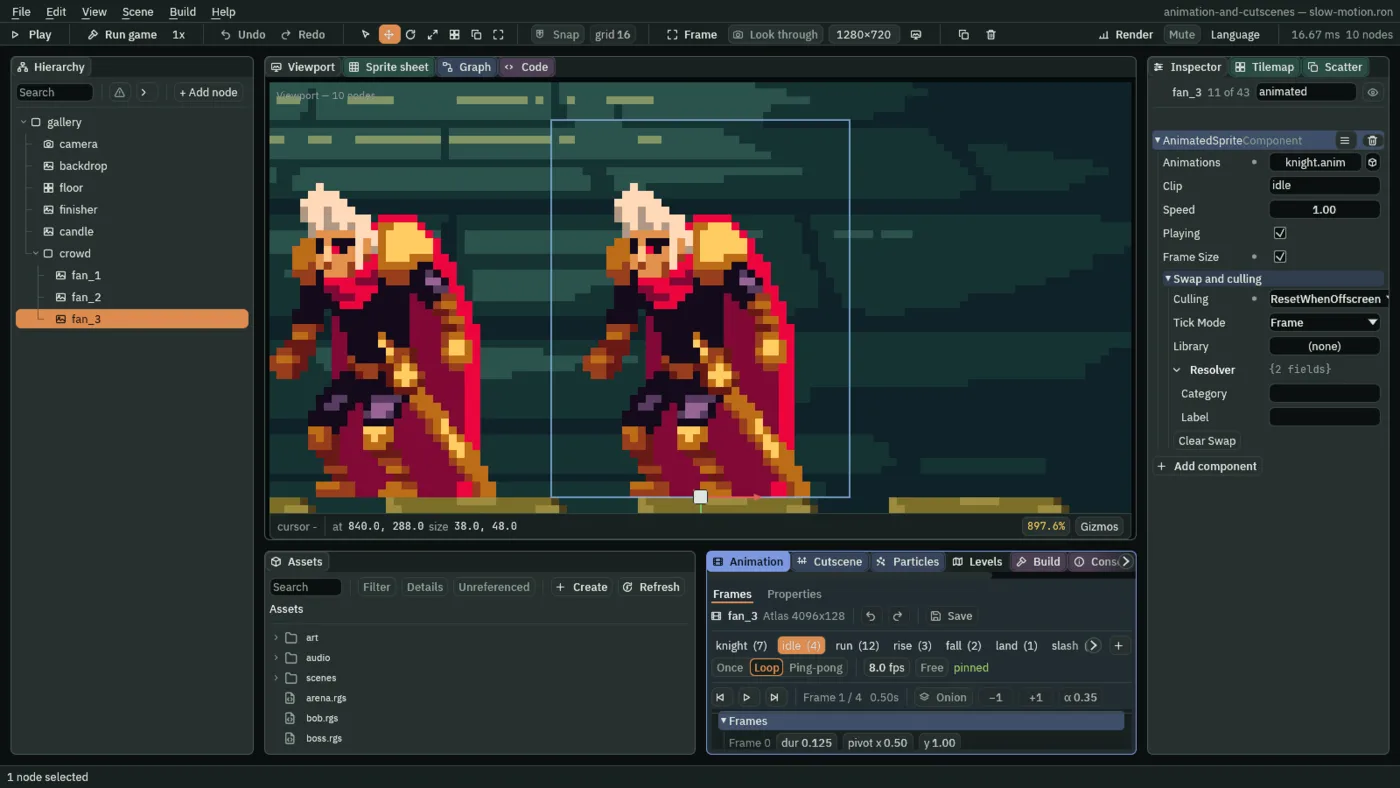
gallery, click + Add node, choose Node and rename itcrowd. Selectcrowd, click + Add node, choose Animated Sprite and rename itfan_1. Set its Position to760and288: past the view’s right edge, which is at640. Give it the knight’s sheet as the finisher has it: Textureart/knight.png, Anchor0.5and1, Sort Layer5, Animationsart/knight.animand Frame Size ticked. Clip staysidle. Under the Sprite’s Flip, tick X, so the fans face the knight. In the Animated Sprite, set Culling to PauseWhenOffscreen. - With
fan_1selected, press Ctrl+D, rename the copyfan_2and set its Position to800and288. Press Ctrl+D again, rename the copyfan_3, set its Position to840and288, and set its Culling to ResetWhenOffscreen.
- Tick Mode
- The Animated Sprite’s Tick Mode: which clock its clip runs on. Frame, as it comes, is the game’s own, so the clip slows when the game does. Unscaled is real time: the sprite keeps its pace while a script has slowed the game. The candle is the one thing in the scene on real time.
- Culling
- The Animated Sprite’s Culling: what its clip does while the camera cannot see the sprite. AlwaysAnimate, as it comes, goes on. PauseWhenOffscreen holds the frame it was on and carries on from it when it comes back. ResetWhenOffscreen holds, and starts the clip over when it comes back into view. Fans one and two are on Pause, fan three on Reset.
- Flip
- The Sprite’s Flip: X mirrors the picture left to right, about the node, and Y top to bottom. Both are off as they come. The fans have X ticked, so they face the knight.
The scripts
- In Assets, press Create, choose New script, type
finisherand press Enter. In the Code tab, replace everything infinisher.rgswith the first script below, and press Ctrl+S. Selectfinisher, click Add component and choose Finisher. - Do the same for
pan.rgs, the second script. Selectcamera, click Add component and choose Pan.
/// A finishing blow: the whole game slows to a fifth as the blade comes
/// round, runs at full speed again once the slash is over, and a second
/// later he swings again.
component Finisher {
    fn on_signal() {
        if heard("frame:swish") {
            set_time_scale(0.2);
        }
        if heard("finished:slash") {
            set_time_scale(1.0);
            await wait(1.0);
            play_clip("slash");
        }
    }
}
/// Pans the camera across to the crowd and back, for good.
component Pan {
    fn on_create() {
        pulse_by(vec2(320.0, 0.0), 2.0, .InOutSine);
    }
}
- set_time_scale
- Runs the whole game at
scaleof its speed from the next step, between0.05and1, until the scene changes.0.2is a fifth: a second of the game takes five seconds on the wall. A sprite on Tick Mode Unscaled keeps real time. frame:swish- The signal a clip’s Trigger track sends the scripts of its node when its frame is reached. The knight’s slash has a Trigger called
swishon its frame2, from chapter 4, which played a sound there. Here nothing sounds and the signal is all the scene wants, andheard("frame:swish")is true on the step it fires. finished:slash- The signal an Animated Sprite sends when a clip that plays once reaches its end, as chapter 5’s
finished:hurtdoes:heard("finished:slash")is true on that step. The slash ends after its last frame, which lasts0.3seconds, so the game stays slow through the whole of the swing, that frame included, and then returns to full speed. - play_clip
- Plays one of this node’s Animated Sprite clips from its first frame, even the one already playing, and sets the sprite playing. The slash is a clip that plays once, so a script starts it again.

8, 11, 14 and 17 of the slash, 0.13, 0.18, 0.23 and 0.28 seconds in. A picture is one step of the game, and the swish is heard on step 8: from step 9 the game runs at a fifth, so each of its steps takes five times as long. These nine steps, 0.15 seconds of the game, take about 0.75 seconds to play.| Node | Component | Field | Value |
|---|---|---|---|
finisher | Position | 260, 288 | |
| Sprite | Texture | knight.png | |
| Anchor | 0.5, 1 | ||
| Sort Layer | 5 | ||
| Animated Sprite | Animations | knight.anim | |
| Clip | slash | ||
| Frame Size | ticked | ||
| Finisher | the script | ||
candle | Position | 380, 288 | |
| Sprite | Texture | flame.png | |
| Anchor | 0.5, 1 | ||
| Sort Layer | 5 | ||
| Animated Sprite | Animations | flame.anim | |
| Clip | flicker | ||
| Frame Size | ticked | ||
| Tick Mode | Unscaled | ||
crowd | Node | no other field | |
fan_1, fan_2, fan_3 | Position | 760, 800 and 840, each with 288 | |
| Sprite | Texture | knight.png | |
| Anchor | 0.5, 1 | ||
| Sort Layer | 5 | ||
| Flip X | ticked | ||
| Animated Sprite | Animations | knight.anim | |
| Frame Size | ticked | ||
fan_1, fan_2 | Culling | PauseWhenOffscreen | |
fan_3 | Culling | ResetWhenOffscreen | |
camera | Pan | the script |
A rewind
What it is for. A replay, a time-reversal puzzle, a clock that runs back and takes the lights with it. A negative Speed plays a clip from its last frame to its first. The same on a cutscene plays it from its end. This scene has both: a knight who runs backwards, and three lamps that a cutscene lights going forward and puts out going back, then plays again.
The runner
- Double-click
scenes/rewind.ronin Assets. Selectgallery, click + Add node, choose Ambient Light and rename itambient. Set its Color to0.62,0.58,0.66, alpha1. - Select
gallery, click + Add node, choose Animated Sprite and rename itrunner. Set its Position to220and288. In its Sprite, dragart/knight.pngonto Texture, set Anchor to0.5and1and Sort Layer to5. In its Animated Sprite, dragart/knight.animonto Animations, set Clip torun, Speed to-1, and tick Frame Size.
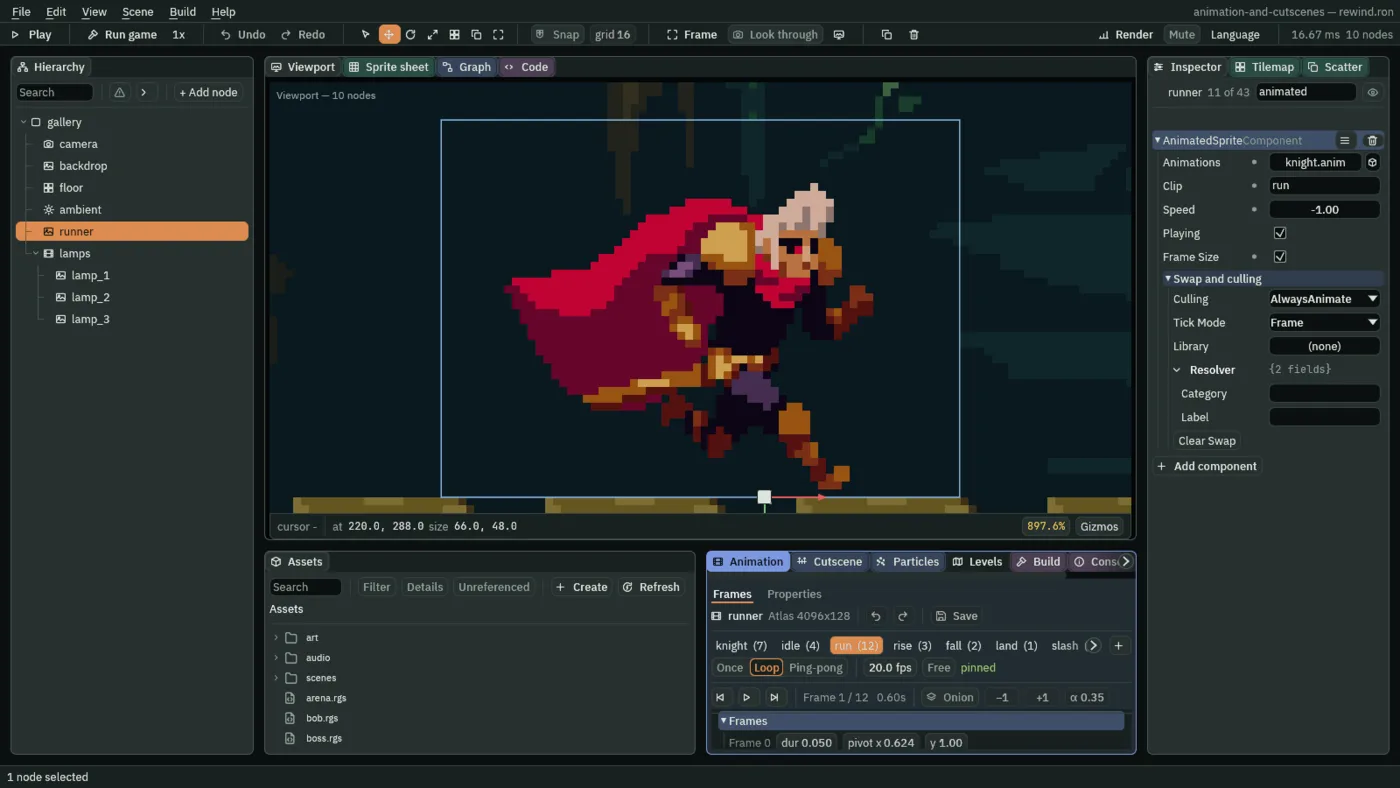

-1, steps 1, 4, 7, 10, 13 and 16, 0.02, 0.07, 0.12, 0.17, 0.22 and 0.27 seconds in: the run’s last frame, 11, and the five before it, 10 down to 6. The run is twelve frames at 20 a second, three steps a frame.
1, steps 19, 22, 25, 28, 31 and 34, 0.32, 0.37, 0.42, 0.47, 0.52 and 0.57 seconds in: frames 6 to 11. Read from the right, they are the six drawings above, one for one.The lamps
Three lamps hang from a node that carries a cutscene. The cutscene lights them one after another, a second apart: lamp_1 from 1 second, lamp_2 from 2 and lamp_3 from 3, each staying lit to the end of 4 seconds.
- Select
gallery, click + Add node, choose Cutscene and rename itlamps. Set its Position to0and0. - Select
lamps, click + Add node, choose Sprite and rename itlamp_1. Set its Position to380and288. Dragart/footlight.pngonto Texture, set Size to12and8, Anchor to0.5and1and Sort Layer to10. Click Add component, choose LightComponent, and set Radius to80and Color to1,0.82,0.56, alpha1. - With
lamp_1selected, press Ctrl+D, rename the copylamp_2and set its Position to440and288. Press Ctrl+D again, rename the copylamp_3and set its Position to500and288. - Select
lampsand click the Cutscene tab. Press New cutscene: it writesscenes/lamps.timelineand fills the node’s Timeline. In the bar, set the length, the box that reads0.00 s, to4. Press Add track, choose Activation, press Pick a node and chooselamp_1; addlamp_2’s andlamp_3’s the same way. Onlamp_1’s lane, click the ruler at1and then the lane on the red line, right-click the bar and tick Open end; do the same onlamp_2’s at2andlamp_3’s at3. Press the bar’s Save. - In the Inspector, tick Playing on
lamps’s Timeline and set its Speed to-1. - In Assets, create a new script,
rewind, and replace everything inrewind.rgswith the script below. Selectlamps, click Add component and choose Rewind.
/// Plays the lamps' cutscene backwards again each time it reaches its start.
component Rewind {
    fn on_signal() {
        if heard("cutscene:ended") {
            play_cutscene();
        }
    }
}
- Radius
- The Light’s Radius: how far its light reaches, in world units. A new Light’s is
240; the lamps’ is80, a small pool round each one. - Color
- The Light’s Color is the colour of its light, a warm
1,0.82,0.56for the lamps. The Ambient Light’s Color is what the room is left at where no light reaches, alpha ignored:0.62,0.58,0.66, a cool grey a little under full brightness. cutscene:ended- The signal a node’s cutscene sends when it reaches its end, or its start when it plays backwards, as in chapter 12:
heard("cutscene:ended")is true on that step. - play_cutscene
- Plays this node’s cutscene from its start, or from its end at a negative Speed. The lamps’ Speed is
-1, so each time the script calls it they go out again, right to left, from the end.
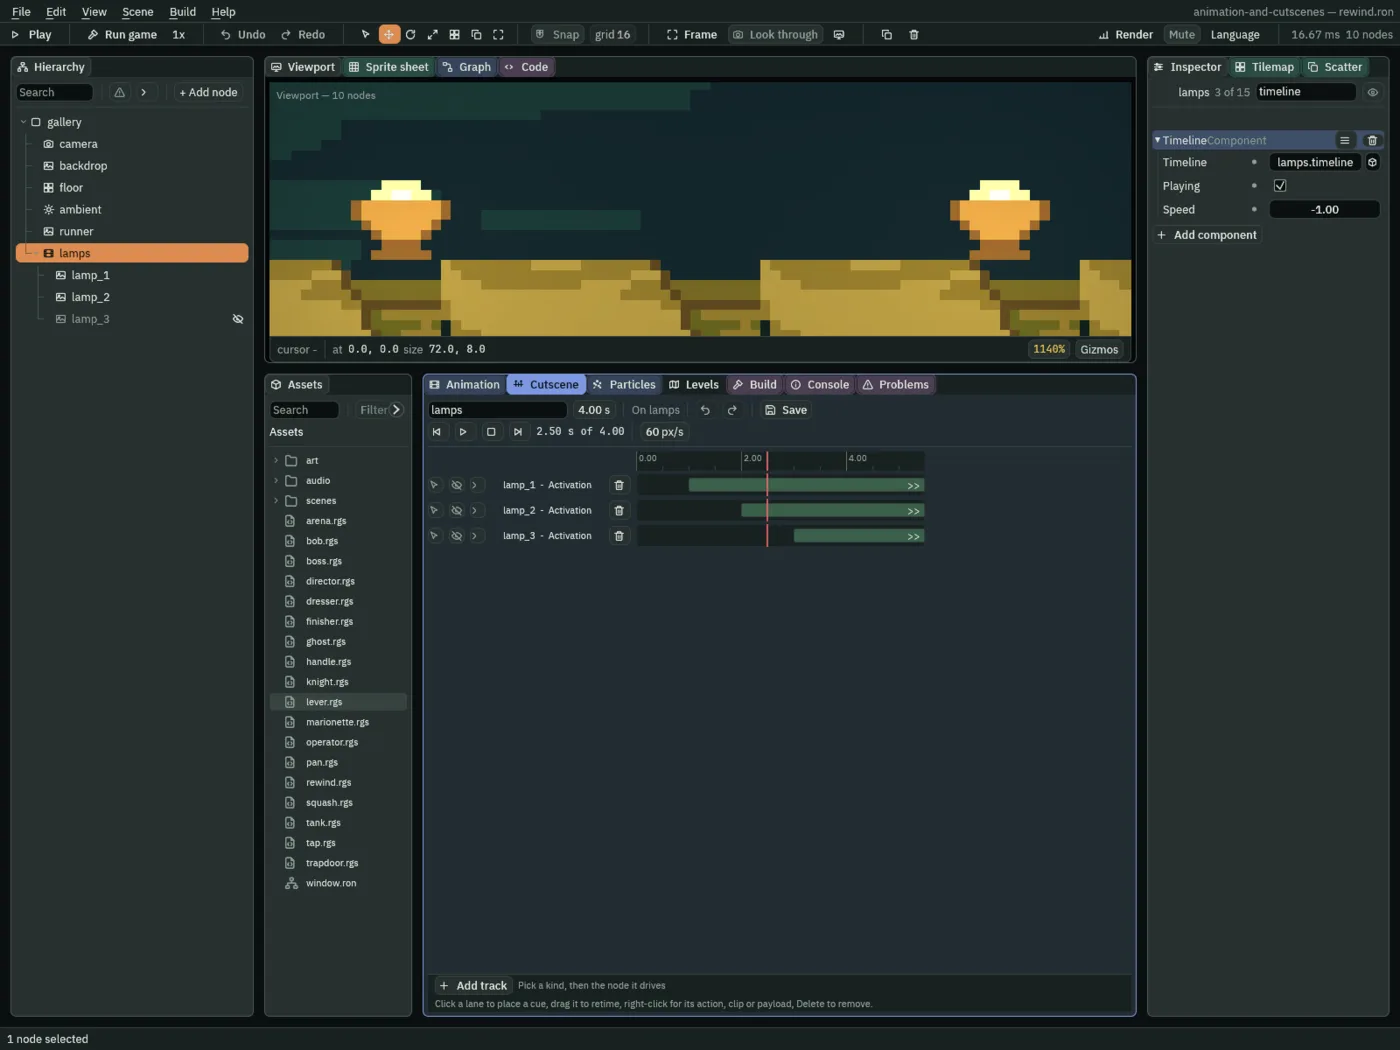
2.5 seconds, scrubbed in the editor: lamp_3, which is lit from 3, is out, so its row in the Hierarchy is greyed and marked hidden.
30, 90, 150 and 210, at 0.5, 1.5, 2.5 and 3.5 seconds: three lamps, two, one, none. The cutscene plays from its end, so lamp_3 goes out first. It then plays again, from step 240, and all three are lit once more.| Node | Component | Field | Value |
|---|---|---|---|
ambient | Ambient Light | Color | 0.62, 0.58, 0.66, alpha 1 |
runner | Position | 220, 288 | |
| Sprite | Texture | knight.png | |
| Anchor | 0.5, 1 | ||
| Sort Layer | 5 | ||
| Animated Sprite | Animations | knight.anim | |
| Clip | run | ||
| Speed | -1 | ||
| Frame Size | ticked | ||
lamps | Timeline | Timeline | lamps.timeline |
| Playing | ticked | ||
| Speed | -1 | ||
| Rewind | the script | ||
lamp_1, lamp_2, lamp_3 | Position | 380, 440 and 500, each with 288 | |
| Sprite | Texture | footlight.png | |
| Size | 12, 8 | ||
| Anchor | 0.5, 1 | ||
| Sort Layer | 10 | ||
| Light | Radius | 80 | |
| Color | 1, 0.82, 0.56, alpha 1 |
| Track | Node | Lit from | Until |
|---|---|---|---|
| Activation | lamp_1 | 1 | the end, 4 |
| Activation | lamp_2 | 2 | the end |
| Activation | lamp_3 | 3 | the end |
A tank of two sprites
What it is for. A character made of parts that each move on their own: a turret on a hull, a rider on a horse, a robot whose arm works while its legs walk. Each part is a node with an Animated Sprite of its own, and each plays the clip of a layer that is cut down to that node by name. The hull rolls on one layer and the turret fires on another, so neither clip knows about the other.
One sheet for two strips
- Double-click
scenes/tank.ronin Assets. Inart, right-clicktank-hull.png, which came with the starter, choose Make Animation…, and ticktank-turret.pngunder it. Set Name totankand press Create. - It writes
art/tank.png, a sheet of 256 by 16, andart/tank.anim, with one clip,tank: two whole frames, the hull’s strip of80by14at the left and the turret’s of48by12at82.
The tank and its two parts
- Select
gallery, click + Add node, choose Animation Layers and rename ittank. Set its Position to240and288. - Select
tank, click + Add node, choose Animated Sprite and rename ithull. Leave its Position at0and0. In its Sprite, dragart/tank.pngonto Texture and set Anchor to0.5and1and Sort Layer to5. In its Animated Sprite, dragart/tank.animonto Animations and tick Frame Size. Clip staysidle. - Select
tankagain, click + Add node, choose Animated Sprite and rename itturret. Set its Position to-4and-13: on top of the hull. Give it the same Texture, Anchor0.5and1, Animations and Frame Size, set its Sort Layer to6, one above the hull’s, and its Clip toaim. - With
hullselected, double-clickart/tank.png. In the Sprite sheet tab set Cell to40and14, with Margin0and0. Select the first cell and press From selection: name the clipidle, set it to1 fpsand Loop, and press Generate 1 and Clear. Select both cells, press From selection:roll,8 fps, Loop, Generate 1, Clear. - Set Cell to
24and12and Margin to82and0: the turret’s strip. Select the first cell:aim,1 fps, Loop, Generate 1 and Clear. Select both cells:fire,6 fps, Loop, Generate 1. - In the Animation tab, choose
aimand set the frame’s pivot x to0.4. Do the same on each of the two frames offire. Press Save. The turret’s cell is24wide with its dome toward the left and the barrel running right, and the pivot hangs the dome, not the middle of the cell, from the turret’s node.
| Clip | Frames | Rate | Loop |
|---|---|---|---|
tank | Make Animation’s own: the hull’s strip, 80 by 14 from 0, 0, and the turret’s, 48 by 12 from 82, 0 | 12 | Loop |
idle | cells 40 by 14, one, from 0, 0; pivot 0.5, 1 | 1 | Loop |
roll | cells 40 by 14, two, from 0, 0; every frame’s pivot 0.5, 1 | 8 | Loop |
aim | cells 24 by 12, one, from 82, 0; pivot 0.4, 1 | 1 | Loop |
fire | cells 24 by 12, two, from 82, 0; every frame’s pivot 0.4, 1 | 6 | Loop |
The layers
- Select
tank. In its Animation Layers, press the + on Layers twice. In the first row set Name todrive, Clip toroll, Weight to1and Blend to Override, and press the + on its Mask Nodes and typehull. In the second row set Name togun, Clip tofire, Weight to1and Blend to Override, and putturretin its Mask Nodes. - In Assets, create a new script,
tank, and replace everything intank.rgswith the script below. Selecttank, click Add component and choose Tank.
/// Drives the toy tank to and fro along the boards.
component Tank {
    fn on_create() {
        pulse_by(vec2(160.0, 0.0), 3.0, .InOutSine);
    }
}
pulse_by moves the tank node 160 units along and back, forever, 3 seconds each way, softly at both ends. The two sprites are its children, so they go with it, each playing the clip of its own layer.

4, 12, 24 and 34, 0.07, 0.2, 0.4 and 0.57 seconds in, close round the tank as it sets off. The flash is the second frame of fire, which turns over at 6 a second. roll turns the hull’s tread over at 8. They are two clocks on two layers, so the flash comes and goes on its own beat and not the tread’s.| Node | Component | Field | Value |
|---|---|---|---|
tank | Position | 240, 288 | |
| Animation Layers | Name, Clip, Weight, Blend, Mask Nodes | drive, roll, 1, Override, hull | |
| Name, Clip, Weight, Blend, Mask Nodes | gun, fire, 1, Override, turret | ||
| Tank | the script | ||
hull | Sprite | Texture | tank.png |
| Anchor | 0.5, 1 | ||
| Sort Layer | 5 | ||
| Animated Sprite | Animations | tank.anim | |
| Frame Size | ticked; Clip idle, as it comes | ||
turret | Position | -4, -13 | |
| Sprite | Texture | tank.png | |
| Anchor | 0.5, 1 | ||
| Sort Layer | 6 | ||
| Animated Sprite | Animations | tank.anim | |
| Clip | aim | ||
| Frame Size | ticked |
A ghost that appears and vanishes
What it is for. An enemy that fades in out of nothing, haunts a place, and leaves; a stranger on a path; a lamp spirit. Its three moments are three clips that play once, each started by the finish of the one before. The ghost holds its first frame, a wisp, for a beat before it begins, and its colour flickers all the while, from a property clip that has nothing to do with which picture is drawn.
One sheet for three strips
The Gothic Ghost has three strips in the same Gothicvania collection as the knight. Copy them in.
- Copy the three files below into
art, each from where the list says, and press Refresh in the Assets panel.
- Double-click
scenes/ghost.ronin Assets. Inart, right-clickghost-appears.png, choose Make Animation…, tickghost-idle.pngandghost-vanish.png, set Name toghostand press Create. It writesart/ghost.png, a sheet of 2048 by 128, andart/ghost.anim, with one clip,ghost, whose three whole frames are the strips:384by48from900,448by80from0and448by64from450. Make Animation lays the tallest strip first. - Select
gallery, click + Add node, choose Animated Sprite and rename itghost. Set its Position to100and200: on the lit brick under the left lantern, where every stage of it can be seen. In its Sprite, dragart/ghost.pngonto Texture, set Anchor to0.5and1, and Sort Layer to6. In its Animated Sprite, dragart/ghost.animonto Animations, set Clip toappear, untick Playing and tick Frame Size.
Three clips and a pivot for each
- With
ghostselected, double-clickart/ghost.png. Appear: set Cell to64and48and Margin to900and0. Drag across the first six cells, Selected 6 x 1, press From selection:appear,10 fps, Once, Generate 1, Clear. - Float: set Cell to
64and80and Margin to0and0. Select the first seven cells:float,8 fps, Loop, Generate 1, Clear. - Vanish: set Cell to
64and64and Margin to450and0. Select the first seven cells:vanish,10 fps, Once, Generate 1. Press Save in the Animation tab. - In the Animation tab, set each frame’s pivot y, with x at
0.5, one frame after another:0.521on the six frames ofappear,0.5on the seven offloat, and0.641on the seven ofvanish. Press Save.
| Clip | Frames | Rate | Loop | Every frame’s pivot |
|---|---|---|---|---|
ghost | Make Animation’s own: three whole frames, 384 by 48 from 900, 0, 448 by 80 from 0, 0 and 448 by 64 from 450, 0 | 12 | Loop | 0.5, 0.5 |
appear | cells 64 by 48, six, from 900, 0 | 10 | Once | 0.5, 0.521 |
float | cells 64 by 80, seven, from 0, 0 | 8 | Loop | 0.5, 0.5 |
vanish | cells 64 by 64, seven, from 450, 0 | 10 | Once | 0.5, 0.641 |
The flicker
- With
ghostselected, click Add component and choose PropertyAnimationComponent. In the Animation tab, click Properties, press New property clips: it writesscenes/ghost.propanimand fills the component’s Clips. Press the + at the right of the tabs, typeflickerand press Enter. - Press Key a property and choose
color. A rowcolorappears, and its first dropdown reads Linear: set it to Nearest. Double-click the row’s lane at0.00, the left end of the ruler: a first key, holding what the Sprite holds, white,1,1,1, alpha1. - Turn Record on. Put the playhead at
0.2: click the time box once,0.00 s, beside the Play and Stop buttons, so that its number is selected, type0.2and press Enter. In the Inspector click the Sprite’s Color, press U8 at the top left of the picker that opens so that it reads F, as in chapter 3, and set A to0.55. The edit is the key: a diamond appears on the lane at0.20, and nothing is written to the scene. Do the same at0.35with A0.9, at0.6with0.6, and at0.8with1. The clip is0.8seconds long. - Turn Record off. The
colorrow is amber, which says the neutral pose does not hold it yet. Press Capture RESET: it writes the Sprite’s own white, alpha1, at whatever time the playhead is. Press Save. - In the Property Animation set Clip to
flicker, tick Playing, and set Looping to Loop. Clips isghost.propanim, and Speed stays1.
- Nearest
- An interpolation, with Step, Linear and the others: between two keys the property takes the value of whichever key is nearer in time, so it jumps halfway between them and is never in between. The ghost’s alpha is only ever one of its five keys, which is a flicker and not a fade. Step would change on the key itself.
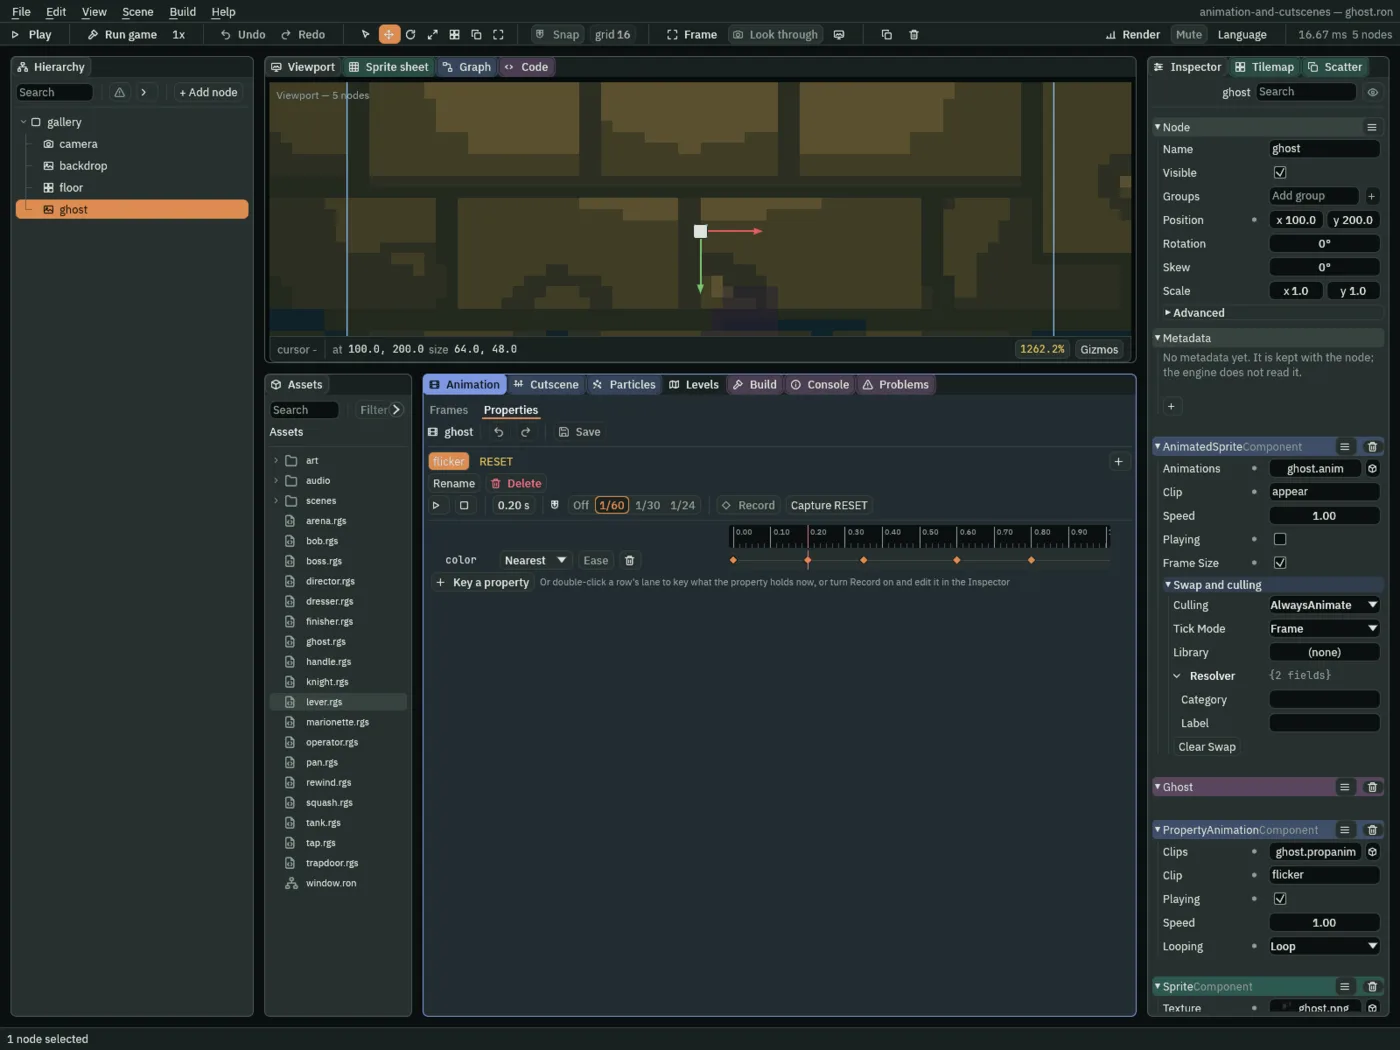
0.2 seconds: one row, color, Nearest, five keys. Playing on its Animated Sprite is off.The script
- In Assets, create a new script,
ghost, and replace everything inghost.rgswith the script below. Selectghost, click Add component and choose Ghost.
/// The ghost waits half a second on its first frame, then appears, floats a
/// while and vanishes, and a second later does it all again: each clip that
/// plays once says when it has finished.
component Ghost {
    fn on_create() {
        await wait(0.5);
        play_clip("appear");
    }

    fn on_signal() {
        if heard("finished:appear") {
            play_clip("float");
            await wait(2.0);
            play_clip("vanish");
        }
        if heard("finished:vanish") {
            hide();
            await wait(1.0);
            show();
            play_clip("appear");
        }
    }
}
finished:appear- The signal the Animated Sprite sends when
appear, a clip that plays once, reaches its end:heard("finished:appear")is true on that step. The script answers by startingfloat. finished:vanish- The same for
vanish. The script answers by hiding the ghost, waiting a second and showing it again, then startingappearfrom its first frame. - hide and show
hide()makes this node invisible andshow()makes it visible again. The ghost is out of the scene betweenvanishand the nextappear.- wait
await wait(2.0)suspends the function for two of the game’s seconds, then carries on from the next line: the ghost floats for two seconds before it vanishes. Withoutawaitin front it would not wait.
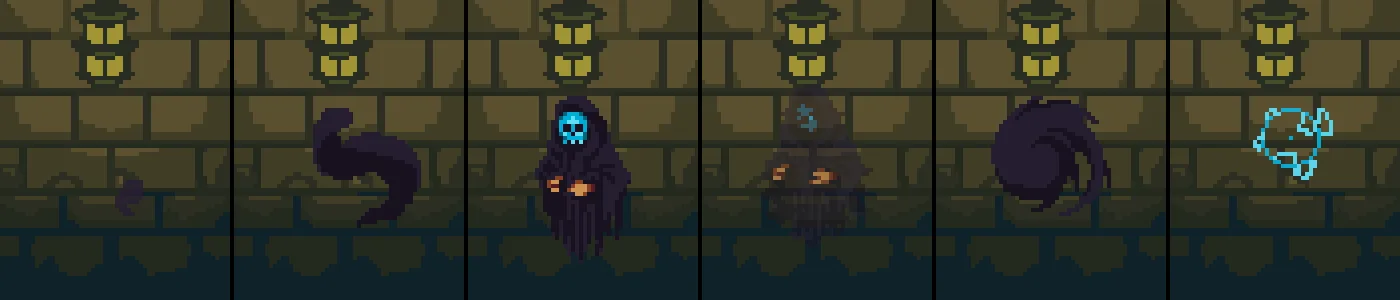
20, 48, 100, 130, 195 and 220, 0.33, 0.8, 1.67, 2.17, 3.25 and 3.67 seconds in: the wisp it holds for half a second, the smoke it appears out of, floating, a low of its flicker, the smoke it goes into and the sparks it leaves.| Node | Component | Field | Value |
|---|---|---|---|
ghost | Position | 100, 200 | |
| Sprite | Texture | ghost.png | |
| Anchor | 0.5, 1 | ||
| Sort Layer | 6 | ||
| Animated Sprite | Animations | ghost.anim | |
| Clip | appear | ||
| Playing | unticked | ||
| Frame Size | ticked | ||
| Property Animation | Clips | ghost.propanim | |
| Clip | flicker | ||
| Playing | ticked | ||
| Looping | Loop | ||
| Ghost | the script |
| Property clip | Length | Track | Keys, in seconds |
|---|---|---|---|
flicker | 0.8 s | color, Nearest | 0: 1, 1, 1, alpha 1; 0.2: alpha 0.55; 0.35: alpha 0.9; 0.6: alpha 0.6; 0.8: alpha 1 |
RESET | 0 s | color, Linear | 0: 1, 1, 1, alpha 1 |
A boss entrance
What it is for. A boss that drops into an empty arena. The camera holds the arena until it lands. Then the picture shakes, the camera comes on, and a shot swings in on the boss, tilted, a little closer, past where it will rest and back. The camera is held by a rig that is switched off, and a signal switches it on.
The demon’s sheet
- Copy the file below into
art, from where the list says, and press Refresh in the Assets panel.
- Double-click
scenes/boss.ronin Assets. Inart, right-clickdemon-idle.png, choose Make Animation…, set Name todemonand press Create. It writesart/demon.png, a sheet of 1024 by 256, andart/demon.anim, with one clip,demon, the whole strip as one frame,960by144. - Select
gallery, click + Add node, choose Node and rename itarena_mark. Set its Position to320and180: the middle of the view, which the rig’s first shot will hold. - Select
gallery, click + Add node, choose Animated Sprite and rename itdemon. Set its Position to420and-10: above the top of the view, with its feet, which are its node, off the screen. In its Sprite, dragart/demon.pngonto Texture, set Anchor to0.5and1and Sort Layer to5. In its Animated Sprite, dragart/demon.animonto Animations and tick Frame Size. Clip staysidle. - With
demonselected, double-clickart/demon.png. In the Sprite sheet tab set Cell to160and144. Drag across the first six cells, Selected 6 x 1, press From selection:idle,8 fps, Loop, Generate 1. In the Animation tab set pivot x to0.501and y to0.889on each of its six frames, and press Save. They are the middle of the body across and the row under its lowest drawn row down, measured on the sheet.
| Clip | Frames | Rate | Loop |
|---|---|---|---|
demon | Make Animation’s own: the strip, 960 by 144 from 0, 0, one frame | 12 | Loop |
idle | cells 160 by 144, six, from 0, 0; every frame’s pivot 0.501, 0.889 | 8 | Loop |
The landing
- With
demonselected, click Add component and choose AudioSourceComponent. Press+beside Triggers, open the new row, set Name tothudand dragimpactSoft_heavy_000.oggfrom Assets onto its Clip: the heavy landing thud that chapter 4 copied in. - Click Add component and choose SignalComponent. Add one connection with the + on Connections: Signal
landedand Tocamera. When the demon sayslanded, the camera hears it. - In Assets, create a new script,
boss, and replace everything inboss.rgswith the first script below. Selectdemon, click Add component and choose Boss.
/// The demon drops into the arena, lands with a thud, and tells the camera.
component Boss {
    fn on_create() {
        await wait(0.8);
        await anneal_by(vec2(0.0, 298.0), 0.5, .InQuad);
        play_sound("thud");
        emit("landed");
    }
}
The demon waits 0.8 seconds in an empty arena, then falls 298 units, from -10 to the boards at 288, in half a second, and the thud sounds as it lands.
The shot
- Select
camera, click Add component and choose CameraRigComponent. Untick Enabled: the rig is switched off, and the camera is its node, at320and180. - Press the + on Framings twice and set the two rows from the table below:
arena, which followsarena_markand holds it still, andboss, which followsdemon, is not Active and has the higher Priority. - In Assets, create a new script,
arena, and replace everything inarena.rgswith the second script below. Selectcamera, click Add component and choose Arena.
| Field | arena | boss |
|---|---|---|
| Name | arena | boss |
| Subject | arena_mark | demon |
| Active | ticked | unticked |
| Priority | 0 | 1 |
| Zoom | 1 | 1.25 |
| Rotation | 0° | -3.44° |
| Duration | 0.5 | 0.9 |
| Ease | EaseInOut | Overshoot |
| Dead Zone | 0, 0 | 0, 0 |
| Soft Zone | 0, 0 | 0, 0 |
| Offset | 0, 0 | 0, 40 |
| Damping | 0, 0 | 0.25, 0.5 |
| Time | 0 | 0 |
| Smoothing | 0.2 | 0.2 |
| Limit | 0 | 0 |
/// The camera holds the empty arena until the demon lands; then the picture
/// shakes, the rig comes on, and the shot swings in on the demon.
component Arena {
    fn on_signal() {
        if heard("landed") {
            set_flag("CameraRigComponent", "enabled", true);
            set_flag("CameraRigComponent", "framings.boss.active", true);
            shake(10.0, 0.6);
        }
    }
}
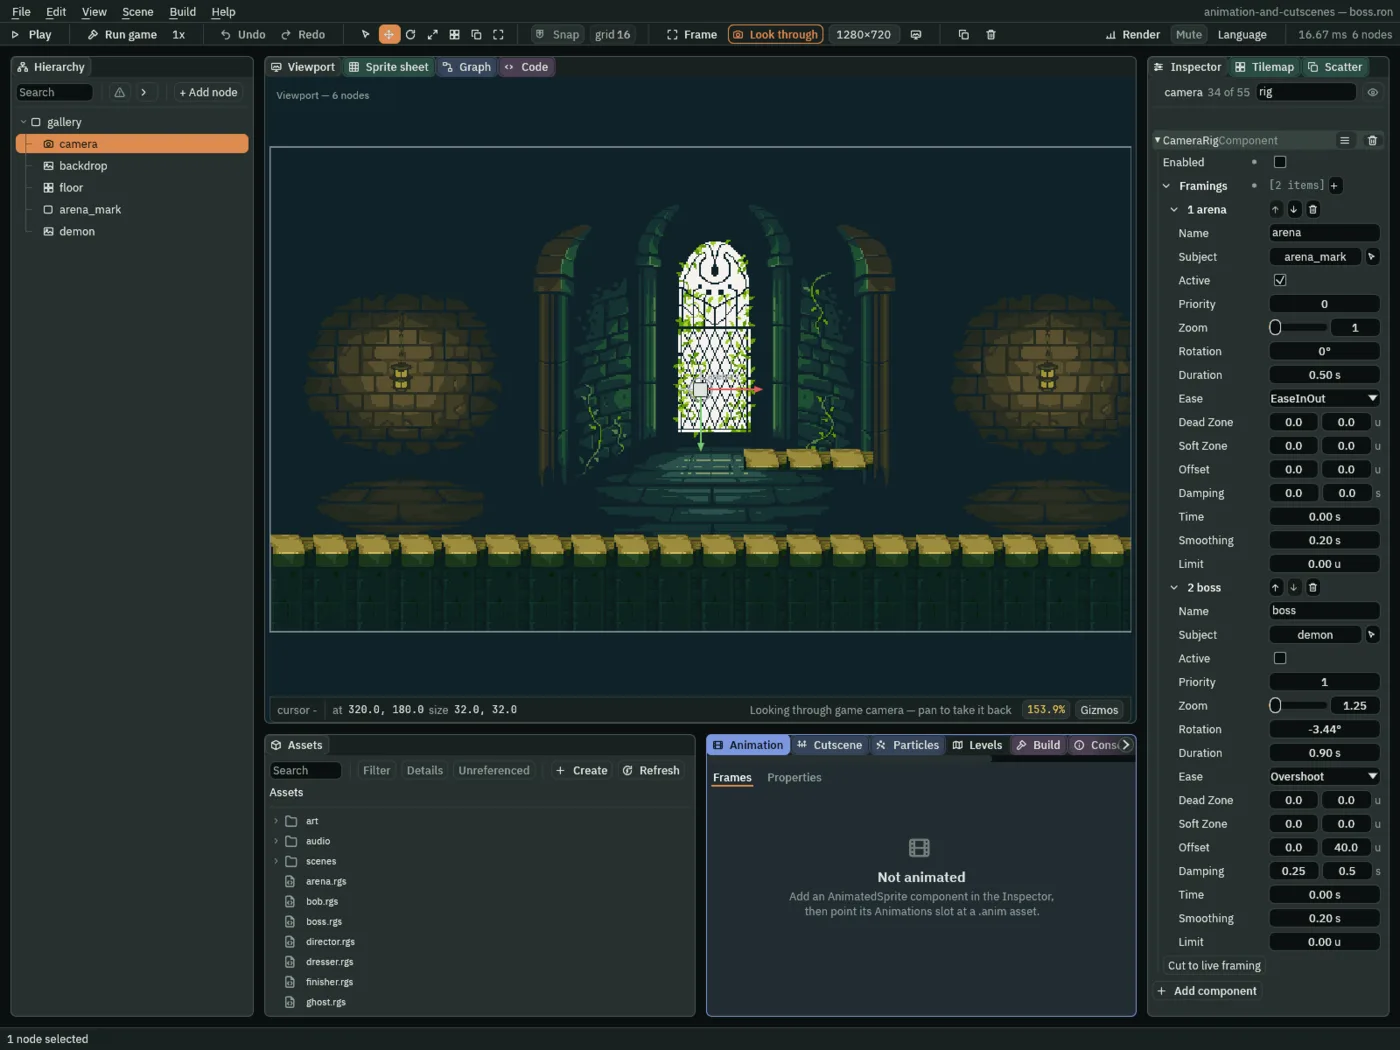
arena shot live and the boss shot waiting.landed- The demon’s own signal, named nowhere else:
emit("landed")sends it to the node its SignalComponent names, the camera, and the camera’s script hears it on the next step. - set_flag
- Writes a true or false onto another component on this node. The first call writes the Camera Rig’s
enabled, which switches the rig on. The second reaches into its list of framings by name:framings.boss.activemakes the shot calledbosslive. - shake
- Shakes the game’s camera by up to
strengthworld units forseconds:shake(10.0, 0.6), ten units for six tenths of a second. A weaker shake during a stronger one changes nothing. - anneal_by
- Moves this node by a vector over some seconds along a curve:
await anneal_by(vec2(0.0, 298.0), 0.5, .InQuad)drops the demon298units in half a second. Withawaitin front the script waits for it to arrive, and the thud sounds the step after..InQuadstarts slowly and speeds up: a fall.
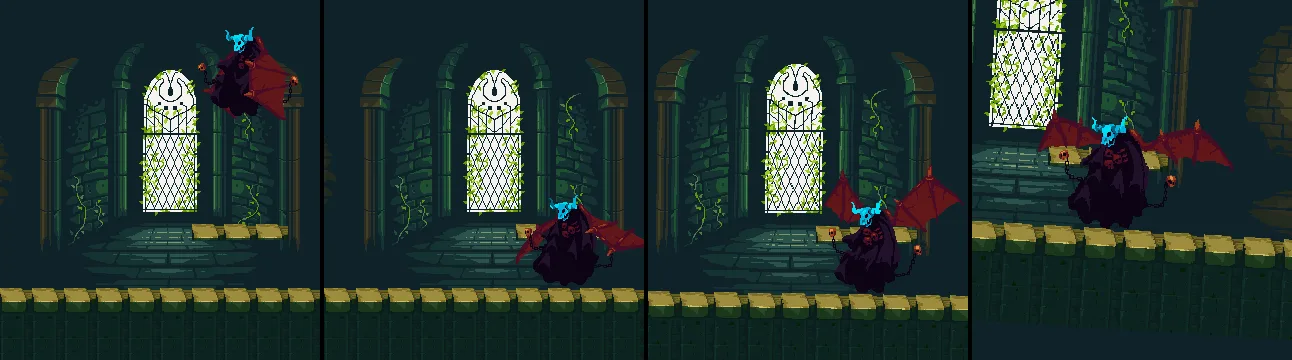
70, 80, 95 and 150, 1.17, 1.33, 1.58 and 2.5 seconds in: falling, landed, the shot swinging in and the shot at rest, a quarter closer and leaning a little more than three degrees.| Node | Component | Field | Value |
|---|---|---|---|
arena_mark | Position | 320, 180 | |
demon | Position | 420, -10 | |
| Sprite | Texture | demon.png | |
| Anchor | 0.5, 1 | ||
| Sort Layer | 5 | ||
| Animated Sprite | Animations | demon.anim | |
| Frame Size | ticked | ||
| Audio Source | Name, Clip | thud, impactSoft_heavy_000.ogg | |
| Signal | Signal, To | landed, camera | |
| Boss | the script | ||
camera | Camera Rig | Enabled | unticked |
| Framings | arena and boss, from the table above | ||
| Arena | the script |
Check it works
Five of the six scenes as the game draws them, each at the step its picture names. The sixth is under the list.
40: blue.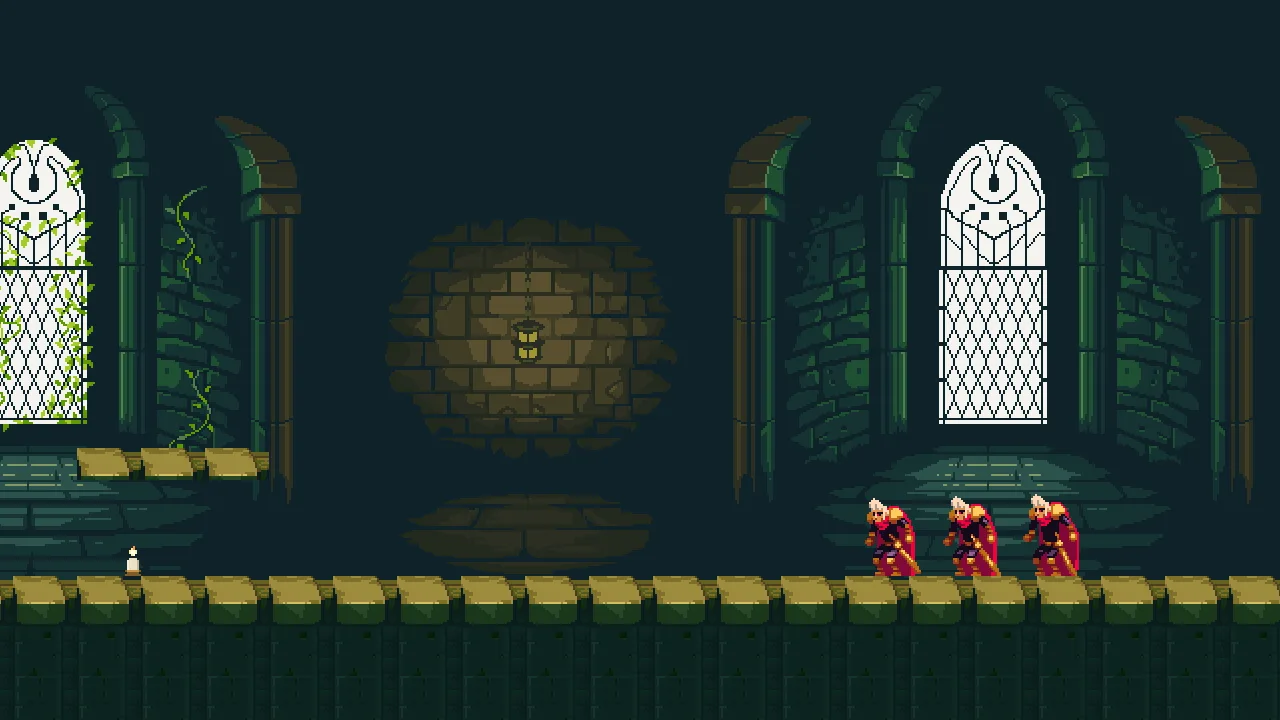
110: the crowd in view, the finisher left behind the edge.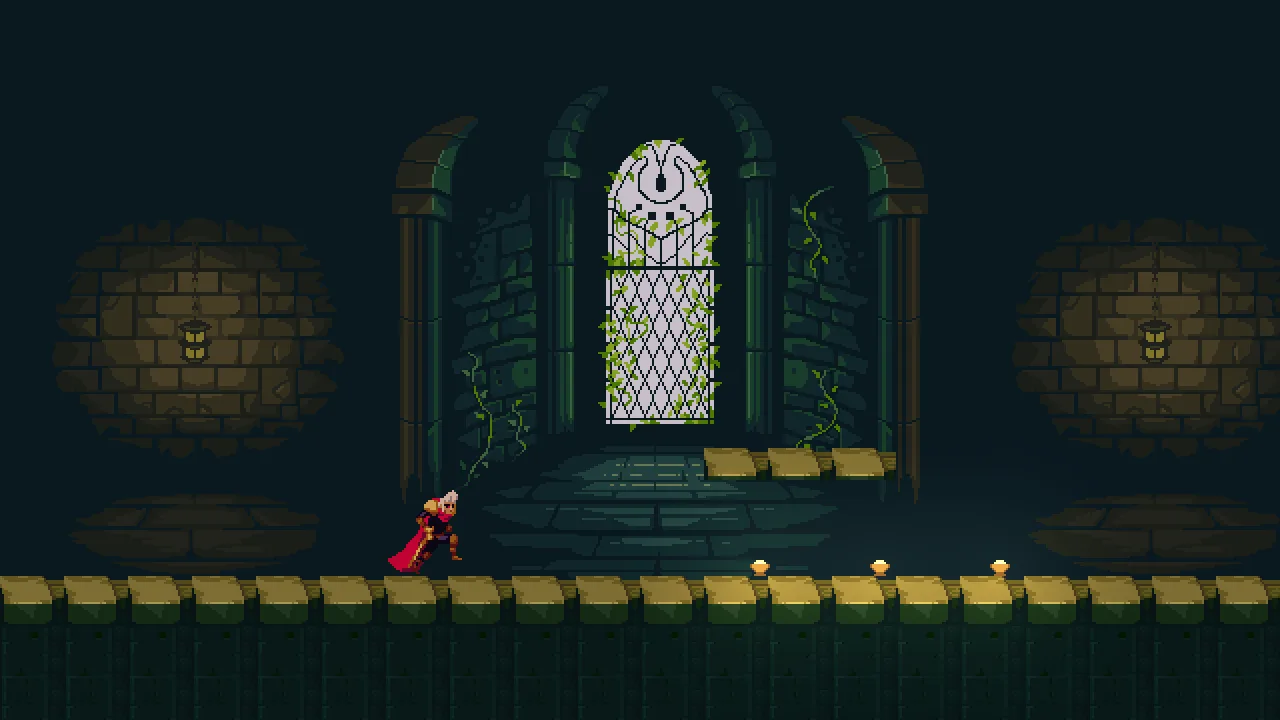
40: three lamps lit, the runner mid-stride.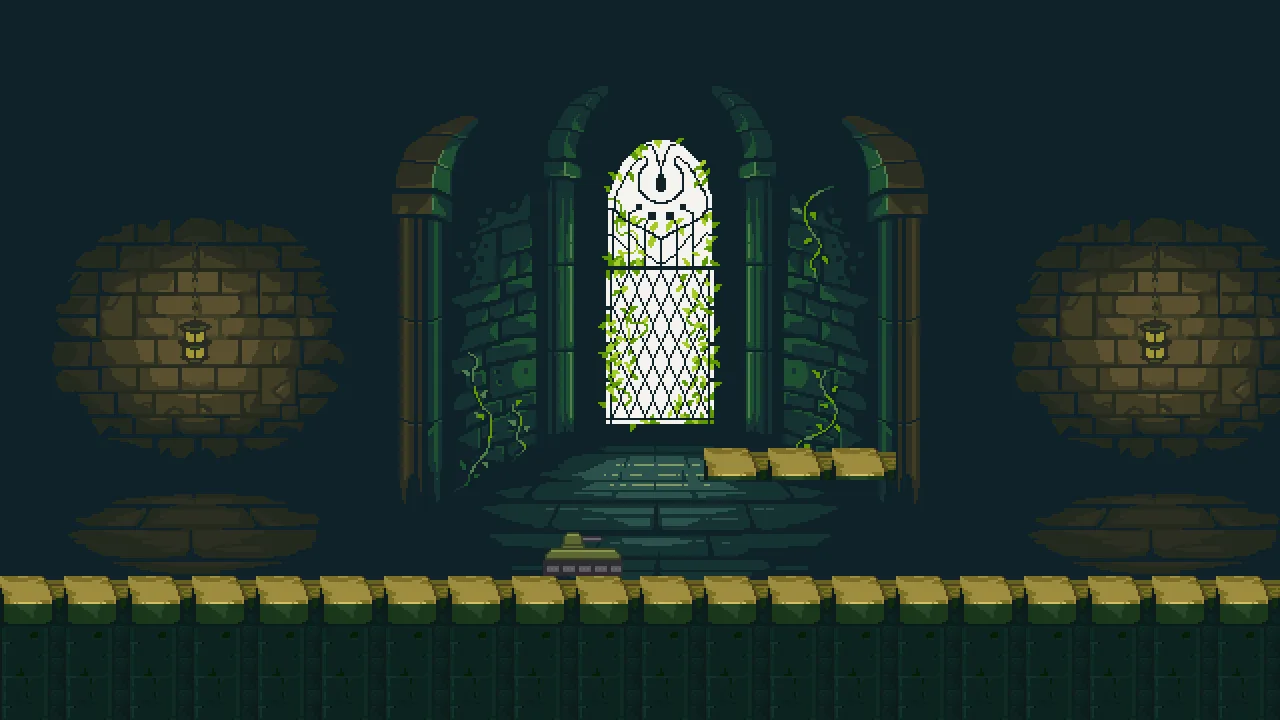
70, on its way out.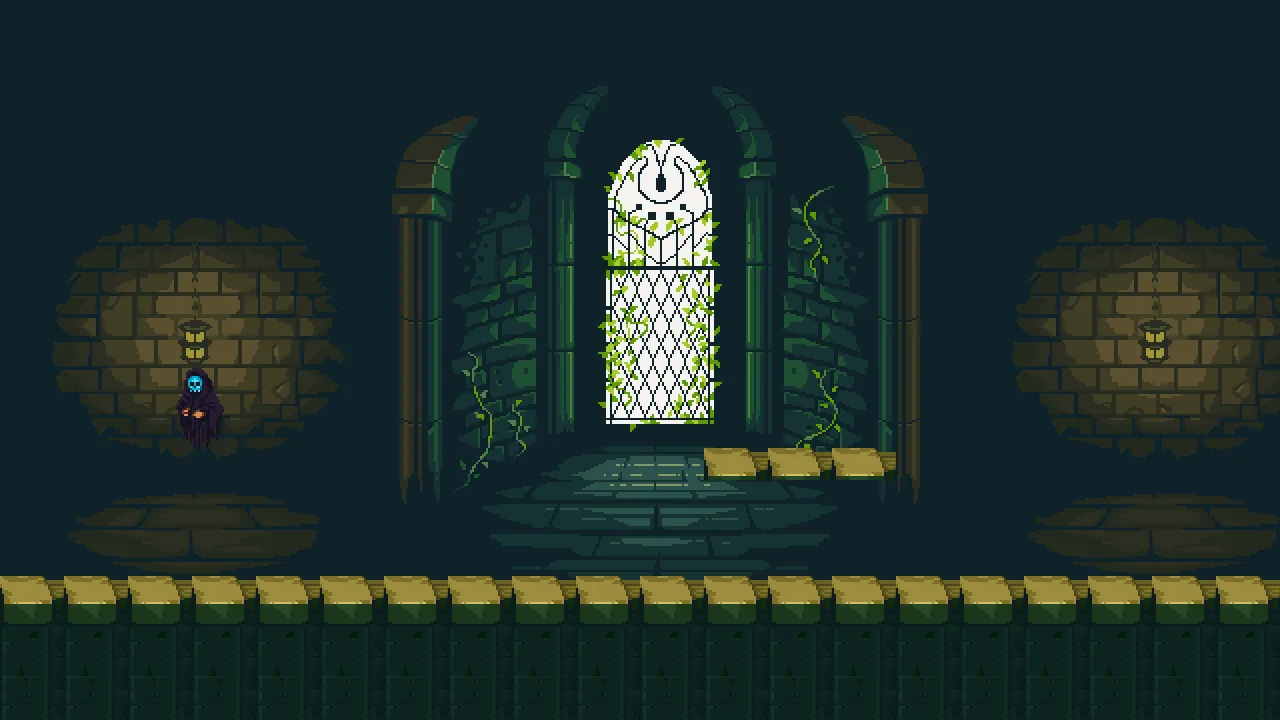
100, at full strength.