Tutorials · Physics and Mechanisms · Chapter 11
Belts and magnets
By the end
- The belfry’s floor painted over the loft, with H7 left open in it, and a plank and a one-way gantry up under H7
- Two belts, Surface effectors: a Surface Speed each way, and a Grip that says how soon a crate is up to it
- A magnet crane, a Point effector beside a Collider of its own, that lifts a crate to its face and drops it when switched off
- A rack of two magnets that pull alike but for their Falloff, one of them with its Area traced as an Outline
- One lever that switches every magnet, from anywhere a magnet can hold him, and the loft’s way up by keys
On this page
Start on this floor
Chapter 10’s crosswind leaves the knight on the loft’s floor at x 149. The loft is open to the hall’s ceiling still. This chapter lays the belfry’s floor over it, with an opening, H7, out of any jump’s reach, and the belts and magnets that get a crate under H7 for him to climb.
- Select
knightand set his Position to149,448. Press F5: he stands on the loft’s floor, east of H6. Press F5 to stop. - Set his Position back to
48,1792, or press Ctrl+Z until it reads so. - Select
tower, click + Add node and choose Node. Rename itloft. Every node in this chapter goes under it. - In the Gizmos menu, keep Collision, Forces, Bodies and Triggers ticked, as chapter 10 left them. As there, the pictures leave Collision off: the Colliders’ green outlines are on your screen and not in them.
The belfry’s floor
The belfry’s floor is painted as the loft’s was in chapter 10: a block lifted from the upper hall’s floor with Pick and put down with Stamp, twice. This time the opening, H7, is left in the middle: columns 26 to 31, x 416 to 512.
- Select
stonein the Hierarchy, open the Tilemap tab, and under Layers clickstone. - Choose
50%from the zoom readout under the Viewport, so the upper hall’s floor and the rows over the loft are both in view, as in the picture below; or scroll the Viewport between the Pick and the Stamp. - With Pick, drag over the upper hall’s floor, both its rows, from x
16, column1, at the west wall, to x416, column25. The bar along the bottom of the window says “Lifted 25x2”. - With Stamp, click at x
16, y224: column1of row14. - With Pick, drag over the same floor from column
6to column12, seven cells, both rows. - With Stamp, click at x
512, y224: column32of row14. The slab runs on to the east wall. - Click Save at the top of the Tilemap panel.
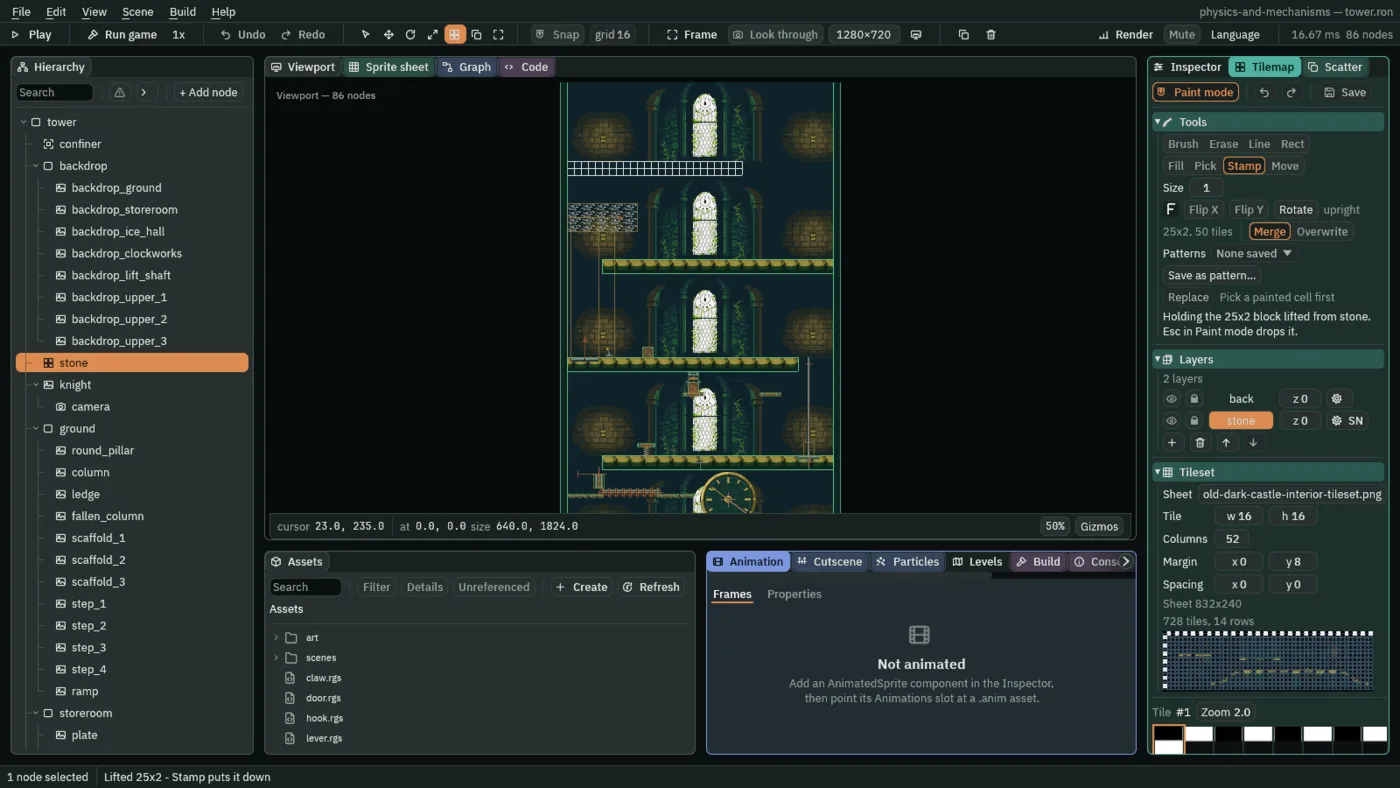
25 cells by 2, and Stamp showing where it will land, its corner at x 16, y 224. At 50% the source and the target are both in view.The slab’s top, y 224, is the belfry’s floor, and its underside, y 256, the loft’s ceiling: the loft is a room 192 tall now, like the floors below it. H7 is 224 over the loft’s floor, far out of a jump.
The plank and the gantry
Under H7 runs a gantry, a one-way walkway 112 over the floor, and a plank halfway up leads to it.
- Select
loft, click + Add node and choose Sprite. Rename itscaffold_7, set its Position to424,396, dragart/scaffold-plank.pngonto Texture and set Size to48,8. Click Add component, choose ColliderComponent, set its Size to48,8and tick One Way. - Select
loft, add a Sprite and rename itgantry. Set its Position to432,340, dragart/scaffold-plank.pngonto Texture, set Size to96,8, and choose Tiled with a Tile Size of48,8. Add a ColliderComponent, Size96,8, One Way ticked.
The plank runs from x 400 to 448, its top 56 over the floor; the gantry from x 384 to 480, its top at y 336, 56 over the plank. From the gantry a held jump falls short of the belfry’s floor: something on the gantry has to lift him the rest. Beyond its east end, to the wall, is the gantry’s belt, below.
The floor belt
A belt is an Effector of the Surface kind: it carries what touches its Area along its node’s own x, at its Surface Speed, closing a share of the gap to that speed every second, its Grip. So its Area is a thin strip at the floor’s top: a belt carries what touches it, not what is over it.
- In the Hierarchy, right-click
crate_1and choose Duplicate. Drag the copy ontoloft, rename itcrate_8and set its Position to420,448: on the loft’s floor, west of the belt. - Select
loft, click + Add node and choose Effector. Rename itbeltand set its Position to552,448: on the floor. - In its Area, open Shape and set Size to
144,2and Offset to0,1. Set Mask to Knight and Crate. - In its Effector, set Kind to Surface, Surface Speed to
90and Grip to20. - Click Add component and choose SpriteComponent:
art/belt.png, Size144,12, Anchor0.5,0, Sort Layer1, Tiled with a Tile Size of16,12. - Select
loft, add a Sprite and rename itbelt_roller: Position480,448,art/belt-roller.png, Size12,12, Anchor0.5,0, Sort Layer2. Press Ctrl+S.
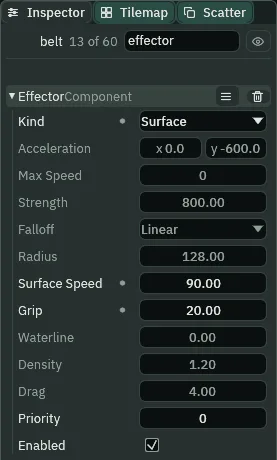
90, its Grip 20.The strip runs from x 480 to the east wall, in the floor’s top 2. The belt’s picture is set into the floor’s moss caps, its drum at the west end. A crate shoved onto it is carried east to the wall; he would be carried too, walking on it at his walk and the belt’s together.
- The Effector’s Kind › Surface
- The Effector’s Kind for a belt: it carries every body touching its Area along the node’s own x at its Surface Speed, closing the gap to it at its Grip. What it gives is the body’s Drift, so the body walks on it as on the floor, the belt’s speed added. A body counts as touching up to
1unit outside the Area, so a body standing on the strip is on the belt. - The Effector’s Surface Speed
- The Effector’s Surface Speed, for a Surface belt: how fast it carries what is on it, in world units a second, along the node’s own x, east on an unturned node. Negative runs it the other way. A new Effector’s is
120. The floor belt’s is90, east; the gantry’s, below,-60, west. - The Effector’s Grip
- The Effector’s Grip, for a Surface belt: how much of the gap between a body’s speed and the belt’s it closes each second. A rate, not a share a step, so a belt feels the same at any frame rate. The floor belt’s
20closes a third of the gap a step at sixty steps a second: a crate let go of at103.8is within1of the belt’s90seven steps later. The gantry’s4closes a fifteenth a step.0carries nothing. A new Effector’s is10.
Two scripts for the magnets
Three magnets follow one lever. As in chapter 10, the lever throws its own handle and says on or off; each magnet hears it and switches its own Effector.
- In Assets, click Create, choose New script, type
magnetand press Enter. In the Code tab, replace everything inmagnet.rgswith the first script below, and press Ctrl+S. Makemagnet_lever.rgsthe same way, with the second.
/// A magnet. The Effector on this node pulls what its Area holds toward the
/// node while it is switched on. The lever's `on` switches it on; its `off`
/// switches it off, and what it held falls. A step that hears both ends
/// switched off.
component Magnet {
    fn on_signal() {
        if heard("on") {
            set_flag("EffectorComponent", "enabled", true);
        }
        if heard("off") {
            set_flag("EffectorComponent", "enabled", false);
        }
    }
}
/// The magnets' lever. The `action` key (E) throws it over while the knight
/// is in its Area's reach: it turns its handle and says `on` or `off` to
/// whoever its Signal wires them to.
component MagnetLever : Area {
    /// How many things its Area notices: one while the knight is in its
    /// reach, none while he is not.
    #[readonly]
    near: i32 = 0,
    /// Whether it is thrown on.
    #[readonly]
    on: bool = false,

    fn on_enter() {
        near += 1;
    }

    fn on_exit() {
        near -= 1;
    }

    fn loop() {
        if near > 0 && pressed("action") {
            on = !on;
            set_flag("SpriteComponent", "flip.x", on);
            if on {
                emit("on");
            } else {
                emit("off");
            }
        }
    }
}
magnet_lever.rgs is chapter 10’s vent_lever.rgs under its own name and doc comment, its body the same line for line. Whom a lever says on and off to is its node’s Signal rows, not its script: chapter 10’s VentLever on this lever would do exactly the same. This one has a script of its own so that its Inspector names what it throws.
component Magnet- A script with no base, like chapter 10’s
Vent: on a step it hearson, set_flag ticks its own Effector’s Enabled, and onoffunticks it, and what the magnet held falls. heard says which word arrived. A step that hears both ends switched off. component MagnetLever : Area- The lever’s script, with an Area base: Near counts the Areas in its reach, On whether it is thrown on. Each pressed
actionin its reach flips it, turns the handle withset_flag("SpriteComponent", "flip.x", on), and emitsonoroff.
The crane
A magnet is an Effector of the Point kind: it pulls what its Area holds toward its own node, as hard as its Strength at the node, weakening with the distance by its Falloff over its Radius. The crane’s hangs over the floor belt’s east end, at the wall, where the belt leaves a crate.
- Select
loftand add a Sprite,crane_arm: Position555,256,art/crane-arm.png, Size64,28, Anchor0,0, Sort Layer1. The jib hangs under the ceiling, its cable’s end at x613. - Select
loft, click + Add node and choose Effector. Rename itmagnetand set its Position to613,294: where the magnet’s middle hangs from the cable. - In its Area, open Shape and set Size to
26,139and Offset to0,84.5. Set Mask to Knight and Crate. - In its Effector, set Kind to Point, Strength to
8000and Radius to192. Leave Falloff at Linear, and untick Enabled. - Click Add component and choose SpriteComponent:
art/magnet.png, Size32,30, Sort Layer2; its Anchor stays0.5,0.5, so it hangs by its eye from the cable. - Click Add component and choose ColliderComponent, Size
32,30: the magnet itself, which stops what it pulls. - Click Add component and choose Magnet. Press Ctrl+S. To see it as in the picture, press F over the Viewport with
magnetselected, and choose100%from the zoom readout under the Viewport.
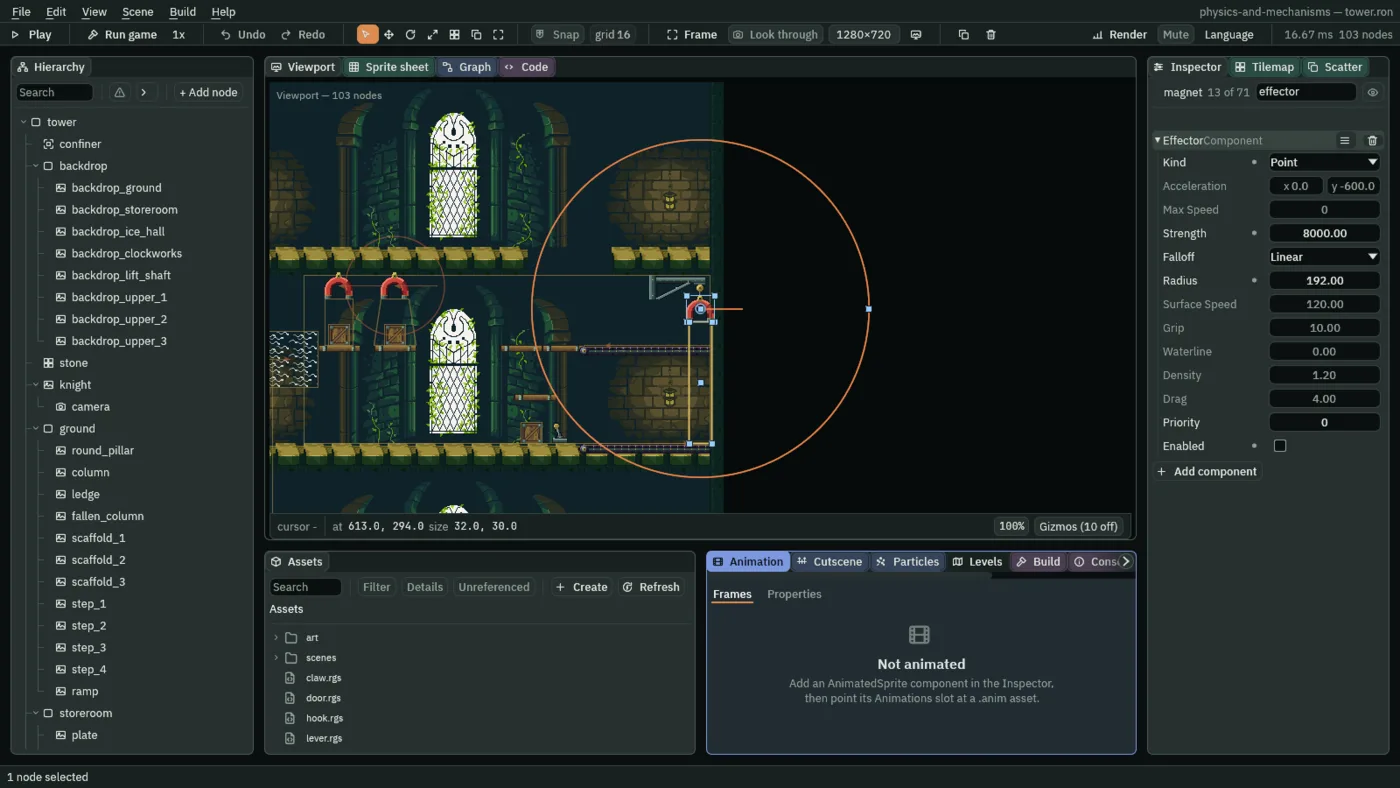
The column runs from x 600 to 626 and from the magnet’s face, y 309, down to the floor: the path a crate against the wall takes up to it. A crate on the floor at the wall is 142 from the node, where the pull is 8000 × (1 − 142 ÷ 192), 2083: more than a crate’s Gravity of 1800, so it lifts it, and more the nearer it comes. Its face is a crate’s height and 3 over the gantry: a crate passes under it there, the knight, 30 tall, does not.
- The Effector’s Kind › Point
- The Effector’s Kind for a magnet: it pulls every body in its Area toward its own node, by its Strength weakened by its Falloff at the body’s distance from the node. A negative Strength shoves away instead. Only the Area says who is pulled; the Radius says only how hard.
- The Effector’s Strength
- The Effector’s Strength, for a Point magnet: its pull at the node itself, in world units a second squared. Negative shoves away. A new Effector’s is
800. The crane’s8000is2083at a crate on the floor, by its Falloff; the rack’s are2400and4800. - The Effector’s Falloff
- The Effector’s Falloff, for a Point magnet: how its pull weakens with the distance d from the node. Constant: the Strength wherever the Area holds the body; the Radius is not read and dims. Linear, as it comes: Strength × (1 − d ÷ Radius), full at the node and nothing at the Radius and beyond. InverseSquare: Strength ÷ (1 + (d / Radius)²), full at the node, half at the Radius, and never nothing.
- The Effector’s Radius
- The Effector’s Radius, for a Point magnet with a Falloff other than Constant: the distance its Falloff is measured over, in world units. It is not a second shape: the Area still says who is pulled. A new Effector’s is
128. The crane’s192leaves2083of its8000at the floor,142out. The Forces gizmo draws it as a circle round the node.
The gantry’s belt
Beyond the gantry’s east end, to the wall, a belt runs west: the only way a crate leaves the crane. Under the magnet the gantry’s belt has 27 of room, enough for a crate and not for him, so he cannot go there and shove it out.
- Select
loft, click + Add node and choose Effector. Rename itgantry_beltand set its Position to552,336. - In its Area: Size
144,2, Offset0,1, Mask Knight and Crate. In its Effector: Kind Surface, Surface Speed-60, Grip4. - Add a SpriteComponent:
art/belt.png, Size144,12, Anchor0.5,0, Sort Layer1, Tiled with a Tile Size of16,12, and in its Flip fold tick X, so its chevrons point west. - Add a ColliderComponent: Size
144,12, Offset0,6, One Way ticked. Its top is flush with the gantry’s planks. - Select
loftand add a Sprite,gantry_roller: Position480,336,art/belt-roller.png, Size12,12, Anchor0.5,0, Sort Layer2. Press Ctrl+S.
The magnet rack
Over the knight’s walk from the arrival, two more magnets hang over two shelves, each with a crate: a rack that shows two Falloffs side by side. The shelves are out of his reach, so he walks under their pull untouched.
- Select
loftand add a Sprite,rack_shelf_1: Position200,340,art/scaffold-plank.png, Size48,8, Tiled with a Tile Size of48,8. Add a ColliderComponent, Size48,8. Press Ctrl+D, rename the copyrack_shelf_2and set its Position to264,340. - Duplicate
crate_1twice more, ascrate_8: drag each copy ontoloft, and name themcrate_9at Position200,336andcrate_10at264,336, one on each shelf. - Select
loft, add an Effector,rack_magnet_1, at Position200,268. Its Area: Size32,53, Offset0,41.5, Mask Knight and Crate. Its Effector: Kind Point, Strength2400, Falloff Constant; untick Enabled. Add the SpriteComponent (art/magnet.png, Size32,30, Sort Layer2), the ColliderComponent (Size32,30) and Magnet, as the crane’s. - Select
loft, add an Effector,rack_magnet_2, at Position264,268. Its Effector: Kind Point, Strength4800, Falloff InverseSquare, Radius56; untick Enabled. Add the Sprite, the Collider and Magnet as on the first. - In its Area, open Shape and click the + beside Outline four times. Type the points:
[0]-16,15;[1]16,15;[2]24,68;[3]-24,68. Set Mask to Knight and Crate. Press Ctrl+S.
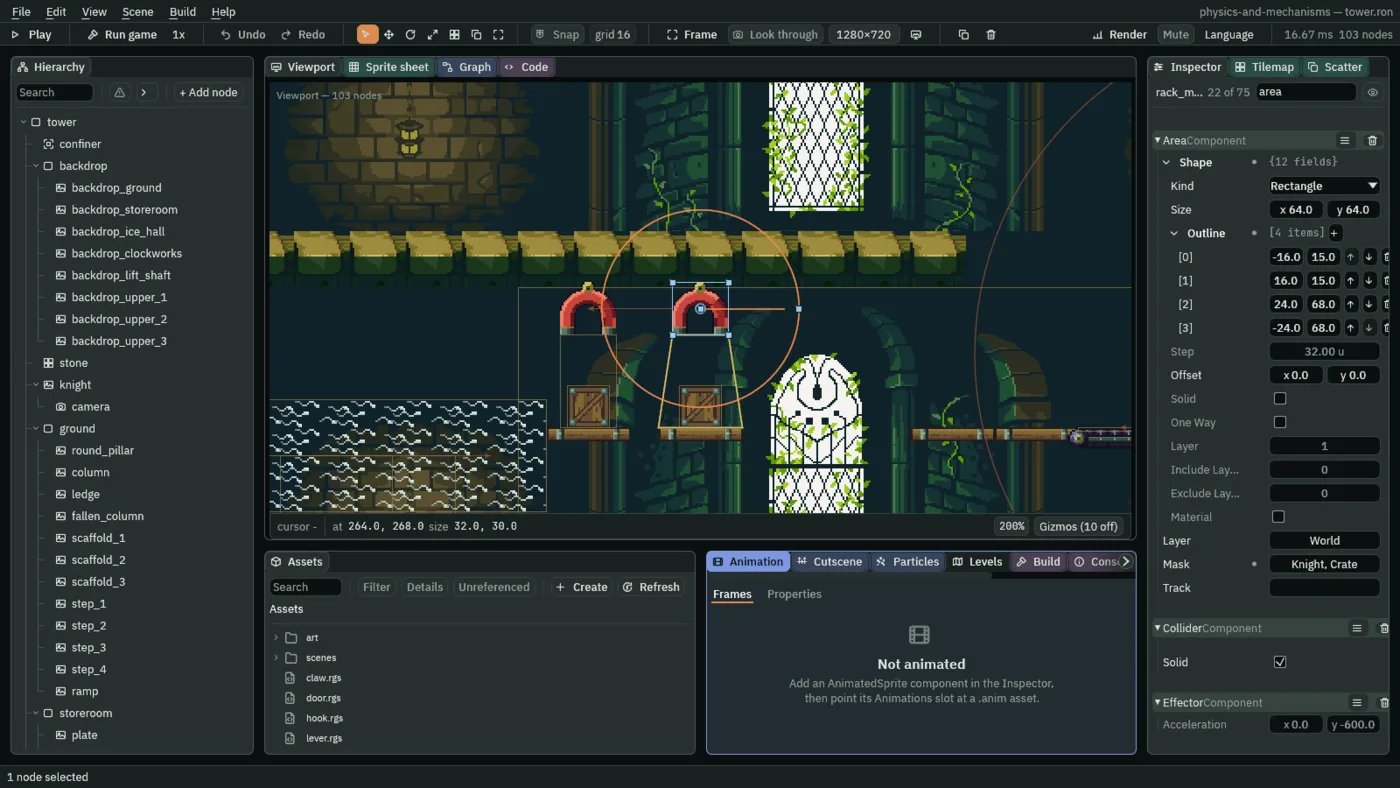
56, as a circle: its crate’s middle sits exactly on it.The first magnet’s Area is a box from its face to the shelf; the second’s is its Outline, which replaces the box: an Area notices by its Outline exactly. The Constant magnet pulls its crate with 2400 the whole way up; the InverseSquare one, its crate at its Radius, starts with half its 4800, the same 2400, and pulls harder as the crate nears. The Forces gizmo draws a Point magnet’s Radius as a circle only where its Falloff reads it: the InverseSquare one has its circle, and the Constant one, which never reads its Radius, has none.
- The Area’s Shape › Outline, traced
- The Area’s Outline, in its Shape: points, in the node’s units, that replace the box, its Size no longer read. An Area notices by its Outline exactly, as it is drawn, never cut into steps. The second rack magnet’s four points,
-16,15to16,15across its face and24,68to-24,68across the shelf, make a fan its crate rises up inside. Empty, as on every other Area here, the box is the shape.
The lever
- Select
loftand add a Sprite,crane_lever: Position452,448, on the floor west of the belt,art/lever.png, Size20,24, Anchor0.5,1, Sort Layer1. - Click Add component and choose AreaComponent: Size
464,192, Offset-60,-96, Mask Knight alone. - Click Add component and choose MagnetLever.
- Click Add component and choose SignalComponent. Click the + beside Connections six times. Give
[0],[1]and[2]the Signalon, and[3],[4]and[5]the Signaloff; pickmagnet,rack_magnet_1andrack_magnet_2for the To of the first three, and the same three, in order, for the last three. Press Ctrl+S.
Its reach is the loft from the rack’s west end, x 160, to the east wall, floor to ceiling. It is that wide because every magnet’s Mask ticks Knight too: a magnet can take him as it takes a crate. Wherever a magnet can hold him, he is in the lever’s reach, and E lets him down.
The crane at work
- Set the knight’s Position to
149,448. Then selectbelt, so its arrow is drawn at full strength, as in the pictures, and press F5. - Hold D: he walks to the crate and shoves it east. Let go as its middle reaches the belt’s west end, where its drum is: he stands off the belt, in the lever’s reach. The belt carries the crate to the wall.
- Once the crate is against the wall, press E. The crane lifts it up through the gantry to its face and holds it there.
- Press E again. The crate falls onto the gantry’s belt, which carries it west, out from under the magnet and off its end onto the planks, where it stops under H7. Press F5 to stop, and set his Position back to
48,1792.

125, 150 and 212 (2.08, 2.50 and 3.53 s), the editor in Play at 200%, belt selected and framed, with the Forces, Bodies and Triggers gizmos. From the skip, D is held to step 125, when the crate’s middle reaches the belt, at x 480.8; he lets go of it at 103.8 a second, and within seven steps it rides at the belt’s 90, its Drift the orange arrow. It is against the wall from step 212.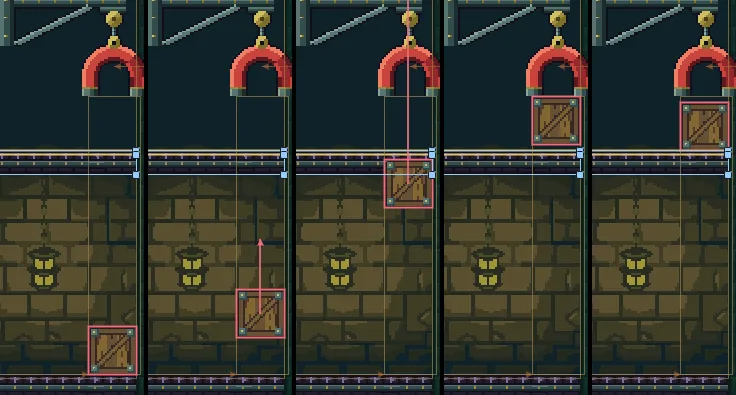
232, 250, 262, 266 and 305 (3.87, 4.17, 4.37, 4.43 and 5.08 s) of the same run, gantry_belt selected and framed at 200%. E goes down on step 231: the magnets are on from the next step and pull from the one after. The crate rises 115 in 32 steps, its pull growing from 2083 to 5986 on the last step before its face, which it meets on step 265. E again on step 301: off from the next step, it falls 3 onto the gantry’s belt.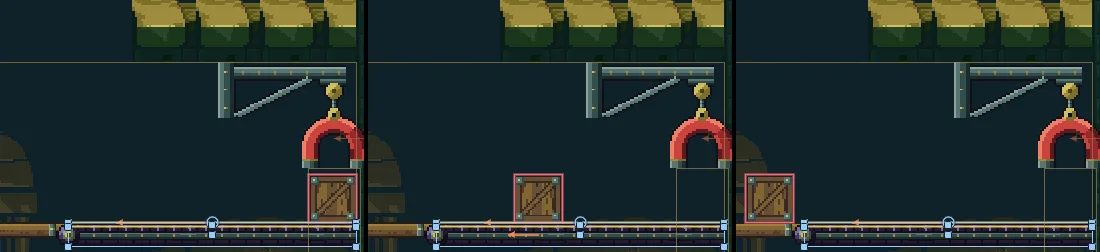
305, 400 and 490 (5.08, 6.67 and 8.17 s) of the same run, framed and selected as the crane strip. The gantry’s belt takes the crate west from rest, a fifteenth of the gap a step, its Drift the orange arrow; off the belt’s west end its Drift fades on the planks, and it stops at x 462.5, under H7.The rack’s magnets switch with the crane’s, on the same E. To watch them, run it again: they are west of the game camera, so select rack_magnet_2 and press F over the Viewport before you press E, as the strip below is framed. The InverseSquare magnet’s crate meets its face only three steps, 0.05 s, before the Constant one’s: press Pause or F6 just after E, then Step or F7 a step at a time, watching the Play bar’s step counter.

232, 240, 244, 248 and 252 (3.87, 4.00, 4.07, 4.13 and 4.20 s) of the same run, rack_magnet_2 selected and framed at 200%. Both pull from step 233 with the same 2400. The InverseSquare one, its crate nearing, pulls harder every step, to 3491 at the last step before its face, which its crate meets in 15 steps; the Constant one pulls 2400 all the way, and its crate meets its face in 18.The magnet takes him too
- Set the knight’s Position to
149,448and press F5. Shove the crate onto the belt as before, wait for it to reach the wall, and press E: the crane lifts it to its face. - Hold D: he walks onto the belt, which carries him on east, into the crane’s column. The magnet lifts him off the belt and holds him up against the crate it holds. Let go of D.
- Press E: the magnets let go, he falls onto the belt and the crate onto the gantry. Hold A to walk back off the belt. Press F5 to stop, and set his Position back to
48,1792.
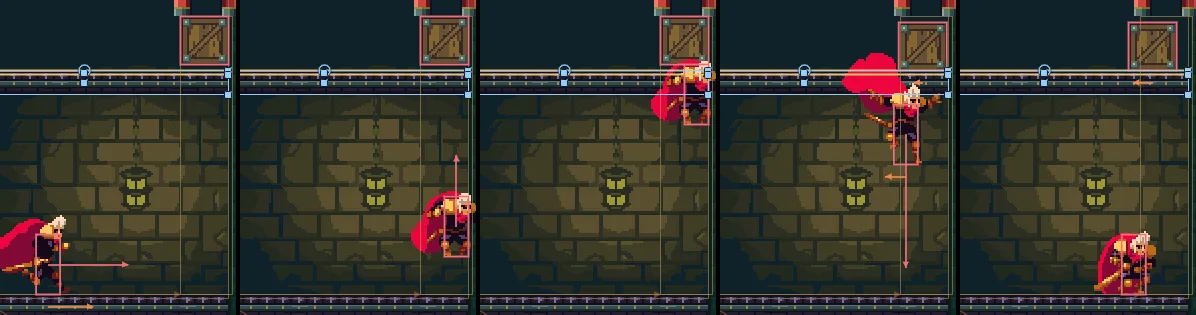
300, 336, 352, 380 and 390 (5.00, 5.60, 5.87, 6.33 and 6.50 s), framed and selected as the crane strip: the crane’s crate at its face since step 265, D held from step 280 to 358, and E on step 371. The magnet holds him at x 618, his feet at 363, his head against the crate, from step 349; off from step 372, he lands on the floor belt on step 389.Try it
The crane’s Strength
- Select
magnetand set its Effector’s Strength to6000. - Set the knight’s Position to
149,448, press F5, shove the crate onto the belt, and press E once it is at the wall. The crate stays on the belt: at the floor the pull is less than its Gravity. The rack’s crates rise as before. - Press F5 to stop. Set Strength back to
8000and the knight’s Position back to48,1792.
At the floor, 142 from the node, a Linear 6000 is 6000 × (1 − 142 ÷ 192), 1563: less than the crate’s 1800.
The InverseSquare magnet’s Radius
- Select
rack_magnet_2and set its Effector’s Radius to28. - Set the knight’s Position to
149,448, press F5, selectloftand press F over the Viewport, and throw the lever as before. The Constant magnet lifts its crate; the InverseSquare one leaves its crate on its shelf. - Press F5 to stop. Set Radius back to
56and the knight’s Position back to48,1792.
Its crate’s middle is 56 from the node, twice the new Radius: 4800 ÷ (1 + 2²), 960, a fifth of the Strength, and far less than 1800.
The floor belt’s Grip
- Select
beltand set its Effector’s Grip to4, the gantry belt’s. - Set the knight’s Position to
149,448, selectbeltagain, press F5, and shove the crate onto the belt as before. It comes up to the belt’s speed slowly, still faster than the belt for most of the way to the wall. - Press F5 to stop. Set Grip back to
20and the knight’s Position back to48,1792.

4: steps 125, 150 and 208 (2.08, 2.50 and 3.47 s), framed and selected as the belt strip, the same keys. He lets go of the crate on step 125, at x 481.8; on step 150 it is at 524.6, 5.6 east of where it is at Grip 20, its Drift, the orange arrow, still faster than the belt’s 90; it is against the wall on step 208, four steps sooner.At 4 the belt closes a fifteenth of the gap a step: the crate takes about 48 steps, not seven, to come within 1 of the belt’s 90.
The way up
The belts and the crane are this floor’s way up, by the keys alone, from where chapter 10 leaves him to where chapter 13 starts him. Chapter 12’s cellar is off the climb.
- Set the knight’s Position to
149,448and press F5. Shove the crate onto the belt; once it is at the wall, press E, and once it is at the magnet’s face, E again: it drops onto the gantry’s belt, which takes it west. - Hold A for a moment, until he is under the plank’s east end, and jump up onto it with Space held; jump again, onto the gantry.
- Once the crate has stopped on the gantry under H7, jump straight up, hold D once his feet are over the crate’s top, and let go of D over its east end: he lands on the crate.
- Hold A and Space together: he jumps up through H7 and lands on the belfry’s floor, west of the opening. Let go. Press F5 to stop, and set his Position back to
48,1792.
He jumps for the plank from about x 440, under its east end, and stops at x 391.7 on the belfry’s floor. Every jump on the way clears what it reaches by 15 or more, and his box stays 15 or more inside H7’s faces. The whole climb is now every floor’s way up, from his start at the tower’s foot to the belfry, by the keys alone.
The loft
| Node | Component | Field | Value |
|---|---|---|---|
loft | (a Node) | under tower | |
scaffold_7 | Position | 424, 396 | |
| Sprite | Texture, Size | scaffold-plank.png; 48, 8 | |
| Collider | Size; One Way | 48, 8; ticked | |
gantry | Position | 432, 340 | |
| Sprite | Texture, Size | scaffold-plank.png; 96, 8 | |
| Draw Mode, Tile Size | Tiled; 48, 8 | ||
| Collider | Size; One Way | 96, 8; ticked | |
crate_8 | Position | 420, 448, a copy of crate_1 | |
belt | (an Effector node) | Position | 552, 448 |
| Area | Shape › Size, Offset | 144, 2; 0, 1 | |
| Mask | Knight, Crate | ||
| Effector | Kind | Surface | |
| Surface Speed, Grip | 90; 20 | ||
| Sprite | Texture, Size | belt.png; 144, 12 | |
| Anchor, Sort Layer | 0.5, 0; 1 | ||
| Draw Mode, Tile Size | Tiled; 16, 12 | ||
belt_roller | Position | 480, 448 | |
| Sprite | Texture, Size | belt-roller.png; 12, 12 | |
| Anchor, Sort Layer | 0.5, 0; 2 |
| Node | Component | Field | Value |
|---|---|---|---|
crane_arm | Position | 555, 256 | |
| Sprite | Texture, Size | crane-arm.png; 64, 28 | |
| Anchor, Sort Layer | 0, 0; 1 | ||
magnet | (an Effector node) | Position | 613, 294 |
| Area | Shape › Size, Offset | 26, 139; 0, 84.5 | |
| Mask | Knight, Crate | ||
| Effector | Kind, Strength | Point; 8000 | |
| Falloff, Radius | Linear, as it comes; 192 | ||
| Enabled | unticked | ||
| Sprite | Texture, Size | magnet.png; 32, 30 | |
| Sort Layer | 2 | ||
| Collider | Size | 32, 30 | |
| Magnet | magnet.rgs | ||
gantry_belt | (an Effector node) | Position | 552, 336 |
| Area | Shape › Size, Offset | 144, 2; 0, 1 | |
| Mask | Knight, Crate | ||
| Effector | Kind | Surface | |
| Surface Speed, Grip | -60; 4 | ||
| Sprite | Texture, Size | belt.png; 144, 12 | |
| Anchor, Sort Layer | 0.5, 0; 1 | ||
| Flip › X | ticked | ||
| Draw Mode, Tile Size | Tiled; 16, 12 | ||
| Collider | Size, Offset | 144, 12; 0, 6 | |
| One Way | ticked | ||
gantry_roller | Position | 480, 336 | |
| Sprite | Texture, Size | belt-roller.png; 12, 12 | |
| Anchor, Sort Layer | 0.5, 0; 2 |
| Node | Component | Field | Value |
|---|---|---|---|
rack_shelf_1, rack_shelf_2 | Position | 200, 340; 264, 340 | |
| Sprite | Texture, Size | scaffold-plank.png; 48, 8 | |
| Draw Mode, Tile Size | Tiled; 48, 8 | ||
| Collider | Size | 48, 8 | |
crate_9, crate_10 | Position | 200, 336; 264, 336, copies of crate_1 | |
rack_magnet_1 | (an Effector node) | Position | 200, 268 |
| Area | Shape › Size, Offset | 32, 53; 0, 41.5 | |
| Mask | Knight, Crate | ||
| Effector | Kind, Strength | Point; 2400 | |
| Falloff; Enabled | Constant; unticked | ||
rack_magnet_2 | (an Effector node) | Position | 264, 268 |
| Area | Shape › Outline | -16, 15; 16, 15; 24, 68; -24, 68 | |
| Mask | Knight, Crate | ||
| Effector | Kind, Strength | Point; 4800 | |
| Falloff, Radius | InverseSquare; 56 | ||
| Enabled | unticked | ||
| each rack magnet | Sprite, Collider | as the crane’s | |
| Magnet | magnet.rgs | ||
crane_lever | Position | 452, 448 | |
| Sprite | Texture, Size | lever.png; 20, 24 | |
| Anchor, Sort Layer | 0.5, 1; 1 | ||
| Area | Shape › Size, Offset | 464, 192; -60, -96 | |
| Mask | Knight | ||
| MagnetLever | magnet_lever.rgs | ||
| Signal | Connections | on to magnet, rack_magnet_1, rack_magnet_2; off to the same three |
Every node is under loft, and every other field is as it comes. The tilemap stone gains the belfry’s slab: rows 14 and 15, from the west wall to H7 and from H7 to the east wall, copies of the upper hall’s floor.