Tutorials · Physics and Mechanisms · Chapter 7
The pendulum
By the end
- A clock face and its hand, a bodiless
pivotat the hub, and a bob with a Character Body and a round Collider - A Joint: Kind Distance, Target
pivot, its Anchor the bob’s rim, Length the rod’s, Turns Body on: a rod that swings for good - A Remote Transform that turns the clock’s hand as the bob turns, and leaves it on its hub
- The knight riding the bob across the gap, and jumping from its far turn up to the gallery
- The gallery’s two ledges, and the break between them that no jump crosses
On this page
Start on this floor
The clockworks are the floor over the ice hall. Chapter 6’s climb leaves the knight on their floor, off the top scaffold plank; to start there, set his Position before Play, as in chapter 6.
- Select
knightand set his Position to488,1120. Press F5: he stands on the clockworks’ floor, by the opening he came up through, and west of him the floor stops at a gap. Press F5 to stop. - Set his Position back to
48,1792, or press Ctrl+Z.
That gap, gap A, runs from x 320 to 448, too wide to jump. Over it hangs the room’s clock, and from the clock’s hub the pendulum this chapter builds, which carries him across.
The clock face and its hand
- Select
towerin the Hierarchy, click + Add node and choose Node. Rename itclockworks. Its Position stays0,0. - Select
clockworks, click + Add node and choose Sprite. Rename itclock_faceand set its Position to384,996: the hub, over the gap’s middle. In its Sprite, dragart/clock-face.pngfrom Assets onto Texture, set its Size to128,128and its Sort Layer to-2, in front of the room’s backdrop. Leave its Anchor at0.5,0.5, so the node is at the face’s middle. - Select
clock_face, click + Add node and choose Sprite. Rename itclock_hand. Its Position stays0,0: the face’s middle. Set its Rotation to-53.13. - In its Sprite, drag
art/clock-hand.pngonto Texture, and set its Size to8,64, its Anchor to0.5,0.75, so it turns about its own hub, a quarter of the way up from its foot, and its Sort Layer to-1.
The hand is turned now as the bob will be, so that before Play the hand and the pendulum’s rod make one line through the hub. In Play the bob turns it.
The pivot and the bob
The pendulum is two nodes: pivot, a bare Node at the hub that the joint hangs from, and bob, the round weight that swings, with its rod as a child Sprite. The bob is pulled out to the east end of its swing and turned to match, its rod pointing at the hub.
- Select
clockworks, click + Add node and choose Node. Rename itpivotand set its Position to384,996, the hub. Give it nothing else. - Select
clockworks, click + Add node and choose Sprite. Rename itbob, set its Position to448,1044and its Rotation to-53.13. In its Sprite, dragart/pendulum-bob.pngonto Texture, set its Size to32,32and its Sort Layer to2. Leave its Anchor at0.5,0.5: the node is the bob’s middle. - Select
bob, click + Add node and choose Sprite. Rename itrodand set its Position to0,-16: the bob’s rim. In its Sprite, dragart/pendulum-rod.pngonto Texture, set its Size to6,64, its Anchor to0.5,1, hung from its foot, and its Sort Layer to1. - Select
bob. Click Add component and choose CharacterBodyComponent. Set its Size to32,16and its Driven By to Script. It gets no script: leave the rest as it comes. - Click Add component and choose ColliderComponent. In its Kind, choose Circle. Set its Size to
32,32and, in its Polygon fold, its Step to4. Solid stays ticked.
The bob is 64 east of the hub and 48 down, 53.13° out from straight down. Its Collider is a round as big as its picture, cut into steps of 4 as chapter 1’s stump is: that is what the knight stands on. The Character Body is what a joint can move; with Driven By Script and no script, nothing else moves it, and his keys never walk it.
The joint
A Joint on the bob holds it to the pivot. Its Kind says what it holds: a Distance joint keeps its two ends exactly a Length apart, a rod.
- With
bobselected, click Add component and choose JointComponent. Until it names its other end, the Problems tab lists it: “this joint joins nothing — it needs the name of the node at its other end”. - In its Kind, choose Distance. Type
pivotinto Target: the Problems row goes. - Set its Anchor to
0,-16, the bob’s rim, where the rod meets it. Leave Target Anchor at0,0and Length at64, as they come: the pivot’s own point, and the rod’s length. - Tick Turns Body. Leave Enabled ticked and, in the Limits fold, Use Limits unticked.
- In the Viewport’s Gizmos menu, tick Forces, and keep Collision, Bodies and Triggers ticked, as chapter 6 left them. The four stay ticked from here on. Forces draws joints in orange, at full strength on the selected node and at half strength on the rest.
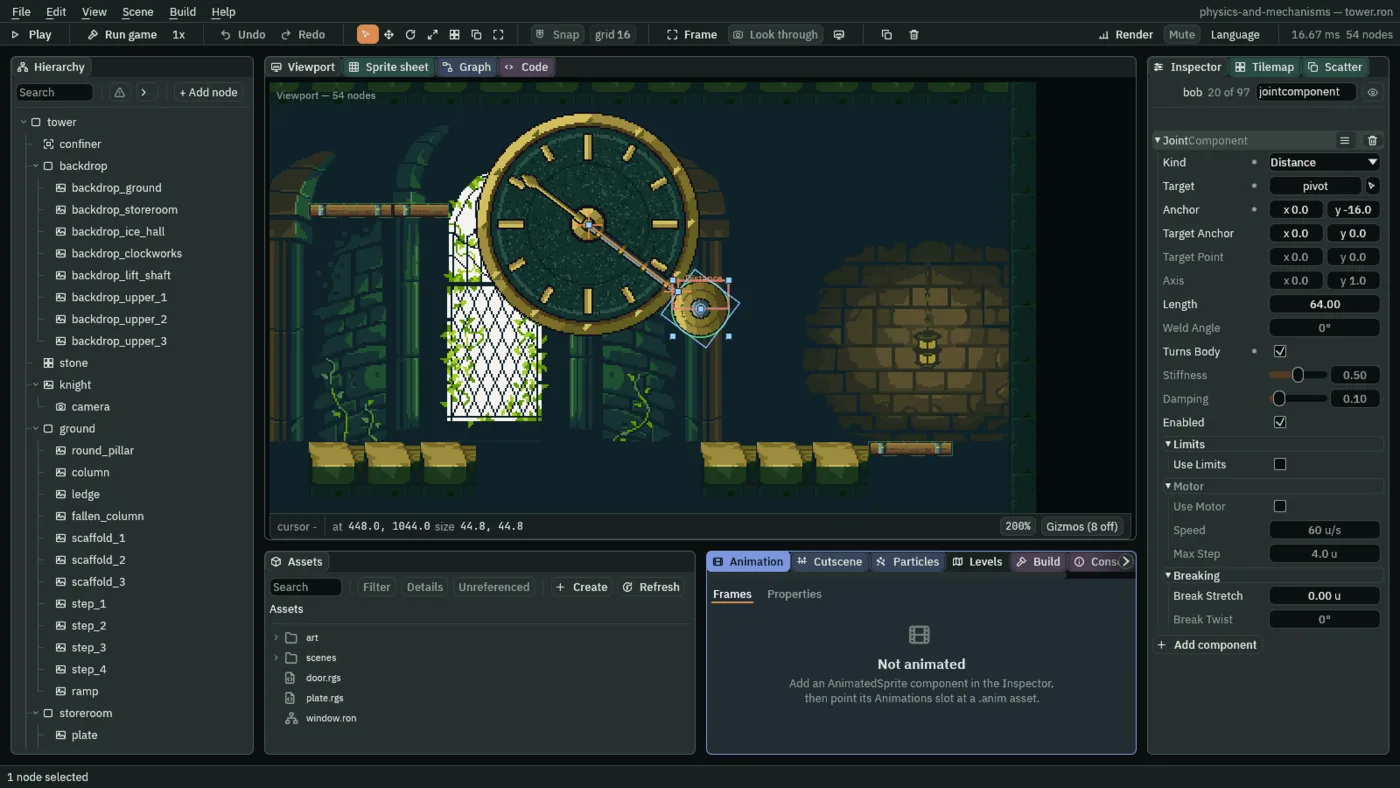
jointcomponent, keeps the Joint’s rows alone.The rows a Distance joint does not read are dimmed, and hovering one says which kinds use it: Target Point, Axis, Weld Angle, Stiffness, Damping, the Motor fold’s three and Break Twist. Chapters 8 and 9 set all but Weld Angle on other kinds of joint; chapter 8’s lantern keeps its Weld Angle at 0, and chapter 14’s crooked sign is the first to set one. Break Stretch stays bright, as every kind reads it; chapter 8 sets one. Min and Max show only once Use Limits is ticked.
- The Joint’s Kind
- The Joint’s Kind: what it holds its node to. It comes as Pin. Distance keeps its two ends exactly its Length apart, as a rod would; the bob’s is a Distance joint. Chapter 8 uses Pin, Fixed and Groove, chapter 9 Slider, Spring and Target.
- The Joint’s Target
- The Joint’s Target: the node at its other end, by name. A node with no Character Body is an anchor: the joint never moves it, and moves only its own node. The bob’s is
pivot, a bare Node at the hub. Empty, or a name nothing answers to, the joint holds nothing, and the Problems tab says so. - The Joint’s Anchor
- The Joint’s Anchor: where on its own node the joint holds, in the node’s units from its Position. The bob’s is
0,-16, its rim, where the rod meets it: the joint holds the rim, not the bob’s middle, so the middle swings80from the hub, the Length and the rim’s16. With Turns Body on, the Anchor turns with the node. - The Joint’s Target Anchor
- The Joint’s Target Anchor: where on the target the joint holds, in the target’s units.
0,0, as it comes, is the pivot’s own point, the hub. Chapter 8’s chain ties each link to a point on the one before. - The Joint’s Length
- The Joint’s Length: how far apart a Distance joint holds its Anchor and its Target Anchor, in world units. It comes as
64, the rod picture’s length, so the bob’s needs nothing typed. With Use Limits ticked a Distance joint holds its ends between Min and Max instead, and the Length row dims. - The Joint’s Turns Body
- The Joint’s Turns Body, for a Pin or a Distance joint: on, the node turns as it swings, its own down pointing along the joint away from the target, and its Anchor turns with it. The bob turns as far as it has swung, so its rim, and the rod its child, keep facing the hub. Off, as it comes, the node keeps the turn it was saved with. The bob’s is on.
- The Joint’s Enabled
- The Joint’s Enabled: whether the joint holds right now. It comes ticked, and the bob’s stays so. Unticked, it holds nothing and its gizmo is drawn dashed; chapter 8’s lever unticks one in Play.
- The Joint’s Use Limits
- The Joint’s Use Limits, in its Limits fold: ticked, the joint holds its ends within a range, its Min and Max, which show then; a Distance joint becomes a slack tie, free inside the range and taut at its ends. Unticked, as it comes and as the bob keeps it, a Distance joint is a rod. Chapter 8’s chain bridge ticks it.
The clock’s hand
The hand is the clock face’s child, and nothing moves it yet. A Remote Transform on the bob copies the bob’s turn onto it once a step: the hand turns as the rod does, and stays on its hub.
- With
bobselected, click Add component and choose RemoteTransformComponent. Until it names a node, the Problems tab lists it: “this Remote Transform copies onto nothing — its Target is empty; type the name of the node that should follow this one”. - Type
clock_handinto Target. - Tick Rotation, which comes unticked, and untick Position, which comes ticked. Leave Scale unticked, Offset at
0,0and Enabled ticked. - Press Ctrl+S.
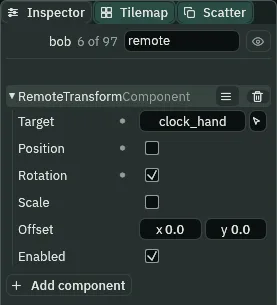
- The Remote Transform’s Target
- The Remote Transform’s Target: the node it copies its own node onto, by name, anywhere in the scene. The bob’s is
clock_hand, the clock face’s child. Empty, or a name nothing answers to, it copies nothing, and the Problems tab says so. - The Remote Transform’s Position
- The Remote Transform’s Position: whether it copies its node’s place onto the target. It comes ticked. The bob’s is unticked: ticked, it would put the hand on the bob each step instead of on its hub.
- The Remote Transform’s Rotation
- The Remote Transform’s Rotation: whether it copies its node’s turn onto the target. It comes unticked. The bob’s is ticked: every step the hand is turned exactly as the bob is, and the bob is turned as far as it has swung, so the hand carries the rod’s line on through the hub.
- The Remote Transform’s Scale
- The Remote Transform’s Scale: whether it copies its node’s size onto the target. It comes unticked, and the bob’s stays so: the bob is drawn at its own size, so a copy would change nothing. Chapter 14’s tavern sign, drawn larger than its shadow, ticks it.
- The Remote Transform’s Offset
- The Remote Transform’s Offset: added to a copied Position, in world units, to set the target that far off its node. With Position unticked it does nothing, so the bob’s stays
0,0. Chapter 14 casts a sign’s shadow onto the wall behind it with one. - The Remote Transform’s Enabled
- The Remote Transform’s Enabled: whether it copies right now. It comes ticked, and the bob’s stays so. Unticked, the target stays wherever it was last left. Chapter 14’s tavern sign has a script switch its own on and off, as a lamp beside it is lit and put out.
It swings
- Select
clock_face. Press F5. While the game runs the Viewport looks through the game camera (Look through on the toolbar), on the knight far below: move the pointer over the Viewport and press F to frame the clock instead. - Click
bobin the Hierarchy, underclockworks, so its joint is drawn at full strength. The bob swings west under the hub and back, the rod and the hand turning with it, and it goes on swinging. Press F5 to stop.
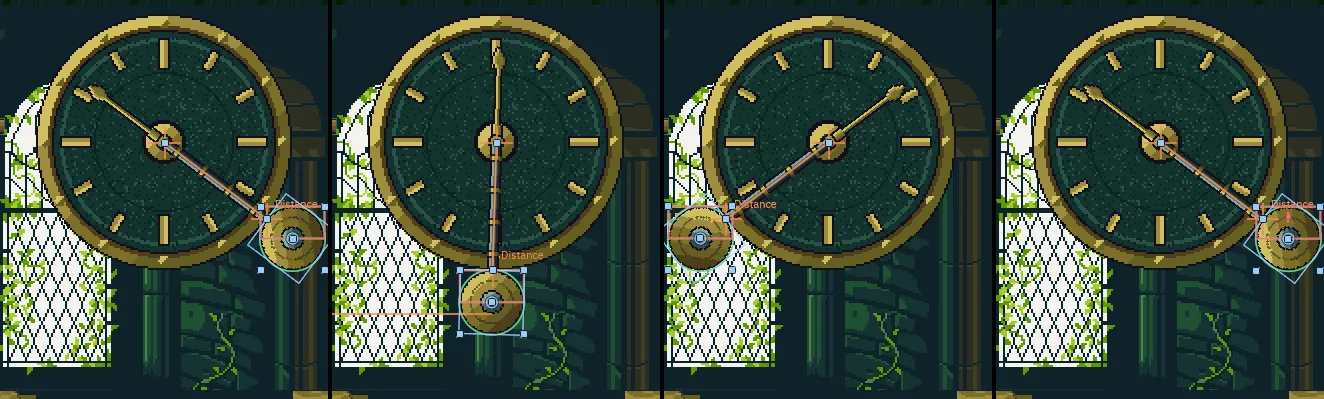
0, 21, 42 and 589 of Play (0.00, 0.35, 0.70 and 9.82 s), nothing pressed, bob selected as in the steps above. The bob starts at its east end, passes under the hub on step 21 and turns at its west end on step 42, 53.13° out; on step 589 it is back at its east end, as far out, after seven swings there and back. The hand is turned as the bob in every frame.The rose box on the bob is its body, its top half, and the orange arrow its Drift: the sideways part of its swing, which chapter 10 reads. The joint’s orange link runs along the rod from the rim to the hub, with its Kind written at the rim: drawn at full strength because bob is selected. Select any other node and it is drawn at half strength, faint on the grey rod.
The gallery
Along the room’s top run two one-way ledges at one height, out of reach of his jump from the floor: the gallery. The east ledge lies just west of the bob’s far turn; the west ledge lies under H4, the opening up to the next floor. Between them is a break, over gap B in the floor.
- Select
clockworks, click + Add node and choose Sprite. Rename itgallery_eastand set its Position to264,988. In its Sprite, dragart/scaffold-plank.pngonto Texture and set its Size to80,8; choose Tiled in Draw Mode and set Tile Size to48,8. - Click Add component and choose ColliderComponent. Set its Size to
80,8and tick One Way. - Press Ctrl+D, rename the copy
gallery_westand set its Position to56,988. - Press Ctrl+S.
The east ledge runs from x 224 to 304, the west one from 16 to 96, both with their tops at 984: 136 over the floor, out of his held jump of 110, and 56 under the ceiling. The break between them, 128 across, sits right over gap B.
Riding it
From where chapter 6 leaves him, the pendulum is the way across gap A and up to the east ledge. It needs a jump timed to the swing: up as the bob starts back toward him, so it comes under him at the top.
- Select
knightand set his Position to488,1120. Press F5. - Hold A and walk him to the edge of gap A; let go there. He stands under the near end of the swing.
- Watch the bob swing away west. As it turns at the far side and starts back, jump straight up with Space, held, and let go as he lands: he comes down on the bob’s top as it turns at his side. A jump a little after the turn, not on it: from six to sixteen steps after it, a window about a sixth of a second wide. A miss lands him back at the edge; wait for the next swing and try again. Pause and Step (F6 and F7), with the Play bar’s step counter, show the timing.
- Hold nothing. The bob carries him back across the gap to its far turn.
- There, hold A and Space together: he jumps west off the bob, his head meets the ceiling, and he lands on the east ledge. Let go.
- Press F5 to stop, and set his Position back to
48,1792.
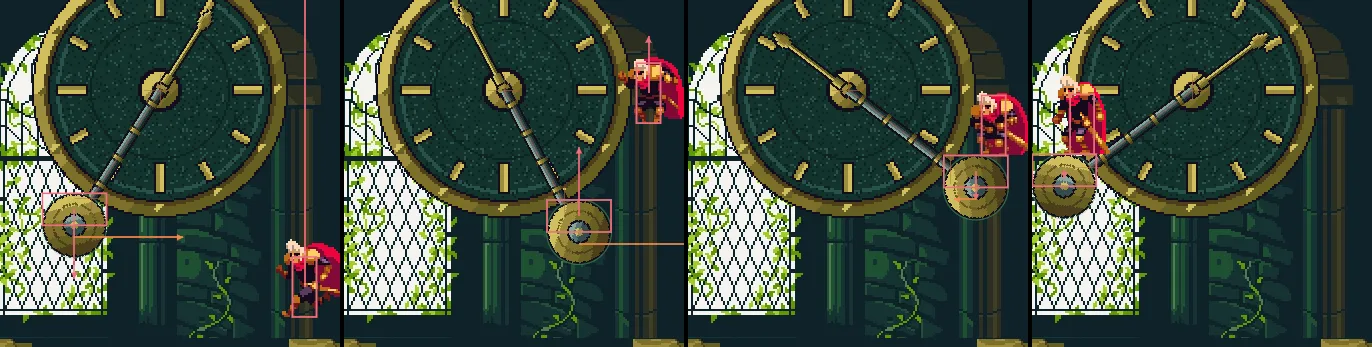
54, 70, 82 and 110 of Play (0.90, 1.17, 1.37 and 1.83 s). A held for the first 12 steps walks him to the edge, at 456. The bob turns at its far side on step 42; Space goes down on step 54 and is held until he lands on the bob on step 82, his feet at 1028.5, 18 under the top of his jump. With nothing held it carries him to its west turn, at 328.8, on step 110. For this picture he was started at the skip, 488, 1120.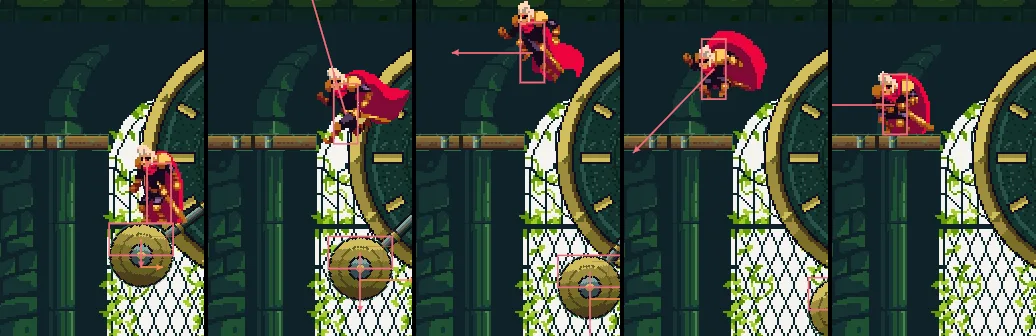
111, the bob’s far turn, until he lands. Steps 111, 115, 119, 124 and 129 (1.85, 1.92, 1.98, 2.07 and 2.15 s): his head meets the ceiling on step 119, his feet at 958, 26 over the ledge’s top, and he lands on the east ledge at 281.3 on step 129.Ridden, the bob swings faster: from his side to its far turn, steps 82 to 110 in the ride above, takes about 28 steps, where empty a half-swing takes 42. The bob is pressed by the gravity of what stands on it, and that press adds to its own pull every step he rides it. It still swings 53° each way, his weight and all.
The break, and H4
That is as far as this chapter goes. The break between the ledges is too wide for a jump under a ceiling so close: chapter 8 hangs a chain bridge across it.
- Select
knight, set his Position to488,1120and press F5. Ride the bob and jump to the east ledge, as above. - Hold A and run off the ledge’s west end, pressing and holding Space as he reaches it: his head meets the ceiling, he comes down well short of the west ledge, and drops through the break and gap B to the ice hall’s floor below. Press F5 to stop, and set his Position back to
48,1792.
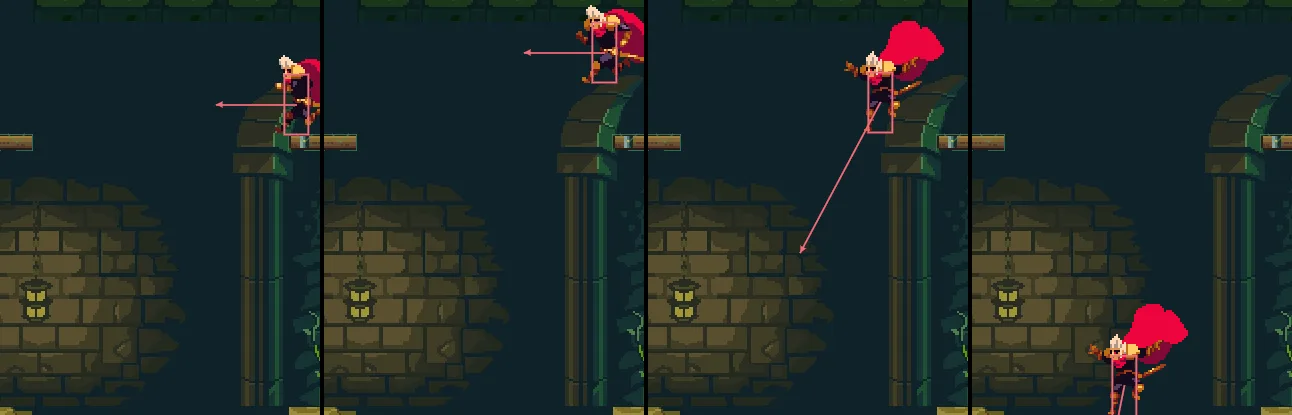
140, and Space from step 160, as his box reaches the ledge’s end. Steps 160, 163, 172 and 187 (2.67, 2.72, 2.87 and 3.12 s): his head at the ceiling on step 163; on step 172 his feet are back at the ledges’ height with his box 93.9 east of the west ledge’s end; he lands on the ice hall’s floor on step 201.To try the west ledge before the bridge reaches it, set him on it.
- Select
knightand set his Position to56,984: on the west ledge, under H4. - Press F5. Hold D and Space together, and let go as he lands: he jumps up through H4 and lands on the floor above, east of the opening. Press F5 to stop.
- Set his Position back to
48,1792.
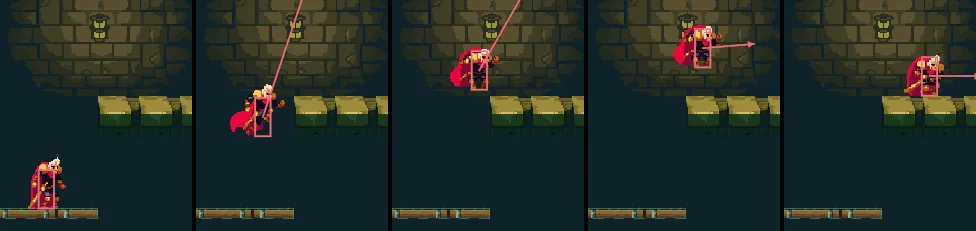
2, 8, 14, 22 and 31 (0.03, 0.13, 0.23, 0.37 and 0.52 s), D and Space held from step 2 until he lands on step 31. His feet rise to 874, 22 over the floor above, and he lands on it at 133.3. Framed at 128.3%, so the floor above fits. For this picture he was placed on the west ledge at 56, 984.The clockworks
| Node | Component | Field | Value |
|---|---|---|---|
clockworks | (a Node) | Position | 0, 0 |
clock_face | Position | 384, 996 | |
| Sprite | Texture, Size | clock-face.png; 128, 128 | |
| Sort Layer | -2 | ||
clock_hand | (under clock_face) | Position, Rotation | 0, 0; -53.13 |
| Sprite | Texture, Size | clock-hand.png; 8, 64 | |
| Anchor, Sort Layer | 0.5, 0.75; -1 | ||
pivot | (a Node) | Position | 384, 996 |
bob | Position, Rotation | 448, 1044; -53.13 | |
| Sprite | Texture, Size | pendulum-bob.png; 32, 32 | |
| Sort Layer | 2 | ||
| Character Body | Size | 32, 16 | |
| Driven By | Script, no script | ||
| Collider | Kind, Size | Circle; 32, 32 | |
| Step | 4 | ||
| Joint | Kind | Distance | |
| Target | pivot | ||
| Anchor | 0, -16 | ||
| Target Anchor, Length | 0, 0; 64, as they come | ||
| Turns Body | ticked | ||
| Enabled; Use Limits | ticked; unticked, as they come | ||
| Remote Transform | Target | clock_hand | |
| Position; Rotation | unticked; ticked | ||
| Scale; Offset; Enabled | unticked; 0, 0; ticked, as they come | ||
rod | (under bob) | Position | 0, -16 |
| Sprite | Texture, Size | pendulum-rod.png; 6, 64 | |
| Anchor, Sort Layer | 0.5, 1; 1 | ||
gallery_east | Position | 264, 988 | |
gallery_west | Position | 56, 988 | |
| each ledge | Sprite | Texture, Size | scaffold-plank.png; 80, 8 |
| Draw Mode, Tile Size | Tiled; 48, 8 | ||
| Collider | Size | 80, 8 | |
| One Way | ticked |
Every node here is under clockworks but the hand, under clock_face, and the rod, under bob. Every other field is as it comes.