Tutorials · Physics and Mechanisms · Chapter 14
A gallery of physics
By the end
- Two scenes of your own beside the tower, each started from an empty scene: a root, a Camera Confiner, a tilemap that New tilemap… names after the sheet and you rename, and the knight pasted in from the tower
- A gargoyle whose body is Driven By its Script:
gargoyle.rgshops it withjump()andcut_jump(), spends its one air jump (Air Jumps1) at the top of every third hop, and drops through its one-way perch withdrop_down(), while its four body hooks count - A blade whose edge is an Area that names its clip’s Track, in the world only on the frames the blade is down, and round at its tips: a Capsule
- A signpost whose board a Fixed joint holds crooked at its Weld Angle
- A tavern sign swinging on a Pin with Turns Body, and its shadow cast on the wall by a Remote Transform that
shade.rgsswitches on and off as a lamp comes and goes - A lamp on a Target joint whose Target Point jumps between two hooks, where its Damping shows
- A scale whose pan rides a Slider between its Min and Max stops on a Spring laid squashed: one crate leaves it at its top, two take it down and open a door
- A crate puzzle seen from above: the knight and two crates Floating, a fence that is one Closed Line with Round corners on its own Sort Layer, a gate whose Collider has Solid off, a bell whose Circle Area rings for what comes through, and marks that fill with
while_in
On this page
Two scenes beside the tower
The tower is finished. This chapter adds two scenes beside it, each with a tilemap of its own: scenes/gallery.ron, seen from the side as the tower is, and scenes/crate_puzzle.ron, a room seen from above. Each case in them is a small thing you know: a gargoyle, a blade, a crooked sign, a tavern sign and its shadow, a lamp, a scale, a pen of crates. Each sets something the tower leaves as it comes, so that by the end you have used every control the seven physics components have.
They are scenes of their own, not rooms of the tower: the crate puzzle’s knight floats, and the tower’s stands. To open one, open scenes in Assets and double-click gallery.ron or crate_puzzle.ron. Play plays the scene that is open. The tower stays the project’s first scene, so Run game still starts it.
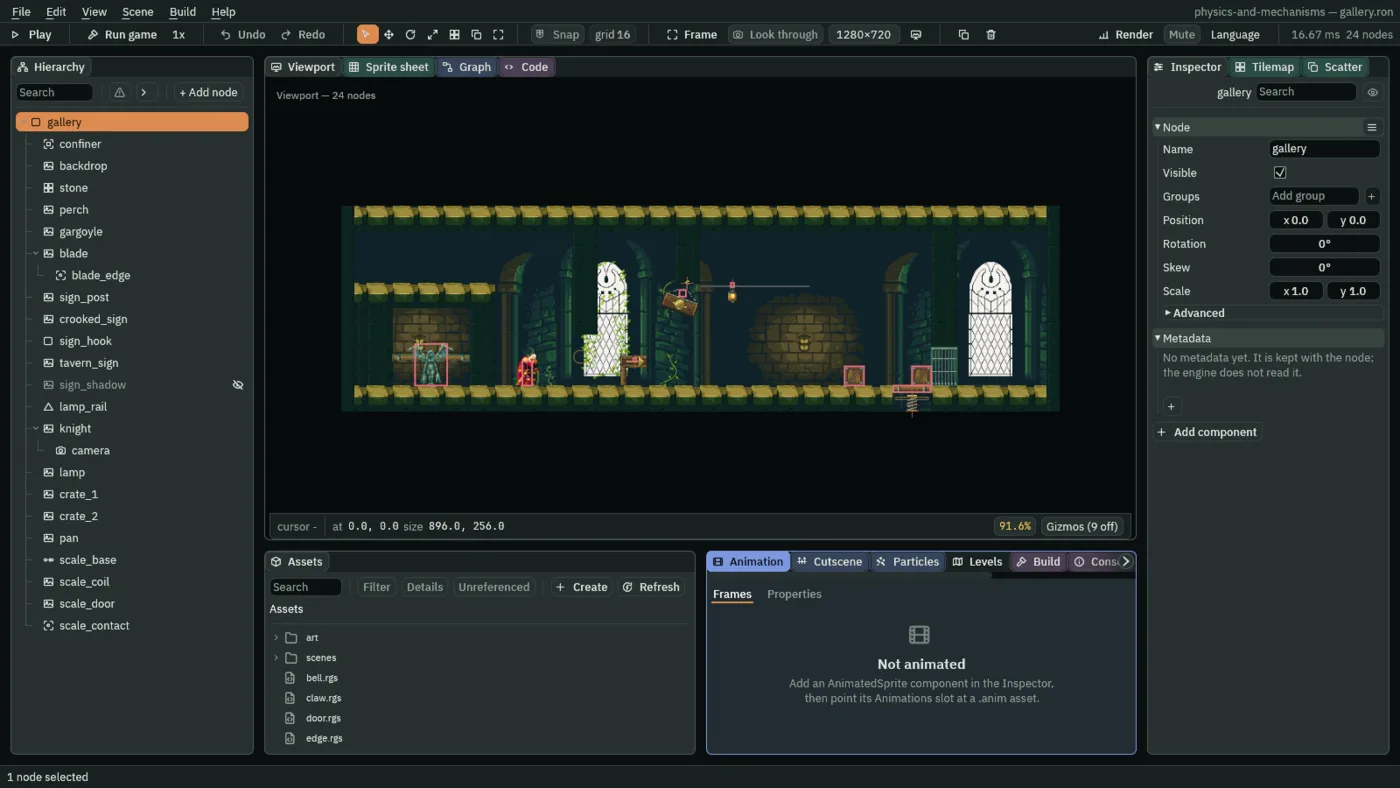
896 by 256, its root selected and framed. The cases run west to east in the order this page builds them.Making the gallery
A new scene is empty, and Save as… stays greyed until it holds a node. So the root comes first, named after the scene, and then the scene is saved under that name.
- Choose File › New scene, or press Ctrl+N. The Hierarchy is empty.
- Click + Add node and choose Node. Rename it
gallery. - Choose File › Save as…. In the dialog, open the project’s
scenesfolder, name the filegallery.ron, and save. - Select
gallery, click + Add node and choose Camera Confiner. Rename itconfiner, set its Position to448,128, the room’s middle, and its Bounds to896,256, the room’s size. Until the camera arrives with the knight,confinercarries a warning, and Problems reads “This Confiner works on the active camera and this scene has no active Camera”: leave it. - Select
galleryand add a Sprite,backdrop. Dragart/old-dark-castle-interior-background.pngonto Texture. Set Draw Mode to Tiled, Size to896,256, Tile Size to960,304, the picture’s own size, Anchor to0,0and Sort Layer to-10, as the tower’s floors have it. Its Position stays0,0. - Select
galleryand add a Tilemap,stone.
The stone is a tilemap of its own, made from the same castle sheet as the tower’s.
- With
stoneselected, open the Tilemap tab beside the Inspector. Dragart/old-dark-castle-interior-tileset.pngfrom Assets onto New tilemap…. The editor writes a new tilemap beside the sheet under the first name not already taken, and pointsstoneat it. The tower’s tilemap has the sheet’s own name, so this one isart/old-dark-castle-interior-tileset-2.tilemap, and the status line at the foot of the window says so. - Before you change anything in it, rename it: in Assets, right-click the new file, choose Rename, and type
gallery.tilemap.stonestill shows it. - In the tab’s Tileset fold, set Margin y to
8. - In the Layers fold, the new tilemap has two layers,
backandground; the second is the solid one. Double-clickground: its name turns into a box, the caret after the name. Press Ctrl+A to select the name, typestone, and press Enter. Then clickstone, so it is the layer you paint on. - Under Tools, click Rect. Choosing a tool turns on Paint mode at the top of the tab, as Brush would: a drag in the Viewport now paints, and selects nothing.
- Paint the room as the table below sets out. For each tile it names, hover the tiles in the picker at the tab’s foot until the tooltip reads its number,
#490for the roof’s first, and click it: the Tile line over the picker shows it. If the tiles are too small to hit, raise Zoom beside it. Drag over the cells the tile covers, from inside the first to inside the last: both corner cells are painted. - A run of two tiles by turns, along a row or down a column, starts with its first two cells, painted one tile each. Then click Pick and drag over the two, click Stamp, and click the next cell along the run, and every second cell after it, to the run’s end; a cell left over at the end you paint on its own. Two rows by turns at once, as the roof’s cap and the stone under it, are a block two by two, picked and stamped the same way, each click on its top row.
- Press the tab’s Save, which writes the tilemap, and Ctrl+S for the scene.
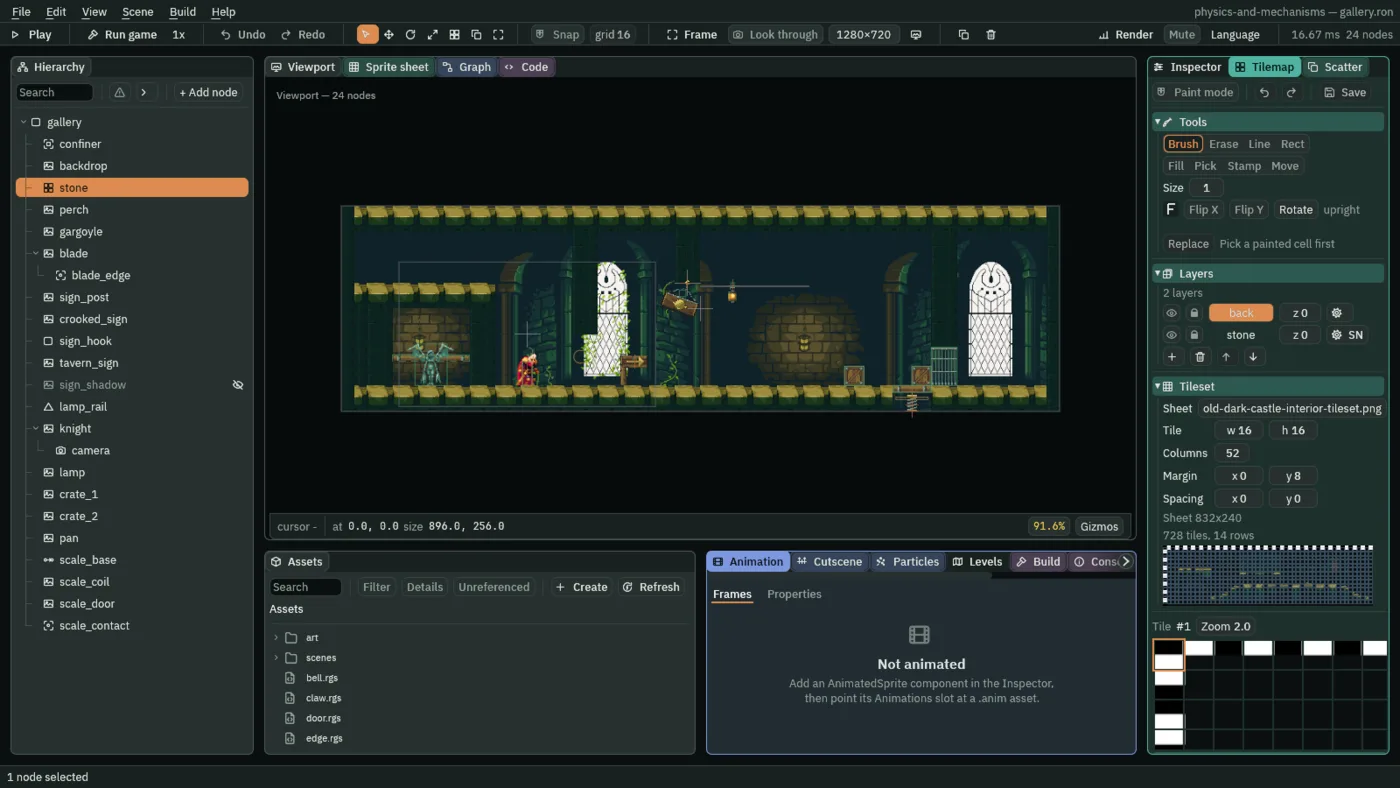
back and stone, and its Tileset with Margin x 0, y 8.| The gallery’s stone | Rows | Columns | Tiles, by the picker’s number (the sheet’s x, y) |
|---|---|---|---|
| The roof | 0 | 1 to 54 | the moss cap: #490 and #489 by turns, from #490 (336, 152 and 320, 152) |
| 1 | 1 to 54 | the stone under the cap: #542 and #541 by turns, from #542 (336, 168 and 320, 168) | |
| The west wall | 0 to 15 | 0 | the pillar’s body: #594 on the even rows and #646 on the odd (336, 184 and 336, 200) |
| The east wall | 0 to 15 | 55 | the pillar’s body: #593 on the even rows and #645 on the odd (320, 184 and 320, 200) |
| The pen’s slab | 6 and 7 | 1 to 11 | as the roof: the cap on row 6, from #490, and the stone under it on row 7, from #542 |
| The pen’s walls | 8 to 13 | 1 to 3, and 10 and 11 | the pillar’s body: on the even rows #594 in the odd columns and #593 in the even; on the odd rows #646 and #645 the same way |
| The blade’s pillar | 2 to 9 | 18 and 19 | the pillar’s body: #593 and #594 across on the even rows, #645 and #646 on the odd (320 and 336 across) |
| The tavern sign’s pillar | 2 to 5 | 26 and 27 | the same |
| The door’s wall | 2 to 10 | 46 and 47 | the same |
| The floor’s slab | 14 and 15 | 1 to 42, and 46 to 54 | as the roof: the cap on row 14 and the stone on row 15, #490 and #542 in the odd columns, #489 and #541 in the even; the three columns between are the pit |
- Margin
- The Tilemap tab’s Margin, in its Tileset fold: where the grid of tiles starts on the sheet, in pixels from its top-left corner. New tilemap… starts it at the corner,
0,0, and the castle’s tiles are8lower: the pillar’s cap begins at the sheet’s y152, which with no margin is half way down a row. With Margin y8, every row of the pillar is a whole tile you can pick. - New tilemap…
- The Tilemap tab’s button that makes a tilemap from the sheet dropped on it, beside the sheet, and points the selected Tilemap at it. It never overwrites: a name already taken gets
-2, then-3. Rename the file before you paint: the tab keeps unsaved work under the name it opened the file by. A file’s id goes with it when it is renamed, so the node still finds it.
Then the knight, copied from the tower. A copy keeps every component he has, his camera, and his scripts’ fields.
- Double-click
scenes/tower.ronin Assets. Selectknightand press Ctrl+C. - Double-click
scenes/gallery.ron. Right-clickgalleryin the Hierarchy and choose Paste as child. - Set the pasted knight’s Position to
232,224: on the floor, east of the pen. Press Ctrl+S.
A hopping gargoyle
In the pen at the gallery’s west end, a gargoyle hops along by itself: small hops, and every third a high one that takes it up to the pen’s roof, from where it comes down onto a plank across the pen, sits a while, and drops through. Its body is walked and jumped by its own script, not by the keys.
- Select
galleryand add a Sprite,perch, at Position112,190. Drag chapter 1’sart/scaffold-plank.pngonto Texture, set Draw Mode to Tiled, Size to96,8, Tile Size to48,8, and Sort Layer to1. Its Anchor stays0.5,0.5. - Click Add component and choose ColliderComponent. Set its Size to
96,8and tick One Way, as chapter 1’s scaffolding has it. - Select
galleryand add a Sprite,gargoyle, at Position112,224. Dragart/gargoyle.pngonto Texture, and set Size to62,56, Anchor to0.5,1and Sort Layer to2. - Click Add component and choose CharacterBodyComponent. Set its Size to
40,52, Driven By to Script, Gravity to1200and Jump Speed to300. In its Jumping fold, set Jump Cut to0.4and Air Jumps to1.
The plank runs across the whole pen, x 64 to 160, its top at y 186, 38 over the floor.
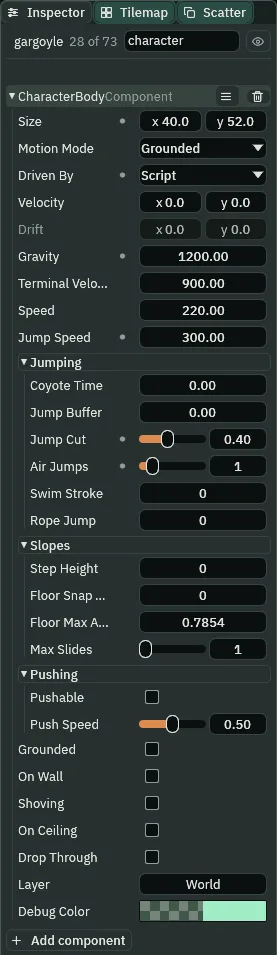
1200, Jump Speed 300, Jump Cut 0.40, Air Jumps 1.- Driven By › Script
- The Character Body’s Driven By, set to Script: the keys leave the body alone, and a script walks and jumps it. Its walk is its Velocity’s x, which the script writes every step with
set_number; its jumps are asked for withjump(), and gravity, walls and floors still act as on the knight. Chapter 5’s crates are driven by a script that says nothing; the gargoyle’s says a lot. - Air Jumps
- The Character Body’s Air Jumps, in its Jumping fold: how many jumps it may take in the air before it lands again, each a whole jump at its Jump Speed from wherever it is. A landing gives them back.
0, as it comes and as the knight keeps it, is no jump in the air; the gargoyle’s1is one, at the top of its high hop. A few suits a double or triple jump. - Jump Cut
- The Character Body’s Jump Cut, as chapter 3 set the knight’s: the share of a rising jump’s speed kept when the jump is cut, from
0to1. Letting go of Space cuts the knight’s;cut_jump()cuts the gargoyle’s. At0.4, a hop cut the step after it leaves the ground rises9where a whole jump rises35. - Gravity and Jump Speed
- The Character Body’s Gravity, in units a second each second, and Jump Speed, the speed a jump leaves with, in units a second. The gargoyle’s
1200and300make a heavy, low hop: a whole jump rises35, under the pen’s roof. The knight’s are2000and680. - Size
- The Character Body’s Size, on the gargoyle:
40by52, its stone body inside its62by56picture, without the wings’ tips. - One Way
- The Collider’s One Way, as chapter 1’s scaffolding has it: a body rises up through it from below and lands on it from above. The perch’s top is
38over the pen’s floor,3over the top of a whole jump.
The script asks for a jump every step it stands, cuts two hops in three as they leave the ground, and at the top of the third asks for one more: its air jump. Its body’s four hooks keep count, and its perch, picked in the Inspector, tells a landing on the plank from one on the floor.
- In Assets, click Create, choose New script, type
gargoyleand press Enter. In the Code tab, replace everything ingargoyle.rgswith the script below, and press Ctrl+S. - Select
gargoyle, click Add component and choose Gargoyle. Leave Speed and Rest as the script gives them. Click the picker button beside Perch and clickperchin the Hierarchy. Press Ctrl+S.
/// The gargoyle. It hops along its pen by itself: small hops, each cut short
/// as it leaves the ground, and every third a high one, an air jump at its
/// top that takes it up to the pen's roof, past its perch, a one-way plank
/// across the pen: it comes down on the perch, sits there a while, and drops
/// through it. A wall turns it round. Its body's hooks keep count, and the
/// Inspector shows the counts as it plays.
component Gargoyle : Body {
    /// How fast it hops along.
    #[suffix("u/s")]
    speed: f32 = 60.0,
    /// How many steps it sits on its perch before it drops through it.
    #[suffix("steps")]
    rest: i32 = 30,
    /// Its perch: the one-way plank it sits on.
    #[node_path]
    perch: i32 = 0,
    /// Which way it hops: 1 east, -1 west.
    #[readonly]
    way: f32 = 1.0,
    /// Its hops so far.
    #[readonly]
    hops: i32 = 0,
    /// Whether this hop is a high one.
    #[readonly]
    high: bool = false,
    /// Whether this hop's air jump is spent.
    #[readonly]
    spent: bool = false,
    /// Whether it sits on its perch.
    #[readonly]
    perched: bool = false,
    /// How many steps it has sat there.
    #[readonly]
    sat: i32 = 0,
    /// How many times it has dropped through its perch.
    #[readonly]
    drops: i32 = 0,
    /// How many times it has landed.
    #[readonly]
    landings: i32 = 0,
    /// How many walls it has met.
    #[readonly]
    walls: i32 = 0,
    /// How many times it has met the roof.
    #[readonly]
    bumps: i32 = 0,

    fn loop() {
        set_number("CharacterBodyComponent", "velocity.x", way * speed);
        if perched {
            sat += 1;
            if sat >= rest {
                drop_down();
            }
        } else if grounded() {
            jump();
        } else if high && !spent && velocity().y >= 0.0 {
            jump();
            spent = true;
        }
    }

    fn on_leave_ground() {
        if perched {
            perched = false;
            high = false;
            drops += 1;
        } else {
            hops += 1;
            high = hops % 3 == 0;
            if !high {
                cut_jump();
            }
        }
    }

    fn on_land() {
        landings += 1;
        spent = false;
        sat = 0;
        perched = position().y < position_of(node(perch)).y;
    }

    fn on_hit_wall() {
        walls += 1;
        way = -way;
    }

    fn on_hit_ceiling() {
        bumps += 1;
    }
}
component Gargoyle : Body- A script with a Body base: it goes on a node with a Character Body, and it hears the body’s four hooks below, besides
loop. Its fields are drawn in the Inspector; the#[readonly]ones (attributes) are counts you watch, not boxes you type into. #[node_path]- Gives a field a picker in the Inspector, beside it, that you point at a node: Perch keeps the node picked. In the script, node
(perch)is that node. - on_leave_ground
- Runs the step after its body leaves the ground, whether it jumped or dropped. The gargoyle counts a hop there and cuts it, or counts a drop when it was sitting on its perch.
- on_land
- Runs the step its body lands. The gargoyle counts the landing, gives its air jump back to its own count, and asks where it landed.
- on_hit_wall
- Runs when its body’s walk is stopped by a wall. The gargoyle turns its Way round, so it hops back the other way the next step.
- on_hit_ceiling
- Runs when its body’s rise is stopped by a ceiling: the gargoyle’s head on the pen’s roof. It only counts it.
- jump
- Asks its body to jump, as Space asks the knight’s, by its Coyote Time, Jump Buffer and Air Jumps: standing, it jumps; in the air, it jumps only while it has an air jump left.
- cut_jump
- Cuts a rising jump to its Jump Cut’s share, as letting go of Space does. Called in
on_leave_ground, a step after the jump, it makes a small hop. - velocity and grounded
- Read its body as the step began: its Velocity, and whether it stands.
velocity().yturned from rising (under0, since y grows downward) to0or more is the top of a jump. - drop_down
- Drops its body through the one-way plank it stands on, as S with Space drops the knight. On solid ground or in the air it does nothing. A drop leaves the ground as a jump does, so
on_leave_groundhears it too, falling rather than rising. - set_number
- Writes a number onto another component of this node.
"velocity.x"is one half of the Character Body’s Velocity: the gargoyle’s walk,60units a second either way. - position and position_of
position()is this node’s place in the world: the gargoyle’s feet.position_of(node(perch))is the perch’s, the middle of the plank. Landed with its feet above that, it is on the perch.
Its small hops are cut a step after they leave the ground and rise 9. Every third is a whole jump, which rises 35. The pen’s roof is 96 over its floor; standing, the gargoyle’s head is 44 under it, so a whole jump stops 9 short. At its top, where velocity().y turns downward, the script asks again, and its one air jump throws it up from there, up past its perch, to the roof. The perch is 3 over a whole jump’s top, so only the air jump takes the gargoyle past it, and from the roof it comes down on it. On the perch it walks on along the plank, counting out its Rest, 30 steps, half a second; then drop_down(), and it falls through to the floor. A wall turns it round.
- Select
gargoyle, so the Inspector shows its counts while the game runs, and press F5. The pen is just west of the knight, in the game camera’s view. - Watch ten seconds: small hops, and every third the high one to the roof, down onto the perch, a moment’s sit and a drop through. Hops, Drops, Landings, Walls and Bumps go up as it plays. Press F5 to stop.

8, 43, 46, 60, 86 and 96 (0.13, 0.72, 0.77, 1.00, 1.43 and 1.60 s), the editor in Play at 200%, framed on the perch, no key pressed: a small hop, 9 up; the top of a whole jump, 3 under the perch’s top; its air jump on step 45 takes it to the roof on 46; it lands on the perch on step 52 and sits there walking west; drop_down() on step 82 drops it through, and it lands on the floor on 96.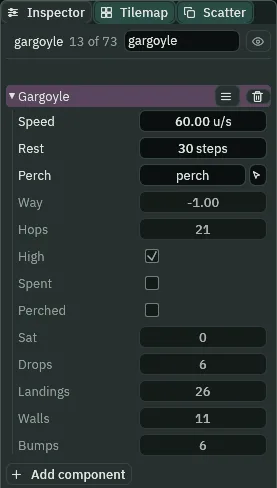
600 of the same run (10.00 s), gargoyle selected: 21 hops, 6 of them up to the roof (Bumps) and down onto the perch, 6 drops through it, 26 landings and 11 walls met, at x 84 and 140 in turn.Try it: no air jump, no cut, no drop
- Select
gargoyleand set its Air Jumps to0. Press F5: the high hop’s secondjump()is nothing, and it never reaches the roof, nor its perch,3over a whole jump. Press F5 to stop and set Air Jumps back to1. - Set its Jump Cut to
1. Press F5: the cut keeps all of the rise, and its small hops go up as high as a whole one. Stop, and set Jump Cut back to0.4. - In
gargoyle.rgs, delete the linedrop_down();and press Ctrl+S. Press F5: the first time it comes down on its perch it stays there for good, walking the plank from wall to wall. Stop, put the line back, and press Ctrl+S.
With Jump Cut at 1 a small hop rises 35, the whole jump’s height, since the cut keeps all of it.
A guillotine blade
Hung from the pillar east of the knight, a blade chops down out of the stone and back up, over and over. Its edge catches him only while the blade is down. The blade is an Animated Sprite whose one clip moves its picture down and up; its edge is an Area on a node of its own that names a track of that clip, and is in the world only on the frames the track covers.
- Select
gallery, click + Add node and choose Animated Sprite. Rename itbladeand set its Position to304,160: the foot of its pillar. - In its Sprite, drag
art/blade.pngonto Texture, and set Size to28,42, Anchor to0.5,1and Sort Layer to-1: behind the stone, so the blade is hidden while it is up in its pillar.
The clip is one picture, the whole blade, shown five times. Only each frame’s pivot moves it: the pivot is the point of the frame that sits on the node, so a pivot higher up the picture draws the blade lower.
- Double-click
art/blade.pngin Assets. The Sprite sheet tab opens on it. Under Grid, set Cell to28and42, the picture’s own size, and click cell0, 0: Selected 1 x 1. - Under Clips, press From selection. Name the clip
chop, choose Loop, and press Generate 1. A file,art/blade.anim, appears beside the picture. - Select
blade. In its Animated Sprite, dragart/blade.animonto Animations, typechopinto Clip, and tick Frame Size. Speed stays1and Playing ticked. - Open the Animation tab in the dock under the Viewport, and drag the border above the dock up to give it room. In the clip’s ruler, right-click its one frame and choose Hold this frame. Do it three more times: each makes a copy, so five frames now each show the whole picture.
- Under Frames, give each frame its seconds in dur and its pivot in pivot x and y, as the table below says, moving from one frame to the next with the transport row’s next-frame button.
- Under the frame strip, type
edgeinto Track name, choose Active, and press Add track. In theedgerow of the grid, click the third cell: frame2, counting from0, the frame the blade is down. Press Save, and Ctrl+S.
| Frame | dur, in seconds | Pivot x, y | Where the blade is |
|---|---|---|---|
| 0 | 0.8 | 0.5, 1 | up in its pillar |
| 1 | 0.05 | 0.5, 0.5 | half way down |
| 2 | 0.5 | 0.5, 0.143 | down, its edge at y 196, 2 into his head |
| 3 | 0.15 | 0.5, 0.33 | going back up |
| 4 | 0.15 | 0.5, 0.67 | nearly up |
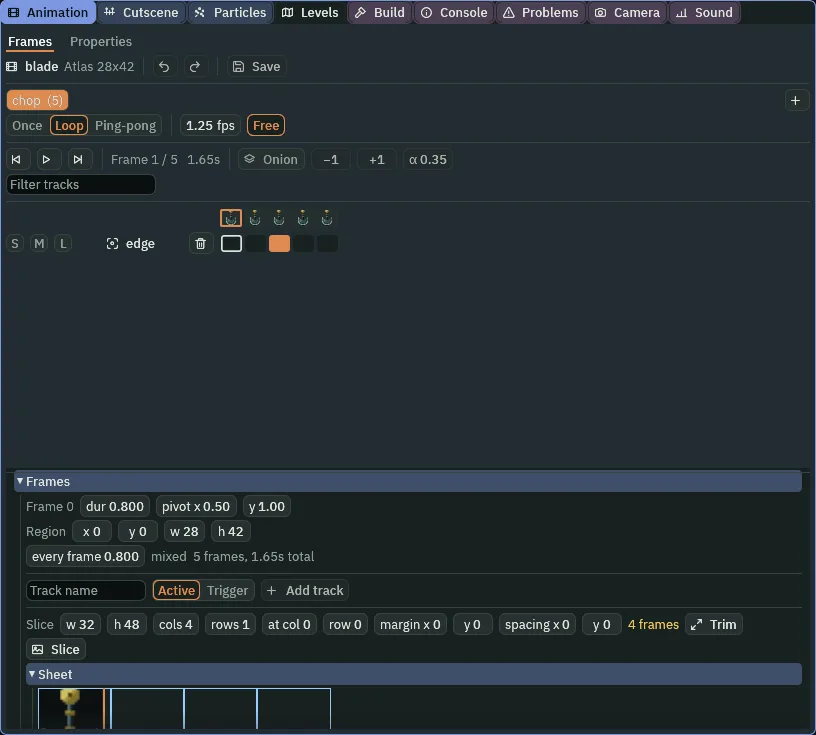
chop, five frames, Loop, 1.65 s round; its edge track Active on frame 2 alone. (The Slice row under it is the tab’s own, untouched.)The edge is a node of its own under the blade: a node whose Area names a track is hidden by the clip on every frame the track does not cover, and a hidden node’s Area notices nothing. On its own node, it is the edge that is hidden, not the blade’s picture.
- Select
blade, click + Add node and choose Node. Rename itblade_edgeand set its Position to0,28, under the blade’s node. - Click Add component and choose AreaComponent. Open its Shape, set Kind to Capsule and Size to
28,16: the crescent’s width, round at its tips. Click the button beside Mask, untick World and tick Knight. Typeedgeinto Track. - In Assets, click Create, choose New script, type
edgeand press Enter. Replace everything inedge.rgswith the script below, and press Ctrl+S. - Select
blade_edge, click Add component and choose Edge. Press Ctrl+S.
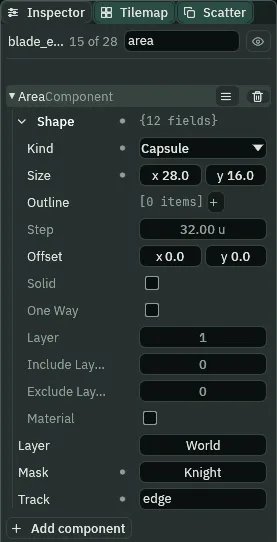
28 by 16, Mask Knight, Track edge./// The blade's edge. Its Area names the blade's `edge` track: it notices
/// only on the frames of the blade's chop that the track covers, when the
/// blade is down. It counts each time it catches the knight.
component Edge : Area {
/// How many times it has caught him.
#[readonly]
hits: i32 = 0,
fn on_enter() {
hits += 1;
}
}
- Track
- The Area’s Track: the name of an event track of the clip its node’s Animated Sprite plays, on its own node or one above it. Named, the Area is in the world only on the frames that track covers, and its node is hidden on the rest. Empty, as it comes, the Area is always in the world. Chapter 4 left it empty; the edge names
edge. - Kind › Capsule
- The Area’s Shape › Kind set to Capsule: a box rounded at its two ends by half its height, along its longer side. A Rectangle, as it comes, notices anything that reaches its box; a capsule leaves out the box’s corners, so the edge’s tips are round, as a crescent’s are.
- Size
- The Area’s Shape › Size: its box, in world units. For a capsule, its length and its thickness: the edge’s
28by16is round at each end with a radius of8. - Mask
- The Area’s Mask: the layers it notices, as chapter 4 set the plate’s. The edge notices the knight’s layer alone.
- Active
- An event track’s kind in the Animation tab: on while the clip shows a frame the track covers, a state held across those frames. A Trigger fires once as its frame begins. An Area’s Track reads an Active one.
component Edge : Area- A script with an Area base, like chapter 4’s plate: on_enter runs when something its Area notices comes into it. The edge counts each time it catches him in Hits.
- Select
blade_edge, so the Inspector shows its Hits, and press F5. Hold D until the knight is under the blade, and let go. - Stand there four seconds. Each time the blade comes down, its edge catches him once, the step it comes down, and Hits goes up by one; while it is up, nothing, though he stands under it the whole time. Press F5 to stop.
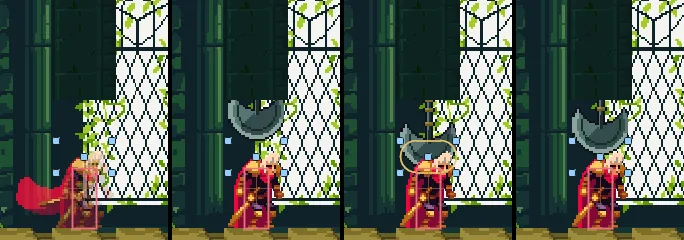
30, 50, 52 and 83 (0.50, 0.83, 0.87 and 1.38 s), the editor in Play at 200%, framed on the signpost, blade_edge selected: D held from step 0 to 27 stands him under the blade. The clip’s first frame holds to step 48 and its second from 49 to 51; its third, the one the edge track covers, from step 52 to 81, and the edge is in the world, its capsule drawn, only then; its fourth from 82. It caught him on step 52, and catches him again on 151 and 250, 99 steps, one chop, apart.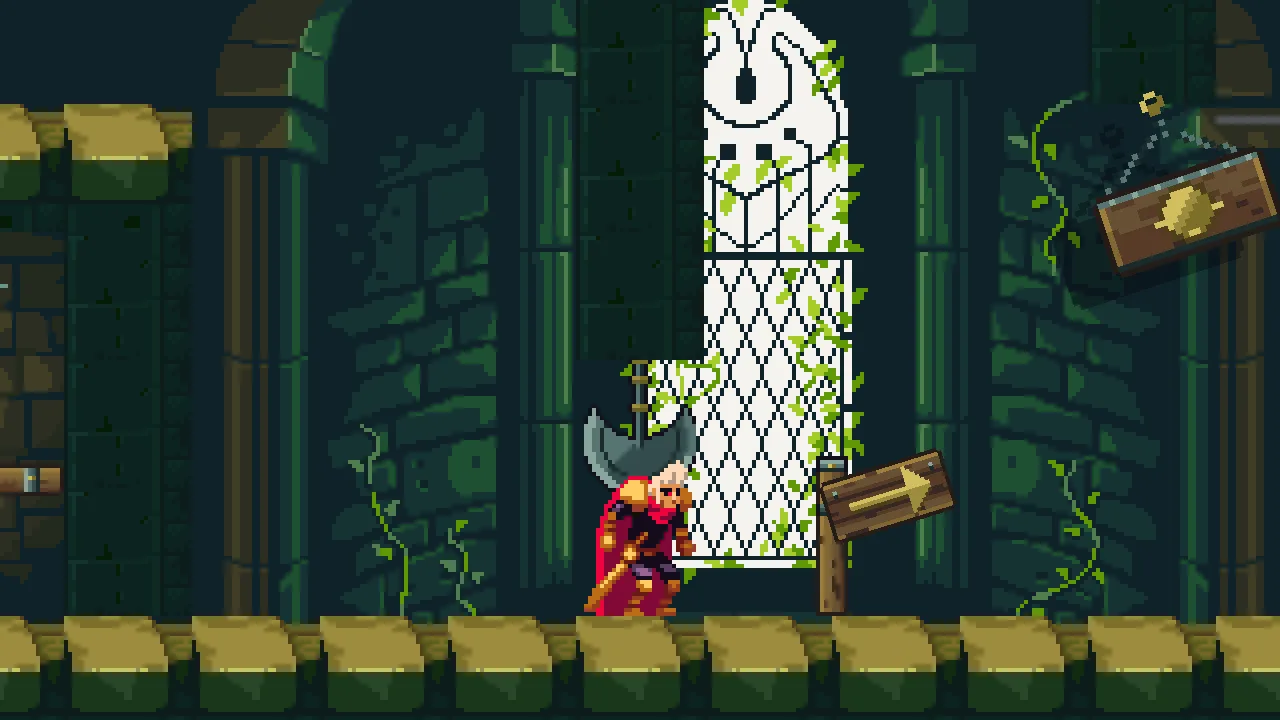
52 (0.87 s), the step the blade comes down on him: D held from step 0 to 27.The edge is a Capsule, and its middle line is 6 over his head, so under the blade he is caught. But stood at a tip, his head grazing only the corner of the box round the edge, he is outside the round, and the blade comes down past him. Walked a step at a time east from under it, a whole chop at each, he is caught at x 320, his box 0.8 into the round; at 322.7 his box is still inside the box round the edge, 1 outside its round, and it is not.
Try it: no track, and a square edge
- Select
blade_edgeand empty its Track. Press F5 and hold D as before: the edge is always in the world, and it catches him once, as he walks under it, and never again however often the blade comes down. Stop, and typeedgeback into Track. - Select
knightand set his Position to322.7,224: under the edge’s east tip. Selectblade_edge, press F5, and press nothing: the blade comes down past him, and Hits stays0. Stop. - Set the edge’s Shape › Kind to Rectangle. Press F5: each time the blade comes down, the square edge catches him at the same stand, and Hits goes up by one. Stop, set Kind back to Capsule, and set the knight’s Position back to
232,224.
At x 322.7 his box is inside the box round the edge and 1 outside its round tip. The stands where the square catches him and the round does not make a band about one step of his walk wide, so a tap of D may step over it: the try-it sets his Position instead.
A crooked sign
East of the blade, a signpost holds a board nailed on crooked. The board is drawn straight and turned by a weld: a Fixed joint holds it at its target’s turn plus a Weld Angle, on its nail, every step, against its own weight.
- Select
galleryand add a Sprite,sign_post, at Position352,224. Dragart/sign-post.pngonto Texture, and set Size to8,40, Anchor to0.5,1and Sort Layer to1. - Select
galleryand add a Sprite,crooked_sign, at Position366,194. Dragart/sign-crooked.pngonto Texture, and set Size to32,16and Sort Layer to2. Leave its Rotation at0: it is drawn straight. - Click Add component and choose CharacterBodyComponent: Size
4,4, Driven By Script. - Click Add component and choose JointComponent. Set Kind to Fixed, type
sign_postinto Target, set Target Anchor to14,-30, where on the post it is nailed, and Weld Angle to-17.19. Press Ctrl+S.
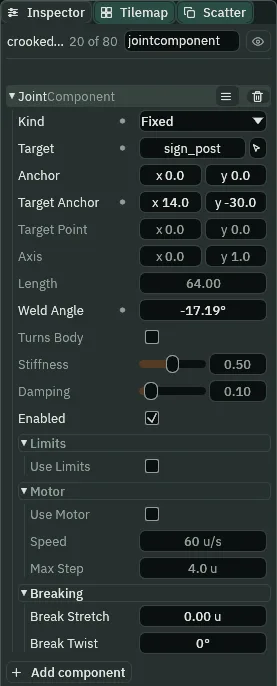
14, -30, its Weld Angle -17.19°.- Kind › Fixed
- The Joint’s Kind for a weld, as chapter 8’s lantern has it: it holds its Anchor on its Target Anchor and its node turned at the target’s turn plus Weld Angle, set true again each step. The post never turns, so the board is held at the Weld Angle itself.
- Weld Angle
- The Joint’s Weld Angle, which only a Fixed joint reads: how far the weld holds its node turned from its Target, in degrees in the Inspector.
0, as it comes and as the lantern keeps it, is turned as the target is. The board’s-17.19(-0.3of a radian, as the scene file keeps it) tips its west end down. A few degrees reads as a crooked nail. - Target Anchor
- The Joint’s Target Anchor: its end on the post, in the post’s own units from its node, the post’s foot.
14,-30is30up the post and14east of it, where the board’s middle is laid.
Saved straight, the board is turned crooked on the very first step of Play, and held there.
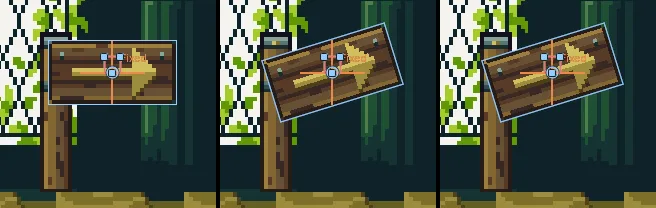
0, 1 and 60 (0.00, 0.02 and 1.00 s), the editor in Play at 400%, framed on the signpost, crooked_sign selected: drawn straight as saved, crooked from step 1, and held there.Try it: a square weld
- Select
crooked_signand set its Joint’s Weld Angle to0. - Press F5: the board hangs square on its post. Press F5 to stop.
- Set Weld Angle back to
-17.19.
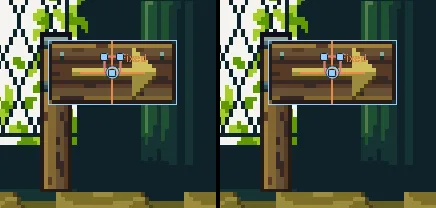
0: steps 0 and 60 (0.00 and 1.00 s), framed as the strip above. The weld holds the board as the post is turned: square.A tavern sign and its shadow
Under the second pillar hangs a tavern sign on a hook, swinging. When the lamp beside it, built in the next section, hangs by it, the sign casts a shadow on the wall behind, down and west of it, turned and sized as the sign is. The shadow is a picture of its own; a Remote Transform on the sign puts it there, and a script on the sign switches the Remote Transform on and off.
- Select
gallery, click + Add node and choose Node. Rename itsign_hookand set its Position to432,96: the foot of its pillar. - Select
galleryand add a Sprite,tavern_sign. Dragart/swing-sign.pngonto Texture, and set Size to32,28and Sort Layer to1. Set its Scale to1.5,1.5, its Rotation to20and its Position to425.8436,112.9145: its ring on the hook, the sign let go20°out. - Click Add component and choose CharacterBodyComponent: Size
8,8, Driven By Script, Gravity300. - Click Add component and choose JointComponent. Leave Kind at Pin. Type
sign_hookinto Target, set Anchor to0,-18, and tick Turns Body. - Click Add component and choose RemoteTransformComponent. Type
sign_shadowinto Target. Position stays ticked; tick Rotation and Scale. Set Offset to-10,8, and untick Enabled. - Select
galleryand add a Sprite,sign_shadow, at Position415.8436,120.9145. Dragart/swing-sign-shadow.pngonto Texture, and set Size to32,28and Sort Layer to-2, behind the sign. Leave it unturned at its own size, and untick its Visible. - In Assets, click Create, choose New script, type
shadeand press Enter. Replace everything inshade.rgswith the script below, and press Ctrl+S. - Select
tavern_sign, click Add component and choose Shade. Click the picker beside Shadow and clicksign_shadowin the Hierarchy. Press Ctrl+S.
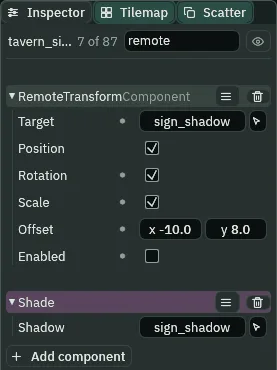
sign_shadow, its place, turn and size, by Offset -10, 8, saved switched off; the Shade script under it./// The tavern sign's shadow. The lamp's `lit` switches on the Remote
/// Transform on this node, which puts the shadow where the sign is, by its
/// Offset, turned and sized as the sign is, every step; and it shows the
/// shadow. The lamp's `dark` switches both off. A step that hears both ends
/// lit.
component Shade {
/// The shadow: the node the Remote Transform copies onto.
#[node_path]
shadow: i32 = 0,
fn on_signal() {
if heard("dark") {
set_flag("RemoteTransformComponent", "enabled", false);
set_visible(node(shadow), false);
}
if heard("lit") {
set_flag("RemoteTransformComponent", "enabled", true);
set_visible(node(shadow), true);
}
}
}
- Anchor and Turns Body
- The Joint’s Anchor, on the sign:
0,-18is its ring,12over its middle times its Scale of1.5. With Turns Body ticked, a Pin is a hinge: it holds the ring on the hook and the sign’s middle the Anchor’s length from it, wherever the swing has it, and turns the sign to hang from its ring, as chapter 7’s bob hangs from its pivot. - Gravity
- The Character Body’s Gravity, on the sign:
300, light, so a swing there and back takes about1.5s, as a pendulum18long takes under that gravity, 2π√(18÷300) =1.54s: the strip below has it back on step92,1.53s. - The Remote Transform’s Target
- The node the sign’s Remote Transform copies the sign onto:
sign_shadow, typed by name. - The Remote Transform’s Position
- Whether it copies the sign’s place onto the shadow. It comes ticked, and the sign keeps it so: the shadow goes where the sign is, by the Offset.
- The Remote Transform’s Rotation
- Whether it copies the sign’s turn. Ticked, the shadow swings as the sign does.
- The Remote Transform’s Scale
- Whether it copies the sign’s size. Ticked, the shadow is drawn half as big again as its own picture, because the sign is: its Scale is
1.5. It comes unticked. - The Remote Transform’s Offset
- Added to the copied place, in world units:
-10,8sets the shadow10west of the sign and8lower, on the wall behind, as a lamp up and east of it would throw it. It comes0,0. - The Remote Transform’s Enabled
- Whether it copies right now. The sign’s is saved unticked, and
shade.rgsticks it when the lamp sayslitand unticks it atdark. Unticked, the shadow stays wherever it was last left. - set_visible
- Shows or hides a node:
set_visible(node(shadow), true)shows the shadow picked in Shadow. A Remote Transform copies place, turn and size, never whether a node is shown, so the script does both. - set_flag
- Ticks or unticks a box on another component of this node:
set_flag("RemoteTransformComponent", "enabled", true)ticks the Remote Transform’s Enabled. The Remote Transform is on the sign, so the sign’s script switches it.
The shadow waits for the lamp. Build it next, then play the two together.
A lamp that snaps between hooks
A lamp hangs from a rail running east from the tavern sign’s pillar, and every two seconds it snaps from one hook to the other. It is a body on a Target joint, as chapter 9’s claw was: a joint that pulls its body toward a point in the world, its Target Point. The claw’s script walked its point smoothly; the lamp’s script makes it jump 80 at once, and there the joint’s Damping shows.
- Select
galleryand add a Node,lamp_rail, at Position528,100. - Click Add component and choose LineComponent. Under Points, press + twice and set the two to
-80,0and56,0: from the sign’s pillar east. Set Width to2and Color to0.08,0.09,0.1, alpha1. Leave Joint at Flat, and set Sort Layer to1. - Click
knightin the Hierarchy and press Ctrl+Down until he is just underlamp_rail: nine times, each one slot down among the gallery’s nodes. The lamp and the scale are built after him, as the picture at the top of the page lists them. - Select
galleryand add a Sprite,lamp, at Position488,100. Drag chapter 8’sart/lantern.pngonto Texture, and set Size to14,22, Anchor to0.5,0, hung by its ring, and Sort Layer to2. - Click Add component and choose CharacterBodyComponent: Size
4,4, Driven By Script, Gravity0. - Click Add component and choose JointComponent. Set Kind to Target, Target Point to
488,100, Stiffness to0.05and Damping to0.03. - In Assets, click Create, choose New script, type
lampand press Enter. Replace everything inlamp.rgswith the script below, and press Ctrl+S. Selectlamp, click Add component and choose Lamp; its Near, Far and Stay stay as the script gives them. - Click Add component and choose SignalComponent. Add two connections, as chapter 4’s plate has them: Signal
lit, Totavern_sign, and Signaldark, Totavern_sign. Press Ctrl+S.
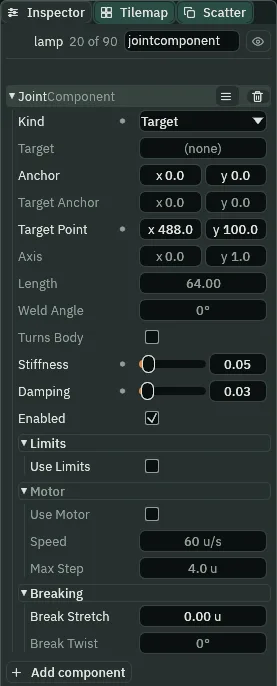
488, 100, a soft Stiffness of 0.05, Damping 0.03./// The lamp. The Target on this node pulls it toward its Target Point, a hook
/// on its rail: this snaps that point from one hook to the other and back,
/// and the lamp swings across after it. It says `lit` as it goes to the hook
/// by the tavern sign, and `dark` as it leaves it; its Signal wires both to
/// the sign.
component Lamp {
/// The hook by the sign, where its light casts the sign's shadow.
near: Vec2 = vec2(488.0, 100.0),
/// The hook away from it.
far: Vec2 = vec2(568.0, 100.0),
/// Seconds it stays on each hook.
#[suffix("s")]
stay: f32 = 2.0,
fn loop() {
set_point("JointComponent", "target_point", near);
emit("lit");
await wait(stay);
set_point("JointComponent", "target_point", far);
emit("dark");
await wait(stay);
}
}
- Target Point
- The Joint’s Target Point, which only a Target reads: where it pulls its body, in world units. Saved on the near hook,
488,100;lamp.rgssets it to the far hook,568,100, and back. - Stiffness
- The Joint’s Stiffness: the share of the way to its point a Target pulls each pass, from
0to1. The lamp’s0.05is soft: after its point jumps, the lamp swings across to it over a few dozen steps, as the strip below shows. - Damping
- The Joint’s Damping: the share of its body’s speed each pass takes off, from
0to1. Chapter 9’s claw walked its point slowly and its Damping hardly showed. Here the point jumps: at0.03the lamp swings27past the far hook and is settled on it within29steps. A new Joint’s is0.1. - Gravity
- The Character Body’s Gravity, on the lamp:
0. Nothing but its joint moves it. - Points, Width and Color
- The Line’s, as chapter 13’s rope has them: the rail’s two points,
136apart along the line from the pillar east, in the node’s own units; a stroke2thick; and a dark iron colour. - Joint › Flat
- The Line’s Joint as it comes: its ends square, and nothing laid on its corners. The rail is open, two ends and no corner, so it is one bar with square ends.
- Sort Layer
- The Line’s Sort Layer: the rail’s
1draws it over the wall and the stone, and under the lamp on2. - set_point
- Writes a pair of numbers onto another component of this node at once:
set_point("JointComponent", "target_point", far)moves the joint’s Target Point to the far hook in one step. The script moves the point, never the lamp. - emit and wait
emit("lit")sayslit, which the lamp’s Signal carries totavern_sign, whereshade.rgshears it.await wait(stay)holds theloopon that line for Stay seconds,2, before it carries on.
The lamp and the sign in Play
- Select
lampand press F5. Move the pointer over the Viewport and press F to frame the lamp, with the tavern sign beside it. - Watch the lamp: two seconds on the near hook, then its point jumps to the far hook and the lamp swings across after it, past the hook, back, and settles. Two seconds later it swings back.
- Watch the sign: it swings on its hook,
20°each way, for good. While the lamp is on the near hook, its shadow swings with it on the wall, faint on the dark stone; while the lamp is away, the shadow is gone. Press F5 to stop.

122, 128, 137, 143 and 152 (2.03, 2.13, 2.28, 2.38 and 2.53 s), the editor in Play at 200%, framed on the rail, lamp selected, no key pressed: its script sets the point on the far hook, the cross, on step 122; the lamp is 27 past it on step 128, 5.7 short on 137, 2.5 past on 143, and on the hook from about step 151.
0, 23, 45, 92 and 150 (0.00, 0.38, 0.75, 1.53 and 2.50 s), the editor in Play at 200%, framed on the rail, tavern_sign selected, no key pressed: let go 20° out, level on step 23, 20° the other way on 45, back on 92. The lamp says lit on step 1, and the shadow is shown from step 2 and on the sign from 3; the lamp says dark on step 122, the shadow is hidden from 123, and on step 150 the sign swings alone.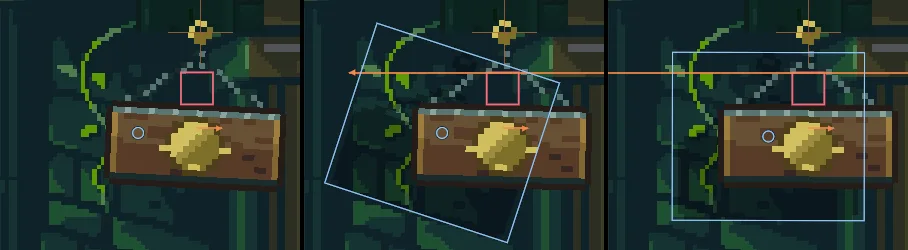
487, 488 and 489 (8.12, 8.13 and 8.15 s), the editor in Play at 400%, framed on the sign’s hook, sign_shadow selected so its outline is drawn while it is shown, no key pressed: hidden, the step the lamp says lit; shown where it was left at the last dark, on step 365, when the sign was turned about 18°; on the sign by its Offset, level as the sign is.Try it: no damping, a lot of damping
- Select
lampand set its Joint’s Damping to0. Press F5 and press F over the Viewport: the lamp swings further past the far hook, and is longer settling. Stop. - Set Damping to
0.3. Press F5: the lamp creeps onto each hook and never passes it. Stop, and set Damping back to0.03.
With no Damping the lamp swings 39 past the far hook and takes 50 steps to settle, against 27 and 29 at 0.03; at 0.3 it never passes the hook, and settles in 9.

0: the same steps, 122, 128, 137, 143 and 152, framed as the strip above: 39 past on step 128, 16 short on 137, 9 past on 143, still swinging on 152; on the hook from about step 172.Try it: the sign without a hinge, the shadow at its own size
- Select
tavern_signand untick its Joint’s Turns Body. Press F5: the pin holds the sign’s middle straight under the hook, the board still turned as it was saved, and it does not swing. Stop, and tick Turns Body again. - Untick its Remote Transform’s Scale. Press F5: the shadow is its picture’s own size, smaller than the sign. Stop, and tick Scale again.
A scale that opens a door
At the gallery’s east end, a pan lies flush with the floor over a pit, a crate on it, against a door. One crate does not weigh it down; the knight shoves a second crate onto it beside the first, and the two take it down to a stop, where a contact under it opens the door.
- Double-click
scenes/tower.ron, select chapter 5’scrate_1and press Ctrl+C. Double-clickscenes/gallery.ron, right-clickgalleryand choose Paste as child. The copy keeps its name,crate_1: set its Position to724,224. - Right-click
galleryand choose Paste as child again. This copy is namedcrate_1too: rename itcrate_2and set its Position to640,224: on the floor, west of the pit. - Select
galleryand add a Sprite,pan, at Position712,232. Dragart/scaffold-plank.pngonto Texture, and set Size to48,8and Anchor to0.5,1: its top at224, flush with the floor. - Click Add component and choose CharacterBodyComponent: Size
46,8, Driven By Script. Then a ColliderComponent: Size48,8, Offset0,-4. Then an AreaComponent: its Shape Size48,8, Offset0,-4, and its Mask set to nothing: the contact below looks for the pan, not the other way. - Click Add component and choose JointComponent. Set Kind to Spring, type
scale_baseinto Target, and set Length to84and Stiffness to0.003. Damping stays0.1. - Select
galleryand add a Node,scale_base, at Position712,256, the pit’s foot. It comes afterpanin the Hierarchy. - Click Add component and choose JointComponent. Set Kind to Slider and type
paninto Target. Axis stays0,1. Tick Use Limits, and set Min to16and Max to24. - Select
galleryand add a Sprite,scale_coil, at Position712,256. Drag chapter 9’sart/spring-coil.pngonto Texture, and set Size to16,20, Anchor to0.5,1and Sort Layer to1: in the pit, under the pan. - Select
galleryand add a Sprite,scale_door, at Position752,176, in the doorway: chapter 4’s portcullis again. Dragart/portcullis.pngonto Texture, set Draw Mode to Tiled, Size to32,48, Tile Size to16,48, Anchor to0.5,0and Sort Layer to-1. Add a ColliderComponent, Size32,48, Offset0,24, and chapter 4’s Door script. - Select
galleryand add a Node,scale_contact, at Position712,240, where the pan’s foot is at its bottom stop. Add an AreaComponent with its Shape Size40,3; its Mask stays World, the pan’s Area’s layer. Add chapter 4’s Plate script, and a SignalComponent: Signalpressed, Toscale_door, and Signalreleased, Toscale_door. Press Ctrl+S.
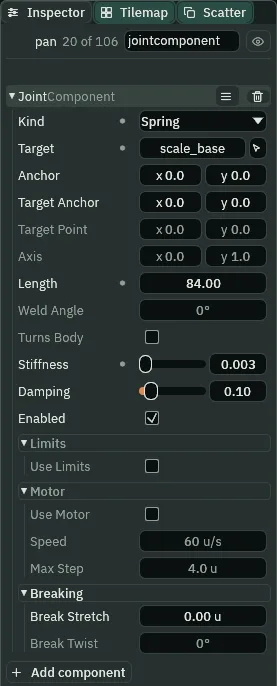
84, Stiffness 0.003.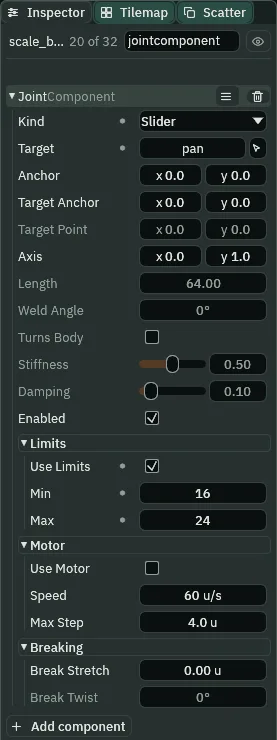
16 and Max 24.- Kind › Spring and Slider
- The Joint’s Kind, as chapter 9’s board and lift have them: a Spring pushes and pulls its ends toward Length apart, by Stiffness; a Slider holds its Target on a line along Axis and, with Use Limits, between Min and Max along it. A Spring does not read the limits; a Slider does. So the pan has both, on two nodes.
- Use Limits
- The Joint’s Use Limits: ticked on the base’s Slider, it keeps the pan’s height over the base, along Axis, between Min and Max.
- Min
- The Joint’s Min: the near end of a Slider’s range, in world units, shown only with Use Limits ticked. The base’s
16is the pan’s bottom stop,8under the floor. - Max
- The Joint’s Max: the far end of the range. The base’s
24is the pan’s top stop, its top flush with the floor. - Length
- The Joint’s Length, on the pan’s Spring: how far apart it pushes its ends, in world units.
84is over three times the24it is laid at, so the spring is squashed: it presses the pan up against its top stop, and what stands on the pan must outweigh that before the pan moves. - Stiffness
- The Joint’s Stiffness, on the Spring: how hard it pushes toward its Length, from
0to1.0.003is very soft; squashed by60, it is still enough to hold one crate up. - Axis
- The Joint’s Axis, on the Slider: the way its line runs from the base,
0,1, down, as it comes. Along it, the pan’s height over the base is its measure.
The base comes after the pan in the Hierarchy, so its Slider is solved after the Spring each step, and the pan ends each step on a stop or between them. One crate does not outweigh the spring: as saved, the pan stays at its top, the door shut.
- Select
panand press F5. Hold D: the knight walks east tocrate_2and shoves it east onto the pan, besidecrate_1. Let go of D when the two crates meet. - Hold A a moment to walk him back off the pan. The two crates take it down to its bottom stop, the contact under it says
pressed, and the door goes up. Press F5 to stop.

210, 236, 250 and 262 (3.50, 3.93, 4.17 and 4.37 s), the editor in Play at 200%, framed on the coil, pan selected: D held from step 60 to 238, then A from 238 to 258. The second crate meets the first on step 236; the pan is at its bottom stop, 16.6 over its base, by step 259, and the door is up.Try it: a stop the contact cannot feel, a weaker spring
- Select
scale_baseand set its Joint’s Min to18. Press F5 and shove the second crate on as before: the pan stops2higher, the contact never feels it, and the door stays shut. Stop, and set Min back to16. - Select
panand set its Joint’s Length to64. Press F5: the saved crate alone sinks the pan, and the door opens at once. Stop, and set Length back to84.
The crate puzzle
The second scene is a room seen from above, 24 cells by 18, a wall of the pillar’s body all round, the floor the camera’s own dark. In its north-east corner, behind a fence, is a pen with two marks on its floor where two crates belong. The knight floats: seen from above there is no down.
- Choose File › New scene. Add a Node, rename it
crate_puzzle, and choose File › Save as…:scenes/crate_puzzle.ron. - Select
crate_puzzleand add a Camera Confiner,confiner, at Position192,144, with Bounds384,288. Until the camera arrives with the knight,confinercarries a warning, and Problems reads “This Confiner works on the active camera and this scene has no active Camera”: leave it. - Select
crate_puzzleand add a Tilemap,stone. In the Tilemap tab, drag the castle’s tileset onto New tilemap…: this time the file isart/old-dark-castle-interior-tileset-3.tilemap, since the gallery’s tilemap kept the id the-2name gave it, so that name is not free. Rename itcrate-puzzle.tilemapin Assets. - Set the Tileset Margin y to
8. In the Layers fold, double-clickground, press Ctrl+A, typestone, and press Enter; then clickstone, so you paint on it. - Click Rect, which turns on Paint mode, and paint the wall round the room as the table below sets out, as you painted the gallery’s: each tile by its number in the picker, and a run of two by turns with Pick and Stamp. Press the tab’s Save, and Ctrl+S.
| The puzzle’s stone | Rows | Columns | Tiles, by the picker’s number (the sheet’s x, y) |
|---|---|---|---|
| The north wall | 0 | 0 to 23 | the pillar’s body: #593 and #594 by turns, from #593 (320, 184 and 336, 184) |
| The west wall | 1 to 16 | 0 | #645 on the odd rows and #593 on the even (320, 200 and 320, 184) |
| The east wall | 1 to 16 | 23 | #646 on the odd rows and #594 on the even (336, 200 and 336, 184) |
| The south wall | 17 | 0 to 23 | #645 and #646 by turns, from #645 (320, 200 and 336, 200) |
The floor inside runs from x 16 to 368 and y 16 to 272. The pen is x 224 to 368, y 16 to 112. Its marks and its fence come first; the crates and the knight, pasted from the gallery, come after them.
The marks
A mark is a dim decal on the floor with an Area that looks for crates. While a crate stays on it, its script fills it, and its picture brightens.
- In Assets, click Create, choose New script, type
markand press Enter. Replace everything inmark.rgswith the script below, and press Ctrl+S. - Select
crate_puzzleand add a Sprite,mark_1, at Position296,30: straight up from where the gate will be, its top edge on the north wall’s face. Dragart/floor-mark.pngonto Texture, set Size to28,28and Sort Layer to1, a decal on the floor, and its Color’s alpha to0.3, dim. - Add an AreaComponent: Shape Size
20,20, Mask Crate. Add the Mark script; its Fill stays1. - Duplicate
mark_1, rename the copymark_2, and set its Position to236,52: against the pen’s west side. Press Ctrl+S.
/// A mark where a crate belongs. Its Area looks for crates. While a crate
/// stays on it the mark fills, a step's share of its Fill seconds every step,
/// and its picture brightens from dim to whole as it does. A crate shoved off
/// leaves it as full as it got.
component Mark : Area {
    /// Seconds a crate must stay on it to fill it.
    #[suffix("s")]
    fill: f32 = 1.0,
    /// How full it is, from 0 to 1.
    #[readonly]
    filled: f32 = 0.0,

    fn while_in() {
        filled = min(filled + dt / fill, 1.0);
        set_colour("SpriteComponent", "color", vec4(1.0, 1.0, 1.0, 0.3 + 0.7 * filled));
    }
}
- while_in
- The third hook of a script with an Area base, beside
on_enterandon_exit: it runs every step another Area is still on this one, withotherand the step’sdt. The step a crate comes on is anon_enter’s step, andMarkhas none, so nothing happens yet; from the next step, every step the crate stays,while_infills the mark by the step’s length ÷ Fill: with Fill1s, a sixtieth of the way each step. dt- The step’s length in seconds,
1÷60at the project’s sixty steps a second.while_inandloopare given it;on_enteris not. - set_colour, vec4 and min
set_colourwrites a colour onto another component of this node, here the Sprite’s Color, red, green, blue and alpha,vec4(…). Its alpha goes from the0.3it was saved with to whole as Filled goes to1;min(…, 1.0)stops Filled at1.
The fence, its gate and its bell
The fence round the pen is one Line: closed, so it runs all round; round at its corners; on a Sort Layer of its own between the marks and the crates. Under it are its solid sides, a gate that is not solid, its posts and a bell.
- Select
crate_puzzleand add a Node,fence. Its Position stays0,0, so every place under it is the world’s. - Click Add component and choose LineComponent. Under Points, press + four times and set them to
224,18;366,18;366,112; and224,112. Set Width to3, Color to0.22,0.12,0.05, alpha1, Joint to Round, tick Closed, and set Sort Layer to2. - Select
fenceand add four Nodes, each with a ColliderComponent:fence_westat Position224,65, its Collider Size4,98;fence_south_1at248,112, Size48,4;fence_south_2at344,112, Size48,4; andgateat296,112, Size48,4. In the gate’s Collider, untick Solid. - Select
fenceand add five Sprites, the posts: dragart/fence-post.pngonto each one’s Texture, and set Size to8,24, Anchor to0.5,1and Sort Layer to3.post_1at224,18andpost_2at224,112, the west side’s ends;post_3at272,112andpost_4at320,112, the gate’s sides;post_5at366,112, the pen’s south-east corner. - In Assets, click Create, choose New script, type
belland press Enter. Replace everything inbell.rgswith the script below, and press Ctrl+S. - Select
fenceand add a Sprite,gate_bell, at Position344,114: hung under the fence’s south side, east of the gateway. Drag chapter 13’sart/bell.pngonto Texture, and set Size to32,34, Anchor to0.5,0and Sort Layer to4. - Add an AreaComponent. Open its Shape: Kind Circle, Size
48,48, Offset-48,-2, round the gateway and centred in it. Set its Mask to Knight and Crate. Add the Bell script. Press Ctrl+S.
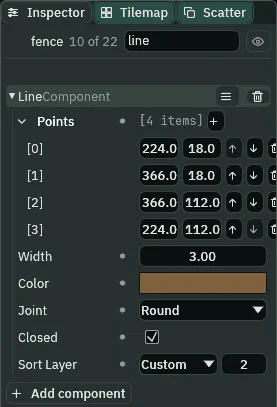
3, Joint Round, Closed, Sort Layer 2.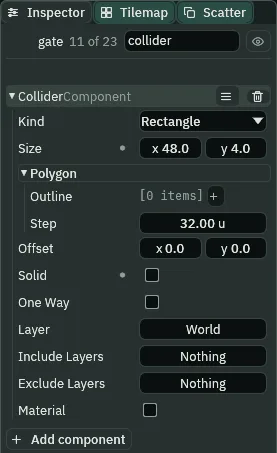
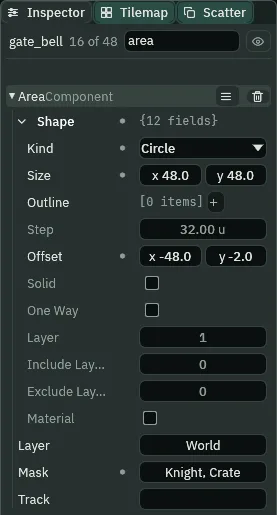
48 across, Offset -48, -2 into the gateway, Mask Knight and Crate./// The bell by the pen's gate. Its Area reaches across the gateway: each
/// thing that comes into it, the knight or a crate, rings it — it swings
/// over — and is counted.
component Bell : Area {
/// How many times it has rung.
#[readonly]
rung: i32 = 0,
fn on_enter() {
rung += 1;
set_flag("SpriteComponent", "flip.x", rung % 2 == 1);
}
}
- Closed
- The Line’s Closed, ticked on the fence: its last point joins back to its first, so four points draw all four sides of the pen. Unticked, as it comes and as the rail and chapter 13’s rope keep it, the line has two ends.
- Joint › Round
- The Line’s Joint set to Round: a disc on every corner, the joining one too, so the corners show no gap at a slant. Flat, as the rail has it, puts nothing there; RoundCaps, the rope’s, rounds its two ends as well.
- Sort Layer
- The Line’s Sort Layer on the fence:
2, over the marks on1, so wheremark_2runs under the fence’s west side the fence is on top, and under the posts and the crates on3and the knight. Set to0, it goes under them: a try-it below. - Points, Width and Color
- The Line’s, on the fence: its four corners in the world’s units, since
fencesits at the origin; a stroke3thick; a dark wood. - Solid
- The Collider’s Solid, unticked on the gate: a Collider with Solid off stops nothing and notices nothing. It is not a trigger, as it would be in Unity or Godot, and no script hears it. The gate is a swing gate saved open, the fence’s Line drawn across it shut; what notices what comes through is the bell’s Area beside it. The fence’s sides keep Solid ticked, as it comes.
- Kind › Circle
- The Area’s Shape › Kind set to Circle: round, its radius the smaller half of its Size,
24, centred where the box would be. What is inside the box round the circle but outside the circle, near its corners, is not noticed. - Offset
- The Area’s Shape › Offset: where its shape sits from its node, in world units. The bell hangs east of the gate, so
-48,-2moves its reach west, into the gateway. - Mask
- The Area’s Mask on the bell: Knight and Crate, so it rings for him and for each crate.
component Bell : Area- Rings for each thing that comes into its Area: on_enter counts it in Rung and turns its picture over with
set_flag("SpriteComponent", "flip.x", …), so the bell swings from one side to the other.
The crates and the knight
The crates and then the knight go last, after the fence, as the Hierarchy in the picture of the finished puzzle below lists them. Each step the bodies move in the order the Hierarchy lists them, and a crate takes a shove as it next moves, so their order decides on which step a shoved crate goes.
- Double-click
scenes/gallery.ronin Assets, selectcrate_1and press Ctrl+C. Double-clickscenes/crate_puzzle.ron. - Right-click
crate_puzzlein the Hierarchy and choose Paste as child. The copy keeps its name,crate_1: set its Position to296,176, under the gate. - Right-click
crate_puzzleand choose Paste as child again. This copy is namedcrate_1too: rename itcrate_2and set its Position to296,232, under the first. - In each crate, set its Sprite’s Sort Layer to
3and its Character Body’s Motion Mode to Floating. Press Ctrl+S. - Double-click
scenes/gallery.ron, selectknightand press Ctrl+C. Double-clickscenes/crate_puzzle.ron, right-clickcrate_puzzleand choose Paste as child. Set his Position to296,268, and in his Character Body set Motion Mode to Floating. Select hiscameraand set its Position to0,-15, his middle. Press Ctrl+S.
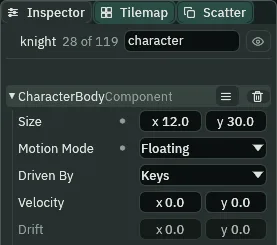
- Motion Mode › Floating
- The Character Body’s Motion Mode set to Floating: it has no down. Its Gravity is not applied, it never stands, and every surface is a wall to it. A Keys body walks all four ways at its Speed, W north and S south as A and D west and east, and stays where it is when let go of. A Floating crate is shoved both ways too, and stays where the shove leaves it. Grounded, as it comes, is the tower’s.
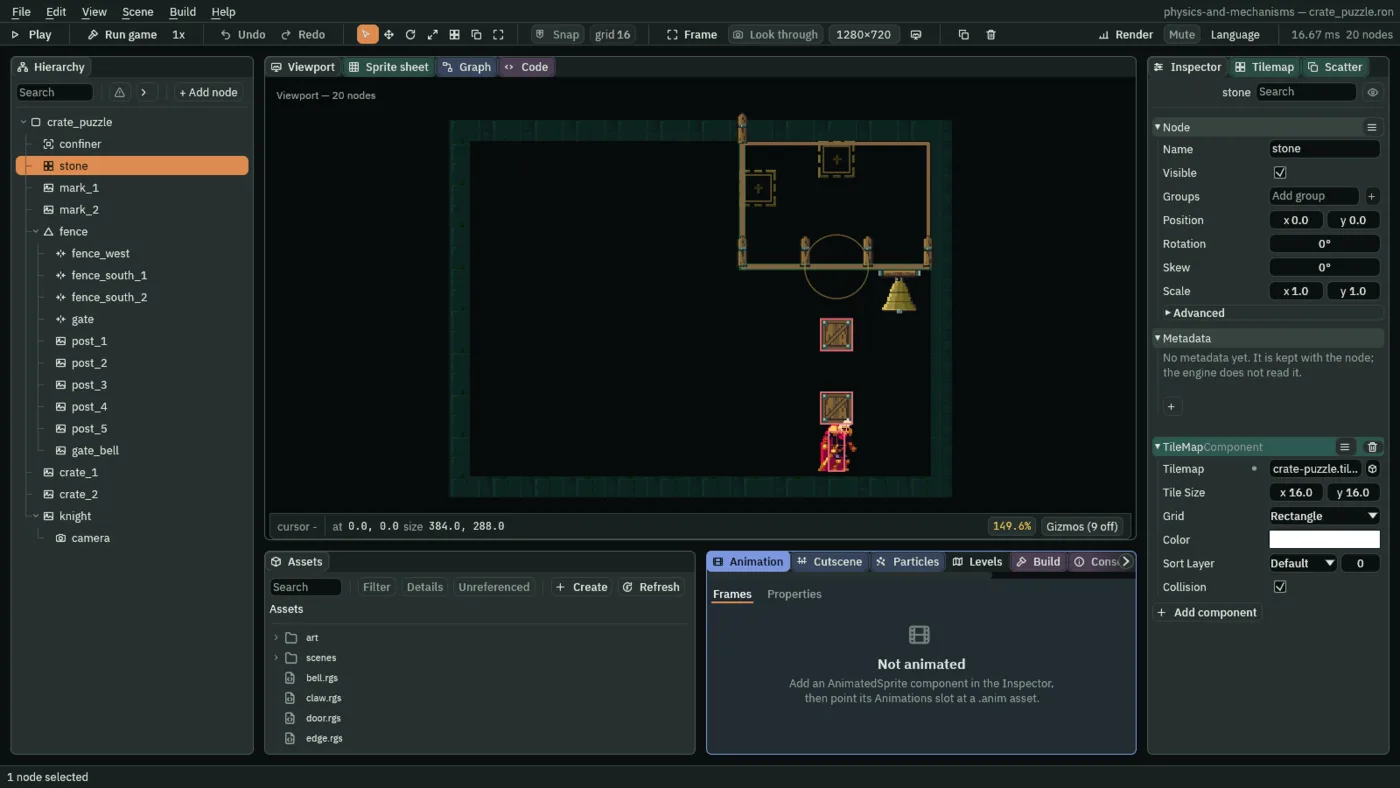
stone. The circle is the bell’s Area, drawn by the Triggers gizmo.The puzzle in Play
- Press F5. Hold W: the knight shoves the column of crates north through the gate, until the first is against the north wall, on
mark_1. Let go. - Hold D until he is clear of the second crate’s east side, then W to line him up beside it: his head north of the second crate’s south side, and not north of its north side,
1to8steps of W from where the row left him. S brings him back if he goes too far. - Hold A: he shoves the second crate west until the fence’s side stops it, on
mark_2. Press F5 to stop.
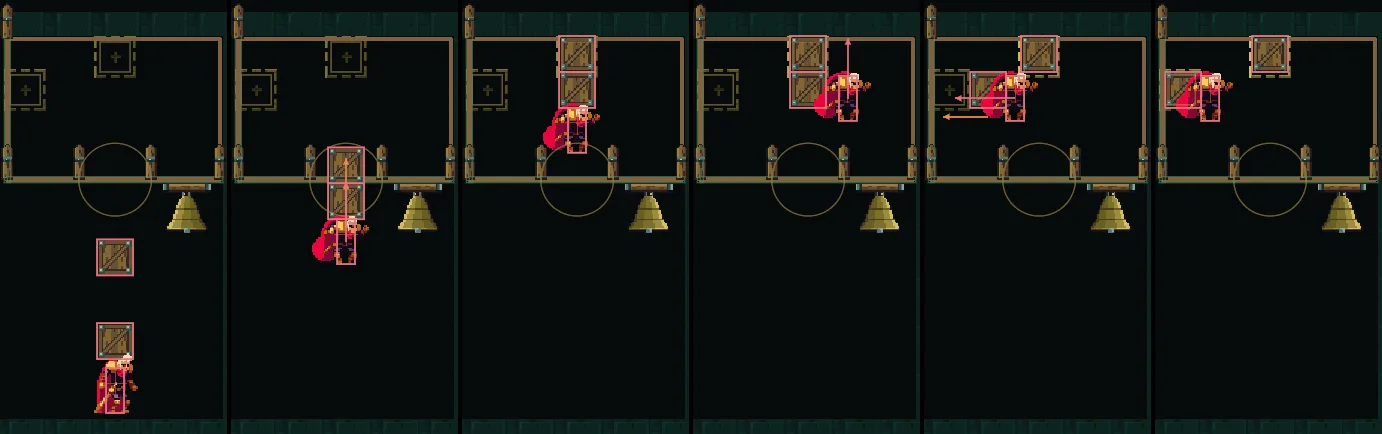
0, 60, 111, 129, 150 and 175 (0.00, 1.00, 1.85, 2.15, 2.50 and 2.92 s), the editor in Play, framed on the stone: W held from step 0 to 111, D from 111 to 121, W from 121 to 129, then A from 129. The first crate is on its mark, against the north wall, from step 110; the second stops against the fence’s west side, on its mark, at x 238.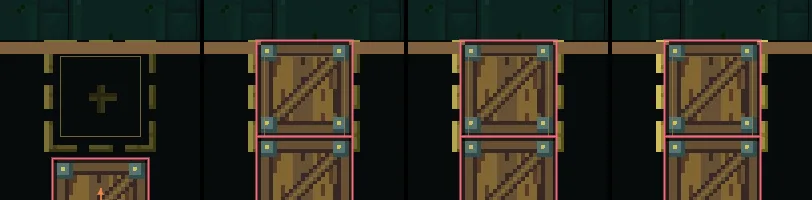
90, 110, 130 and 160 (1.50, 1.83, 2.17 and 2.67 s), the editor in Play at 400%, framed on mark_1, W held from step 0 to 111: empty; the crate comes on about step 95, and while_in fills the mark every step from the next; whole after a second, 61 steps, it stays whole.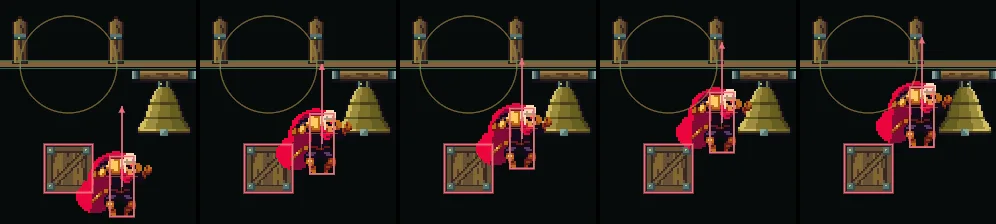
40, 48, 49, 52 and 53 (0.67, 0.80, 0.82, 0.87 and 0.88 s), the editor in Play at 200%, framed on post_4: D from step 0 to 10 takes him under the gate’s east post, outside the pen, then W walks him north beside it. On step 48 his head is just short of the box round the circle; from step 49 to 52 his box is inside that box and outside the circle, and the bell is still; on step 53 it comes into the circle, and the bell rings.Try it: a latched gate, an open fence, a square bell, a mark that fills once
- Select
gateand tick its Collider’s Solid. Press F5 and hold W: the gate is latched, and the crates stop against it. Stop, and untick Solid. - Select
fenceand untick its Line’s Closed. Press F5: the fence’s west side is gone from the picture, though its Collider still stands. Stop, and tick Closed. Set its Sort Layer to0and look atmark_2: it now covers the fence’s west side. Set Sort Layer back to2. - Select
gate_belland set its Shape › Kind to Rectangle. Press F5, hold D until he stands under the gate’s east post, outside the pen, and walk him north a step at a time with Pause and Step and W held: it rings four steps sooner than the circle did, while he is still beside the post, out of the gateway. Stop, and set Kind back to Circle. - In
mark.rgs, writeon_enterforwhile_in, and(1.0 / 60.0)fordt, which onlywhile_inis given, and press Ctrl+S. Press F5 and shove the first crate onto its mark: it fills a sixtieth and stops. Stop, put the script back as it was, and press Ctrl+S.
Who moves what
The gallery is no floor’s way up. The tower is unchanged from chapter 13: by the keys, from his start, the whole climb still takes 2755 steps, 45.9 s.
The gallery and the puzzle, node by node
| Node | Component | Field | Value |
|---|---|---|---|
confiner | Position | 448, 128 | |
| Camera Confiner | Bounds | 896, 256 | |
backdrop | Sprite | Texture, Draw Mode | old-dark-castle-interior-background.png, Tiled |
| Size, Tile Size | 896, 256; 960, 304 | ||
| Anchor, Sort Layer | 0, 0; -10 | ||
stone | Tilemap | Tilemap | gallery.tilemap |
perch | Position | 112, 190 | |
| Sprite | Texture, Draw Mode | scaffold-plank.png, Tiled | |
| Size, Tile Size, Sort Layer | 96, 8; 48, 8; 1 | ||
| Collider | Size, One Way | 96, 8; ticked | |
gargoyle | Position | 112, 224 | |
| Sprite | Texture, Size | gargoyle.png, 62, 56 | |
| Anchor, Sort Layer | 0.5, 1; 2 | ||
| Character Body | Size, Driven By | 40, 52; Script | |
| Gravity, Jump Speed | 1200, 300 | ||
| Jump Cut, Air Jumps | 0.4, 1 | ||
| Gargoyle | Perch | perch | |
knight | Position | 232, 224, pasted from the tower |
| Node | Component | Field | Value |
|---|---|---|---|
blade | Position | 304, 160 | |
| Sprite | Texture, Size | blade.png, 28, 42 | |
| Anchor, Sort Layer | 0.5, 1; -1 | ||
| Animated Sprite | Animations, Clip | blade.anim, chop | |
| Frame Size | ticked | ||
blade_edge | Position | 0, 28, under blade | |
| Area | Shape › Kind, Size | Capsule, 28, 16 | |
| Mask, Track | Knight; edge | ||
| Edge | edge.rgs | ||
sign_post | Position | 352, 224 | |
| Sprite | Texture, Size | sign-post.png, 8, 40 | |
| Anchor, Sort Layer | 0.5, 1; 1 | ||
crooked_sign | Position | 366, 194 | |
| Sprite | Texture, Size, Sort Layer | sign-crooked.png, 32, 16; 2 | |
| Character Body | Size, Driven By | 4, 4; Script | |
| Joint | Kind, Target | Fixed, sign_post | |
| Target Anchor, Weld Angle | 14, -30; -17.19 |
| Node | Component | Field | Value |
|---|---|---|---|
sign_hook | (a Node) | Position | 432, 96 |
tavern_sign | Position, Rotation | 425.8436, 112.9145; 20 | |
| Scale | 1.5, 1.5 | ||
| Sprite | Texture, Size, Sort Layer | swing-sign.png, 32, 28; 1 | |
| Character Body | Size, Driven By, Gravity | 8, 8; Script; 300 | |
| Joint | Kind, Target | Pin, sign_hook | |
| Anchor, Turns Body | 0, -18; ticked | ||
| Remote Transform | Target | sign_shadow | |
| Position, Rotation, Scale | ticked, ticked, ticked | ||
| Offset, Enabled | -10, 8; unticked | ||
| Shade | Shadow | sign_shadow | |
sign_shadow | Position, Visible | 415.8436, 120.9145; unticked | |
| Sprite | Texture, Size, Sort Layer | swing-sign-shadow.png, 32, 28; -2 | |
lamp_rail | Position | 528, 100 | |
| Line | Points | -80, 0; 56, 0 | |
| Width, Color | 2; 0.08, 0.09, 0.1, alpha 1 | ||
| Joint, Sort Layer | Flat; 1 | ||
lamp | Position | 488, 100 | |
| Sprite | Texture, Size | lantern.png, 14, 22 | |
| Anchor, Sort Layer | 0.5, 0; 2 | ||
| Character Body | Size, Driven By, Gravity | 4, 4; Script; 0 | |
| Joint | Kind, Target Point | Target, 488, 100 | |
| Stiffness, Damping | 0.05, 0.03 | ||
| Lamp | lamp.rgs | ||
| Signal | lit, dark | each to tavern_sign |
| Node | Component | Field | Value |
|---|---|---|---|
crate_1, crate_2 | Position | 724, 224; 640, 224, pasted from the tower | |
pan | Position | 712, 232 | |
| Sprite | Texture, Size, Anchor | scaffold-plank.png, 48, 8; 0.5, 1 | |
| Character Body | Size, Driven By | 46, 8; Script | |
| Collider | Size, Offset | 48, 8; 0, -4 | |
| Area | Shape › Size, Offset | 48, 8; 0, -4 | |
| Mask | Nothing | ||
| Joint | Kind, Target | Spring, scale_base | |
| Length, Stiffness | 84, 0.003 | ||
scale_base | Position | 712, 256, after pan | |
| Joint | Kind, Target | Slider, pan | |
| Use Limits, Min, Max | ticked, 16, 24 | ||
scale_coil | Position | 712, 256 | |
| Sprite | Texture, Size | spring-coil.png, 16, 20 | |
| Anchor, Sort Layer | 0.5, 1; 1 | ||
scale_door | Position | 752, 176 | |
| Sprite | Texture, Draw Mode | portcullis.png, Tiled | |
| Size, Tile Size | 32, 48; 16, 48 | ||
| Anchor, Sort Layer | 0.5, 0; -1 | ||
| Collider | Size, Offset | 32, 48; 0, 24 | |
| Door | door.rgs | ||
scale_contact | Position | 712, 240 | |
| Area | Shape › Size | 40, 3 | |
| Plate | plate.rgs | ||
| Signal | pressed, released | each to scale_door |
| Node | Component | Field | Value |
|---|---|---|---|
confiner | Position | 192, 144 | |
| Camera Confiner | Bounds | 384, 288 | |
stone | Tilemap | Tilemap | crate-puzzle.tilemap |
mark_1, mark_2 | Position | 296, 30; 236, 52 | |
| Sprite | Texture, Size | floor-mark.png, 28, 28 | |
| Color, Sort Layer | 1, 1, 1, alpha 0.3; 1 | ||
| Area | Shape › Size | 20, 20 | |
| Mask | Crate | ||
| Mark | mark.rgs | ||
fence | Line | Points | 224, 18; 366, 18; 366, 112; 224, 112 |
| Width, Color | 3; 0.22, 0.12, 0.05, alpha 1 | ||
| Joint, Closed, Sort Layer | Round, ticked, 2 | ||
fence_west | Collider | Position; Size | 224, 65; 4, 98 |
fence_south_1, fence_south_2 | Collider | Position; Size | 248, 112 and 344, 112; 48, 4 |
gate | Collider | Position; Size | 296, 112; 48, 4 |
| Solid | unticked | ||
post_1 … post_5 | Position | 224, 18; 224, 112; 272, 112; 320, 112; 366, 112 | |
| Sprite | Texture, Size | fence-post.png, 8, 24 | |
| Anchor, Sort Layer | 0.5, 1; 3 | ||
gate_bell | Position | 344, 114 | |
| Sprite | Texture, Size | bell.png, 32, 34 | |
| Anchor, Sort Layer | 0.5, 0; 4 | ||
| Area | Shape › Kind, Size | Circle, 48, 48 | |
| Shape › Offset | -48, -2 | ||
| Mask | Knight, Crate | ||
| Bell | bell.rgs | ||
crate_1, crate_2 | Position | 296, 176; 296, 232 | |
| Sprite | Sort Layer | 3 | |
| Character Body | Motion Mode | Floating | |
knight | Position | 296, 268 | |
| Character Body | Motion Mode | Floating | |
camera | Position | 0, -15 |
The first four tables are gallery.ron, every node under gallery, blade_edge under blade; the last is crate_puzzle.ron, the fence’s sides, posts and bell under fence. The crates are chapter 5’s, and the knight is the tower’s, pasted. Every other field is as it comes.