Tutorials · Physics and Mechanisms · Chapter 8
Chains and welds
By the end
- A chain bridge across the gallery’s break: eight links, each a light body tied to the one before by a slack Distance joint, which sags under him and lets him walk on or jump off wherever he stops
- A rotten plank nailed by a Pin with a Break Stretch: it holds him, and snaps when he follows a crate onto it;
plank.rgshears thejoint:brokesignal and turns its picture over - A lantern welded to the pendulum’s bob by a Fixed joint, turned as the bob is, with a Break Twist the swing never reaches
- A shutter in a Groove he shoves along its Axis to its Length, and
lever.rgs, which switches its Joint off when he presses E against it - The clockworks’ way up whole by keys: the pendulum, the bridge, the shutter, and a jump up through H4 to the lift shaft’s floor
On this page
The clockworks, finished
Chapter 7 left the clockworks half built: the pendulum takes the knight across gap A to the east ledge, and between the east ledge and the west ledge, over gap B, is a break no jump crosses. This chapter hangs a chain bridge across the break and puts three more things on the floor, each on a Joint of another kind: a rotten plank on the middle floor, a lantern on the bob and a shutter at the bridge’s west end. Two of them have short scripts, printed whole below.
Everything goes under clockworks, the Node chapter 7 made for this floor. To start Play on this floor rather than at the tower’s foot, set the knight’s Position before Play and put it back after.
- Select
knightand set his Position to488,1120: the clockworks’ east floor, where chapter 6’s climb leaves him. Press F5 to play from there, and F5 again to stop. - Afterwards press Ctrl+Z until his Position reads
48,1792again, or type48,1792back, so the tower still starts at its foot. - In the strip under the Viewport, open the Gizmos menu: Collision, Bodies, Triggers and Forces stay ticked, as chapter 7 left them. Forces draws every joint in orange; Bodies draws each body’s box in rose, with a rose arrow for its own velocity and an orange one for its Drift. The strips on this page are drawn with those two alone, so on your screen there is more than in them: the Colliders’ green outlines, and the yellow box of the shutter’s Area, a little wider than the shutter. (The crate’s Area is the same box as its body, under the rose.)
While the game runs, the Viewport looks through the game camera (Look through on the toolbar), so it follows him. A pan, a zoom or F gives you the view back.
A chain bridge
The break runs from x 96, the west ledge’s end, to x 224, the east ledge’s. The bridge is eight links of chain-link.png, 12 by 6, laid straight across it one every 16, their feet at 980, 4 above the ledges’ tops. Each link is a body nothing drives, so only its joint and gravity move it, with a solid Collider to walk on and a Joint that ties its west end to the east end of the link before it. The first is tied to the west ledge.
- Select
clockworks, click + Add node and choose Sprite. Rename itlink_1and set its Position to104,980. - In its Sprite, drag
art/chain-link.pngfrom Assets onto Texture, and set Size to12,6and Anchor to0.5,1: hung from its feet. - Click Add component and choose CharacterBodyComponent. Set its Size to
12,6, Driven By to Script and Gravity to400. - Click Add component and choose ColliderComponent. Set its Size to
12,6and Offset to0,-3. Solid stays ticked. - Click Add component and choose JointComponent. Set Kind to Distance, type
gallery_westinto Target, and set Anchor to-6,0and Target Anchor to40,-8. - In the Joint’s Limits fold, tick Use Limits. Min and Max appear under it: leave Min at
0and set Max to6.
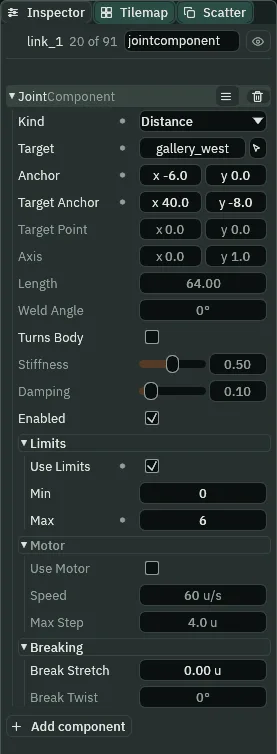
link_1’s Joint: a Distance tie from its west foot to the west ledge’s end, held between Min 0 and Max 6. Length is dim: with Use Limits ticked, a Distance joint never asks it.- In the Hierarchy, right-click
link_1and choose Duplicate. Rename the copylink_2, set its Position to120,980, typelink_1into its Joint’s Target, and set its Joint’s Target Anchor to6,0: the east foot of the link before. - Duplicate
link_2six times in the same way, each copy’s Joint Target the link before it:link_3at136,980,link_4at152,980,link_5at168,980,link_6at184,980,link_7at200,980andlink_8at216,980. Their Target Anchor stays6,0. - Select
gallery_east, the east ledge. Click Add component and choose JointComponent: Kind Distance, Targetlink_8, Anchor-40,-8, Target Anchor6,0; tick Use Limits and set Max to6. Press Ctrl+S.
- Kind › Distance, with limits
- The Joint’s Kind, as chapter 7’s rod has it. Without limits a Distance joint holds its two ends exactly Length apart, a rod. With Use Limits ticked it holds them anywhere from Min to Max apart, and pulls only when they are further than Max: a slack tie, a link of chain.
- Target
- The Joint’s Target: the node at its other end, typed by name. A node with no Character Body, like the ledges, is an anchor the joint never moves. The east ledge holds a Joint of its own whose Target is
link_8: a ledge has no body, so that joint holds the link and never moves the ledge. - Anchor and Target Anchor
- The Joint’s Anchor is its end on this node, and Target Anchor its end on the Target, each in that node’s own units from its position. Chapter 7’s rod used the pivot’s own point,
0,0. Here both are off the node:-6,0is a link’s west foot,6,0the east foot of the link before, and40,-8ongallery_westis its east end,4above its top. - Use Limits
- The Joint’s Use Limits, in its Limits fold: ticked, the joint keeps its measure between Min and Max, and shows those two rows. For a Distance joint the measure is how far apart its ends are. A Distance, a Slider and a Target read it; on other kinds it is dim. It comes unticked.
- Min
- The Joint’s Min: the near end of its range, shown only with Use Limits ticked. For a Distance joint, the least its ends may be apart, in world units. The ties leave it at
0, as it comes: a link may close right up to the one before. - Max
- The Joint’s Max: the far end of its range, in world units. For a slack tie, the slack: each tie lets its ends be up to
6apart, and pulls them back past that. A new Joint’s is64. - Length
- The Joint’s Length, dim on every link: a Distance joint with Use Limits ticked keeps its range and never asks it. It stays
64, as it comes. - Gravity
- The Character Body’s Gravity, as in chapter 2: how fast it gathers speed falling, in units a second each second. The links’
400is light against the knight’s2000, so his weight shapes the chain more than its own does. A new body’s is1800.
The bridge in Play
Laid straight, the chain is 22 longer than the break when every tie is out to its slack: eight links of 12 and nine ties of 6 make 150, against 128. So in Play it falls into a sag at once, its bottom links’ feet about 20 below the ties, and hangs still. Its end links lie a step above the ledges, so he steps up onto them and down off them as he walks.
- Set the knight’s Position to
488,1120and press F5. Ride the pendulum to the east ledge as in chapter 7, and wait there a moment: the bridge has hung into its sag. - Hold A. He walks out onto the bridge, and the chain dips under him as he goes, the link he stands on lowest. Let go of A over the middle: he stands there, the bridge dipped under him a little.
- Press Space from there: he jumps off it until his head meets the ceiling, and lands on it again. Hold A: he walks on to the west ledge. Press F5 to stop, and Ctrl+Z back to
48,1792.

0, 60, 145, 158 and 172 (0.00, 1.00, 2.42, 2.63 and 2.87 s), the editor in Play at 200%, framed on the east ledge, with the Forces and Bodies gizmos: laid straight; hung to its slack; and A held from step 120, walking him across. For this picture he was stood on the east ledge, where chapter 7’s swing leaves him, from the start.
200, 204, 216 and 262 (3.33, 3.40, 3.60 and 4.37 s), framed as the strip above: A held from step 120 to 160 lets go of him over the middle; Space from 200 to 240 lifts his feet from 994 to 958, his head at the ceiling, and he is back on the chain by step 215; A from 250 walks him on. For this picture he was stood on the east ledge from the start.A rotten plank
On the middle floor, at its west edge over gap B, a rotten plank juts out flush with the floor. It is nailed at its east end, and the nail is weak: it holds the knight, and gives when he follows a crate onto it. The nail is a Node, nail, and the plank a body pinned to it with a Break Stretch, the most the nail may be pulled out of true before it gives.
- Select
clockworks, click + Add node and choose Node. Rename itnailand set its Position to224,1124: the middle floor’s west edge,4under its top. - Select
clockworksand add a Sprite,plank, at Position200,1128. Dragart/rotten-plank.pngonto Texture, and set Size to48,8and Anchor to0.5,1. Its top lies flush with the floor’s. - Click Add component and choose CharacterBodyComponent: Size
48,8, Driven By Script. Then a ColliderComponent: Size48,8, Offset0,-4. - Click Add component and choose JointComponent. Leave Kind at Pin, as it comes. Type
nailinto Target, set Anchor to24,-4, its east end, and in the Breaking fold set Break Stretch to1.3.
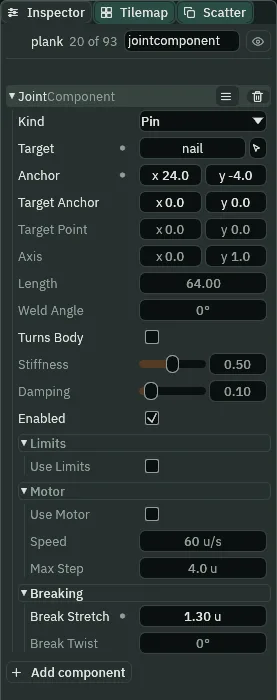
1.3.- Kind › Pin
- The Joint’s Kind as a new Joint comes: a Pin holds its Anchor on its Target Anchor, a nail or a hinge. The plank, pinned by its east end, hangs from that end like a shelf from its bracket.
- Anchor
- The Joint’s Anchor, on the plank:
24,-4from its node, which is the middle of its bottom edge, is the middle of its east end, where the nail is. Left at0,0, the plank would hang from its middle, half of it over the floor. - Turns Body
- The Joint’s Turns Body, which chapter 7 ticked for the bob: unticked here, as it comes, so the plank never turns about its nail. It stays level while the nail holds, and falls level when it gives.
- Break Stretch
- The Joint’s Break Stretch, in its Breaking fold, in world units: how far out of true the joint may be pulled in one step before it breaks. When it breaks, its Enabled is unticked for you and the node hears
joint:broke.0, as a new Joint comes, never breaks. Every kind reads it. joint:broke- The signal a node hears on the step its own Joint breaks, carrying the measure that broke it. Broken by its Break Stretch, that is how far out of true it was, in world units, as the plank’s is. A weld broken by its Break Twist alone carries how far it was wrenched off its angle instead, in radians, not the Inspector’s degrees, and signed: less than
0for a wrench one way, more for the other. It needs no Signal component: the joint says it to its own node.plank.rgs, below, listens for it.
The plank needs a script for one thing: to hear its nail go, keep how far out of true it was, and turn its picture over as it falls.
- In Assets, click Create, choose New script, type
plankand press Enter. In the Code tab, replace everything inplank.rgswith the script below, and press Ctrl+S. - Select
plank, click Add component and choose Plank.
/// The rotten plank. The Pin on this node is its nail, and the Pin's Break
/// Stretch is how far out of true the nail can be pulled before it gives.
/// When it gives, the joint says `joint:broke` to this node with how far out
/// of true it was: the plank keeps that, and turns its picture over as it
/// falls.
component Plank {
    /// Whether the nail has given way.
    #[readonly]
    snapped: bool = false,
    /// How far out of true the nail was when it gave, in world units.
    #[readonly]
    stretch: f32 = 0.0,

    fn on_signal() {
        if heard("joint:broke") {
            snapped = true;
            stretch = heard_value("joint:broke");
            set_flag("SpriteComponent", "flip.y", true);
        }
    }
}
component Plank- A script with no base, like chapter 4’s door: it goes on any node, and hears signals. Its name,
Plank, is what Add component lists. - Snapped and Stretch
- The Plank’s two fields, drawn in the Inspector as Snapped and Stretch. Both are
#[readonly](attributes): drawn, and not for typing into, so in Play you can watch them change. Snapped starts unticked and Stretch at0. - heard and heard_value
heard("joint:broke")is true on the step the signal reaches this node;heard_value("joint:broke")is the number it carried, here how far out of true the nail was, or0if it carried none.- set_flag
- Writes true or false onto another component on this node.
"flip.y"reaches one part of the Sprite’s Flip: its Y, which draws the picture upside down. The plank is a body and never turns, so its picture is turned over instead.
The plank’s side trips need a crate on the middle floor, east of the plank, made as chapter 5’s crates are. Copy one.
- In the Hierarchy, right-click
crate_1, chapter 5’s first crate, and choose Duplicate. - Drag the copy onto
clockworks, rename itcrate_5, and set its Position to264,1120: on the middle floor, east of the plank. Press Ctrl+S.
The plank in Play
The way up never crosses the plank; it is a side trip, with the knight set on the middle floor before Play. Walk onto it first.
- Select
knight, set his Position to240,1120, west of the crate, and press F5. - Hold A: he walks off the floor onto the plank. Let go once he is wholly on it. It holds him, and stays where it is.
- Press F5 to stop, and Ctrl+Z back to
48,1792.
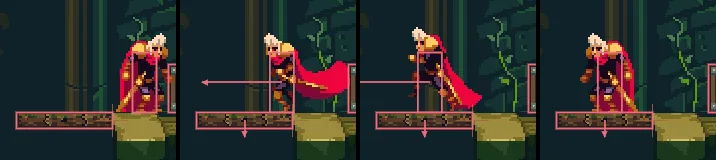
0, 8, 14 and 120 (0.00, 0.13, 0.23 and 2.00 s), the editor in Play at 200%, framed on the nail, with the Forces and Bodies gizmos: A held from step 0 to 14. The short arrow under the plank is the step’s fall his weight gives it, which its nail takes back. For this picture he was stood at 240, 1120 from the start.- Select
knightand set his Position to300,1120, east of the crate. Then selectplank, so the Inspector shows its Snapped and Stretch while the game runs, and press F5. - Hold A: he shoves the crate west onto the plank, and it holds the crate. Keep holding: the moment he steps onto it after the crate, the nail gives, and the plank falls with the crate on it, upside down. Let go of A at once, or he follows it down. In the Inspector, Snapped is ticked and Stretch holds how far out of true the nail was.
- To catch the step, press Pause or F6 as the crate goes onto the plank, then Step or F7 one step at a time, and watch the step counter on the Play bar. Press F5 to stop, and Ctrl+Z back to
48,1792.
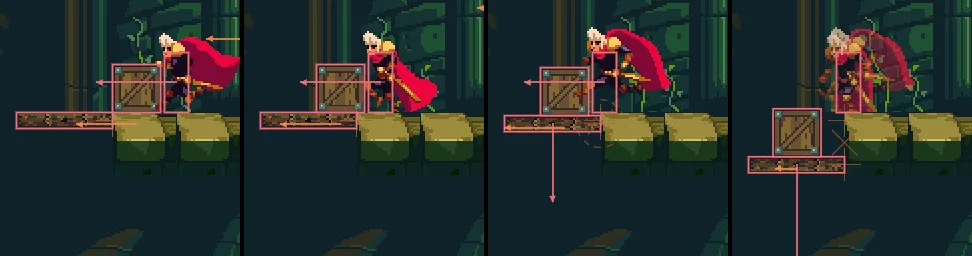
20, 30, 35 and 40 (0.33, 0.50, 0.58 and 0.67 s), the editor in Play at 200%, framed on the nail: A held from step 0 to 35. The crate is on the plank from about step 26; on step 35 his box comes over its end and the nail gives the same step. The broken joint is drawn crossed out. For this picture he was stood at 300, 1120 from the start.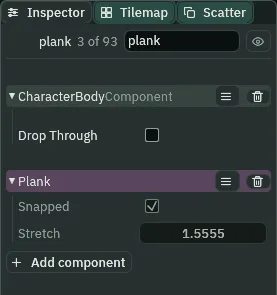
36 of the same run (0.60 s), plank selected: its script heard joint:broke the step the nail gave, with how far out of true it was, 1.56.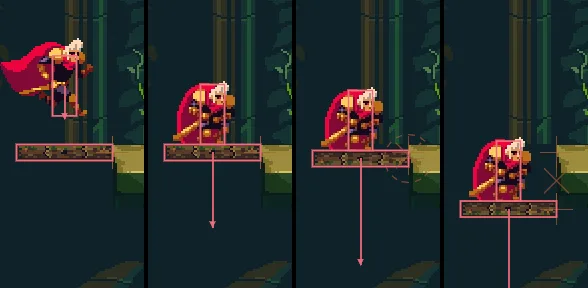
2, 8, 9 and 14 (0.03, 0.13, 0.15 and 0.23 s), framed on the nail, no key pressed: he lands on step 8 and the nail gives on step 9. For this picture he was stood at 200, 1104 from the start.A lantern on a weld
A lantern hangs from the bob’s west side and swings with it. A Fixed joint welds it there: it holds the lantern’s Anchor on the bob’s Target Anchor, and holds the lantern turned as the bob is, plus a Weld Angle. The bob’s Turns Body turns the bob as it swings, and its Target Anchor with it, so the lantern goes round with the bob’s side.
- Select
clockworksand add a Sprite,lantern, at Position430,1068, and set its Rotation to-53.13, the bob’s. Dragart/lantern.pngonto Texture, and set Size to14,22, Anchor to0,0.5, its outer edge, and Sort Layer to3. - Click Add component and choose CharacterBodyComponent: Size
4,4, Driven By Script. - Click Add component and choose JointComponent. Set Kind to Fixed, type
bobinto Target, and set Target Anchor to-30,0, the bob’s west side. Anchor stays0,0and Weld Angle0. In the Breaking fold, set Break Twist to28.65.
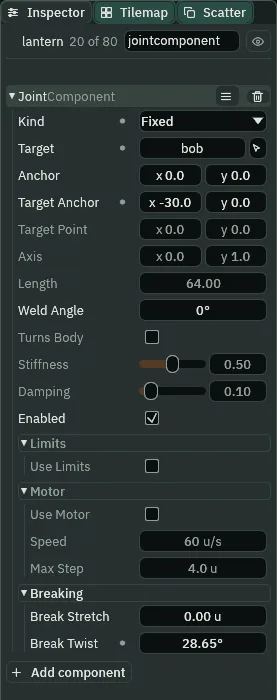
0°, its Break Twist 28.65°.- Kind › Fixed
- The Joint’s Kind for a weld: it holds its Anchor on the Target Anchor, as a Pin does, and its turn too, at the target’s turn plus Weld Angle. Welded onto a swinging body, it moves only itself and is set true again each step, so the bob keeps its swing with the lantern on it.
- Weld Angle
- The Joint’s Weld Angle, which only a Fixed joint reads: how far this node is turned from its Target, in degrees in the Inspector. The lantern’s is
0: it is turned as the bob is, both at-53.13, so in the Inspector you turn the lantern itself to match. The gallery’s signpost, in chapter 14, has one that is not0. - Break Twist
- The Joint’s Break Twist, in its Breaking fold, in degrees: how far a weld may be wrenched off its angle in one step before it breaks. Only a Fixed joint reads it. The lantern’s
28.65is half a radian. The swing wrenches it about4°a step empty and under6°with him riding the bob, so it is set and never reached.0never breaks. - Size
- The Character Body’s Size, on the lantern:
4by4, far smaller than its picture. It only rides its weld, and a small box stays clear of the bob’s round Collider as the two turn.

0, 21 and 42 (0.00, 0.35 and 0.70 s), the editor in Play at 200%, framed on the clock face, with the Forces and Bodies gizmos, no key pressed: the bob at its east turn, at the bottom and at its west turn, the lantern on the bob’s west side every step.Try it: the lantern saved unturned
- Select
lanternand set its Rotation to0. - Press F5, and at once F6 to pause. The game camera is on the knight, far below: move the pointer over the Viewport and press F to frame the lantern. On the first step the weld is wrenched past its Break Twist and breaks: the lantern drops straight down through gap A while the bob swings on.
- Press F7 a step at a time, or F6 to run on, and watch the Play bar’s step counter. Press F5 to stop.
- Set the lantern’s Rotation back to
-53.13.
The lantern lands on the ice below on step 34 (0.57 s): paused later than that, you find it lying there already.

0: steps 0, 1, 5 and 10 (0.00, 0.02, 0.08 and 0.17 s), framed as the strip above, no key pressed. The weld breaks on step 1.A shutter in a groove
At the bridge’s west end hangs a shutter, 14 over the west ledge, in a groove that runs west from a rail: he shoves it along the groove, and at its end it stops. A ring pull drops it: with him against it, E switches its Joint off, and it falls onto the ledge.
- Select
clockworksand add a Node,shutter_rail, at Position88,938: where the groove starts. - Select
clockworksand add a Sprite,shutter, at Position88,970. Dragart/shutter.pngonto Texture, and set Size to16,32, Anchor to0.5,1and Sort Layer to1. - Click Add component and choose CharacterBodyComponent: Size
16,32, Driven By Script; in its Pushing fold tick Pushable and set Push Speed to0.75. Then a ColliderComponent: Size16,32, Offset0,-16. - Click Add component and choose JointComponent. Set Kind to Groove, type
shutter_railinto Target, and set Anchor to0,-32, the middle of its top, Axis to-1,0and Length to48. - Click Add component and choose AreaComponent. Open its Shape and set Size to
24,32and Offset to0,-16. Click the button beside Mask, untick World and tick Knight.
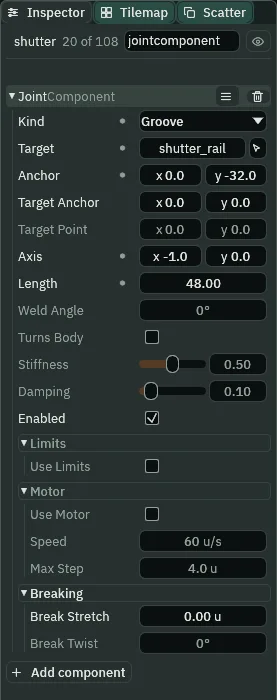
48.- Kind › Groove
- The Joint’s Kind for a groove: it holds its Anchor on a line that starts at the Target’s point and runs along Axis for Length, and lets it slide anywhere on it. The shutter’s top slides from the rail up to
48west, and no further either way. Godot’s GrooveJoint2D is the same idea. - Axis
- The Joint’s Axis: the way a Groove or a Slider runs, a direction in the Target’s own units.
-1,0is west. Its length does not matter, only its way. A new Joint’s is0,1, down. Only a Groove and a Slider read it. - Length
- The Joint’s Length, on a Groove: how long the groove is, in world units, from the Target along Axis. The shutter’s
48stops it with its top at x40and him behind it at x54, under H4, where his jump up clears the opening.
The ring pull is a script on the shutter with an Area base: its Area notices the knight against the shutter, and the action key, E, then switches the Joint off.
- In Assets, click Create, choose New script, type
leverand press Enter. In the Code tab, replace everything inlever.rgswith the script below, and press Ctrl+S. - Select
shutter, click Add component and choose Lever. Press Ctrl+S.
/// The shutter's ring pull. The shutter hangs in its groove by the Joint on
/// this node. With the knight against the shutter, the `action` key (E) pulls
/// the ring: the Joint is switched off, and the shutter drops.
component Lever : Area {
    /// How many things its Area notices against the shutter.
    #[readonly]
    near: i32 = 0,
    /// Whether the ring has been pulled.
    #[readonly]
    pulled: bool = false,

    fn on_enter() {
        near += 1;
    }

    fn on_exit() {
        near -= 1;
    }

    fn loop() {
        if near > 0 && !pulled && pressed("action") {
            pulled = true;
            set_flag("JointComponent", "enabled", false);
        }
    }
}
component Lever : Area- A script with an Area base, like chapter 4’s plate: it goes on a node with an Area, and hears what comes in and goes out. Near counts the Areas against the shutter; Pulled is ticked once the ring is pulled, so it is pulled only once.
- loop
- Runs once every step the game runs. Here it asks, each step, whether he is near and the ring not yet pulled, and whether
actionwent down. - pressed
pressed("action")is true on the one step an action goes down, not while it is held.actionis one of the project’s actions ininput.ron, on E and Enter.- Enabled
- The Joint’s Enabled: whether it is held right now. Unticked, the joint does nothing, and the shutter is a plain body again, which gravity drops.
lever.rgsunticks it withset_flag("JointComponent", "enabled", false); a break unticks it too, as the plank’s did. It comes ticked.
- Set the knight’s Position to
488,1120, then selectshutter, so the Inspector shows its Joint’s Enabled while the game runs. Press F5, ride the pendulum to the east ledge and hold A across the bridge. - He walks into the shutter and shoves it west along its groove, slower than he walks, until it stops at the groove’s end with him behind it. Let go of A.
- Press E. Enabled is unticked, the groove is drawn dashed, and the shutter drops onto the ledge. Press F5 to stop, and Ctrl+Z back to
48,1792.

178, 195, 215, 234 and 242 (2.97, 3.25, 3.58, 3.90 and 4.03 s), the editor in Play at 200%, framed on the west ledge: the bridge strip’s run, A held from step 120 to 220, then E pressed on step 231. For this picture he was stood on the east ledge from the start.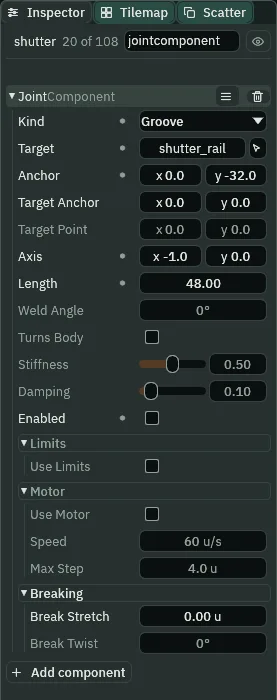
232 of the same run (3.87 s), shutter selected: Enabled unticked by lever.rgs the step E went down.You need not pull the ring to climb on: the way up leaves the shutter at its groove’s end. Pulled, it lies on the ledge beside him, and the jump up through H4 is the same.
The way up
The clockworks’ way up is whole now, by the keys alone: chapter 7’s pendulum to the east ledge, the bridge to the west ledge, the shutter shoved to its groove’s end, and a jump up through H4, the opening in the ceiling over the west ledge, to the lift shaft’s floor.
- Set the knight’s Position to
488,1120and press F5. Ride the pendulum to the east ledge, as in chapter 7. - Hold A across the bridge into the shutter, and on until it stops at the groove’s end. Let go: he stands under H4.
- Hold D and Space together: he jumps up through H4 and lands on the lift shaft’s floor, east of the opening, where chapter 9 starts. Press F5 to stop, and Ctrl+Z back to
48,1792.
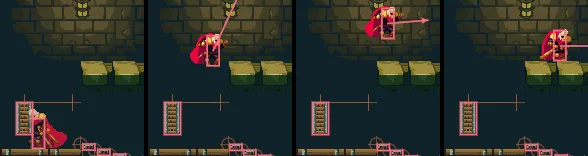
224, 235, 245 and 254 (3.73, 3.92, 4.08 and 4.23 s), framed on the west ledge at 100%, his picture 48 pixels tall: A held from step 120 to 220 across the bridge, then D and Space from 225 to 254. His feet rise to 874, 22 over the floor, and he lands at x 131.333. At 200% the floor is above the view.The bridge, the plank, the lantern and the shutter
| Node | Component | Field | Value |
|---|---|---|---|
link_1 … link_8 | Position | 104, 980; then 120, 136, 152, 168, 184, 200, 216, each at 980 | |
| Sprite | Texture, Size | chain-link.png, 12, 6 | |
| Anchor | 0.5, 1 | ||
| Character Body | Size | 12, 6 | |
| Driven By, Gravity | Script, 400 | ||
| Collider | Size, Offset | 12, 6; 0, -3 | |
| Joint | Kind | Distance | |
| Target | gallery_west for link_1; the link before for the rest | ||
| Anchor | -6, 0 | ||
| Target Anchor | 40, -8 for link_1; 6, 0 for the rest | ||
| Use Limits, Min, Max | ticked, 0, 6 | ||
gallery_east | Joint | Kind, Target | Distance, link_8 |
| Anchor, Target Anchor | -40, -8; 6, 0 | ||
| Use Limits, Min, Max | ticked, 0, 6 |
| Node | Component | Field | Value |
|---|---|---|---|
nail | (a Node) | Position | 224, 1124 |
plank | Position | 200, 1128 | |
| Sprite | Texture, Size | rotten-plank.png, 48, 8 | |
| Anchor | 0.5, 1 | ||
| Character Body | Size, Driven By | 48, 8; Script | |
| Collider | Size, Offset | 48, 8; 0, -4 | |
| Joint | Kind, Target | Pin, nail | |
| Anchor | 24, -4 | ||
| Break Stretch | 1.3 | ||
| Plank | plank.rgs | ||
crate_5 | Position | 264, 1120, a copy of chapter 5’s crates | |
lantern | Position, Rotation | 430, 1068; -53.13 | |
| Sprite | Texture, Size | lantern.png, 14, 22 | |
| Anchor, Sort Layer | 0, 0.5; 3 | ||
| Character Body | Size, Driven By | 4, 4; Script | |
| Joint | Kind, Target | Fixed, bob | |
| Target Anchor | -30, 0 | ||
| Weld Angle, Break Twist | 0; 28.65 |
| Node | Component | Field | Value |
|---|---|---|---|
shutter_rail | (a Node) | Position | 88, 938 |
shutter | Position | 88, 970 | |
| Sprite | Texture, Size | shutter.png, 16, 32 | |
| Anchor, Sort Layer | 0.5, 1; 1 | ||
| Character Body | Size, Driven By | 16, 32; Script | |
| Pushable, Push Speed | ticked, 0.75 | ||
| Collider | Size, Offset | 16, 32; 0, -16 | |
| Joint | Kind, Target | Groove, shutter_rail | |
| Anchor, Axis | 0, -32; -1, 0 | ||
| Length | 48 | ||
| Area | Shape › Size, Offset | 24, 32; 0, -16 | |
| Mask | Knight | ||
| Lever | lever.rgs |
Every node here is under clockworks but gallery_east, which chapter 7 made, and every other field is as it comes. The crate is made as chapter 5’s are: right-click crate_1 in the Hierarchy and choose Duplicate, drag the copy onto clockworks, rename it crate_5 and set its Position.