Tutorials · Worlds and Levels · Chapter 14
A gallery of worlds
By the end
- An isometric room of diamond flagstones, its tall pillars drawn rightly over each other and the wanderer walking behind them and in front, with its Collision off
- A staggered map of the same tiles, numbered by the rows of the screen
- Two boards of hexes, pointy-topped and flat-topped, whose tiles carry a cost and a name, and a token on each that steps from hex to hex and turns each it enters to trodden earth
- A dungeon cut from Tiny Dungeon’s sheet with its gutters, its sand floor drawn as the brown one, figures that never slice through each other, and outlined pots among them
- A damage counter: a number every
0.6seconds over a practice dummy, rising and fading - A far ridge on a Parallax plane that collides with nothing, and a spyglass that shows it through a round lens in a dark shade
On this page
Four scenes, seven cases
No grey block stands in for anything here: the vale and the crypt are as chapter 13 left them, and the game still plays from the hut to the bell. This chapter makes four scenes beside them, none of them a level, each a small case the vale and the crypt have no place for: an isometric room and a staggered map, two boards of hexes, a dungeon with a damage counter in it, and a far ridge seen through a spyglass.
Every map so far has laid its cells out in rows and columns of squares. A map’s Grid lays them out four other ways, each for its own kind of game:
| Grid | Its cells | Reach for it for |
|---|---|---|
| Rectangle | squares in rows and columns | a side view, as the vale and the crypt, or a room seen from straight above, as the dungeon |
| Isometric | diamonds, numbered along the diamond’s two sides | a room seen from above at an angle |
| IsometricStaggered | the same diamonds, numbered by the rows of the screen | a long isometric strip whose rows run across the screen |
| HexPointyTop, HexFlatTop | hexagons, every other row or column half a cell on | a board where each neighbour is as far as every other |
Open a scene by double-clicking it in Assets. F5 plays the scene that is open; Run game still starts the vale, the project’s startup scene. The arrows, or W, A, S and D, float the wanderer and the knight, step the hex tokens, and pan the lookout.
Every gallery scene starts the same way: a root, and a camera of its own that frames a view 320 by 180, x -160 to 160 and y -90 to 90, and stands still, all but the lookout’s, which pans. The galleries are unlit: none has an Ambient Light, so everything draws at its own colours.
- With
scenes/vale.ronorscenes/crypt.ronopen, press Ctrl+S. Choose File → New scene: an empty scene takes its place, without asking. - Press + Add node and choose Node. Rename it
gallery-iso. Choose File → Save as…, open thescenesfolder, name the filegallery-iso.ron, and save. - Select
gallery-iso, press + Add node and choose Camera: the menu opens on Add child of gallery-iso. Rename itcamera, and leave its Position at0,0. - In its Camera, set Scaling to Letterbox, type Extent
180and Width320, and type Background as the table below gives it. Leave Pixel Snap ticked. - Press Add component and choose PixelPerfectComponent. Leave Assets PPU
1, Reference Width320and Reference Height180as they come, and tick Upscale Render Texture and Crop Frame. Press Ctrl+S.
| Background | |
|---|---|
| Each gallery’s camera, the vale’s | 0.10, 0.12, 0.20, alpha 1 |
A colour is typed in linear light, so those dark-looking numbers show on the screen as a lighter slate blue, behind every case. The other three scenes, gallery-hex, gallery-dungeon and gallery-lookout, start the same way, each saved in scenes under its root’s name; each case below says when.
An isometric room
A room of diamond flagstones seen from above at an angle, with four tall pillars standing in it and the wanderer, the pilgrim’s figure, floating where the keys send him. Behind a pillar, the pillar draws over him; in front of it, he draws over the pillar.
What collides, what draws, what sorts: the map draws its floor and its pillars on Figures, the wanderer’s Sort Layer, and nothing in the room collides, its Collision off. Everything under room sorts by Y, each pillar by its cell’s foot and the wanderer by his feet, and the floor, on the same Sort Layer at a z lower, draws under all of it.
- With
scenes/gallery-iso.ronopen, selectgallery-iso, press + Add node and choose Node: the menu opens on Add child of gallery-iso. Rename itroom, and type its Position-84,-40. - In its Node’s Advanced fold, tick Sort children by Y.
- Select
room, press + Add node and choose Tilemap: the menu opens on Add child of room. Rename itiso-floor, and leave its Position at0,0. - In its TileMapComponent, type Tile Size
32,16, set Grid to Isometric and Sort Layer to Figures, and untick Collision.
- Sort children by Y
- A node’s own row, in its Advanced fold: its children draw in the order of their place down the screen, the one nearer the bottom in front. A picture sorts by its node’s place, a Sprite anchored at its foot by its feet; a tile that sorts by Y, by its cell’s foot. Only children on one Sort Layer at one order pass in front of each other: Sort Layer is compared first, then a tile layer’s z, then Y.
- The TileMap’s Tile Size,
32by16 - One cell in world units. An isometric diamond is twice as wide as it is tall, so a cell’s box is
32by16, the diamond filling it corner to corner. - The TileMap’s Grid: Isometric
- Diamond cells, numbered along the diamond’s two sides: a cell one along in
xis half a cell right and half a cell down the screen, one along inyhalf a cell left and half a cell down. Cellx,yhas its box’s corner at x16(x − y), y8(x + y), so cell0,0is the room’s top corner and a row of the map runs down to the right. - The TileMap’s Collision, unticked
- A map’s tiles collide as their cells’ boxes, and a diamond’s box is the rectangle round it, whose corners reach over the four diamonds beside it: a pillar would stop him at its box’s edge, short of its shaft. So the room collides with nothing, and he floats through a pillar.
- Click the Tilemap tab and drop
art/iso.pngon New tilemap…: the editor writesart/iso.tilemapand pointsiso-floorat it. The picture,128by16, came with the starter: four cells of32by16, a flagstone, the same worn, a pillar’s foot and its head. - In the Tileset band, type Tile
32and16, and Columns4. - In the Layers band, double-click
backand rename itfloor, and type its z-1. Renamegroundpillars: it stays Solid with Blocks nav, at z0, as New tilemap made it. - Click
pillars’ row and press +: an empty layer goes in over it and lights. Rename itheads, and leave it as a new layer comes: not Solid, z0.
A pillar is drawn 32 high and cut in two: its foot is tile #3, its head #4. Both are painted in the same cell, and the head is told to draw a cell up, onto the foot; both sort by that cell’s foot, so he is behind or in front of the whole pillar, never between its halves.
- Click tile
#3in the picker. In the Tile band under it, type Y sort1. - Click tile
#4. Type Art origin’sy-1, and Y sort1.
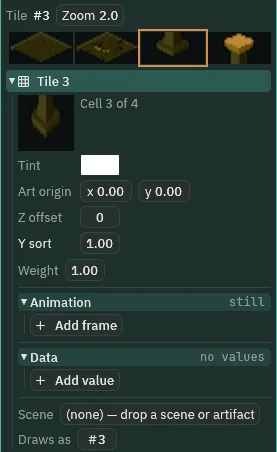
#3: Y sort 1.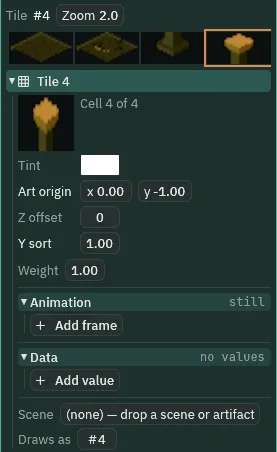
#4: drawn a cell up, Art origin y -1, and sorted at the foot of the cell it is painted in.- A tile’s Y sort
- Where the tile counts as being for sorting by Y, in cells below the top of its own cell:
0, the top, as every tile comes, to1, its foot. It matters only under a parent that sorts its children by Y. The foot and the head both sort at1, the cell’s foot, the line where the pillar meets the floor. - A tile’s Art origin, a cell up
- Chapter 4’s, at
y-1: the head is painted in its foot’s cell and drawn a whole cell higher, standing on the foot. It still sorts by the cell it is painted in, so foot and head sort as one.
- Click
floor’s row and tile#1. With Rect, drag from cell0,0to4,4:25diamonds, the room. The cursor line at the Viewport’s foot names the cell under the pointer. - Click tile
#2, and with Line drag from cell0,4to4,4: a worn aisle along the room’s south-west edge. - Click
pillars’ row and tile#3. With Brush, click cells1,1,2,2,3,1and1,3. - Click
heads’ row and tile#4, and click the same four cells. Press the tab’s Save.
- Select
room, press + Add node and choose Animated Sprite: the menu opens on Add child of room. Rename itwanderer, and type its Position16,56: the middle of cell3,3, in front of the pillars. - In its Sprite, drag
art/pilgrim.pngonto Texture, type Size38,48and Anchor0.5,1, his feet, and set Sort Layer to Figures. - In its Animated Sprite, drag
art/pilgrim.animonto Animations, leave Clip atidle, and tick Frame Size. - Press Add component and choose CharacterBodyComponent. Set Motion Mode to Floating and type Speed
80. Leave Driven By at Keys and Size at32,48. Press Ctrl+S.
- The Animated Sprite’s Frame Size
- Ticked, each frame of the clip is drawn at its own size, as the pilgrim’s are cut; unticked, every frame is drawn at the Sprite’s Size.
- The body’s Motion Mode: Floating
- The keys send him every way, up and down as well as across, and nothing pulls him down: a room seen from above has no floor to fall to. Grounded, as it comes, is the pilgrim’s, who walks and jumps. Speed
80is how far a held key floats him in a second.
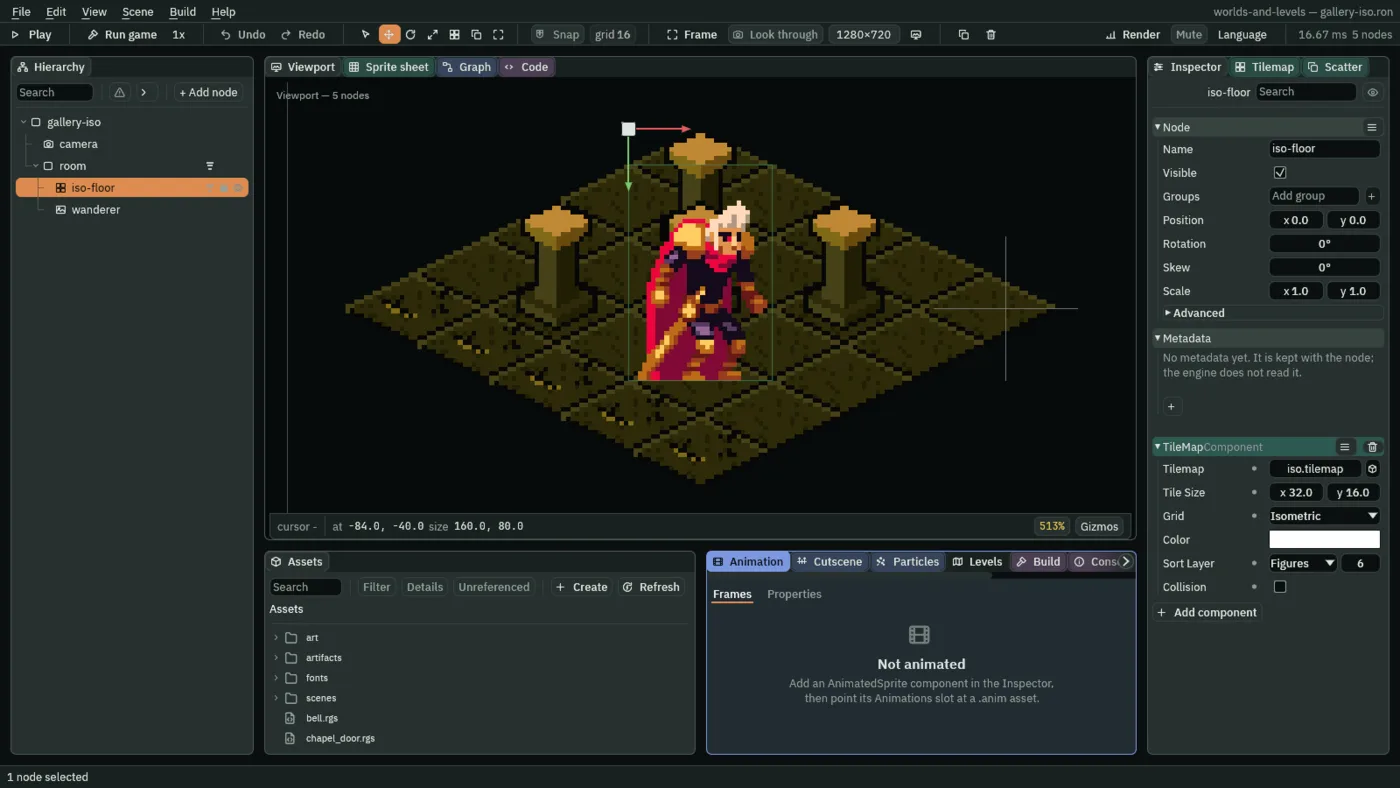
iso-floor on an Isometric grid, and the wanderer in it.- Why the Problems tab says nothing
roomsorts its children by Y, and Problems says so when its Y sort is split across bands that never pass each other: two children on different Sort Layers, or tile layers at different orders on one. Here the map and the wanderer are on one Sort Layer, Figures, andpillarsandheadssit at his order,0, so they pass in front of each other. The floor’s layer at z-1paints no tile that sorts by Y, so it is not read: it is the floor, under everything.
- Press F5: Play runs the open scene, the room.
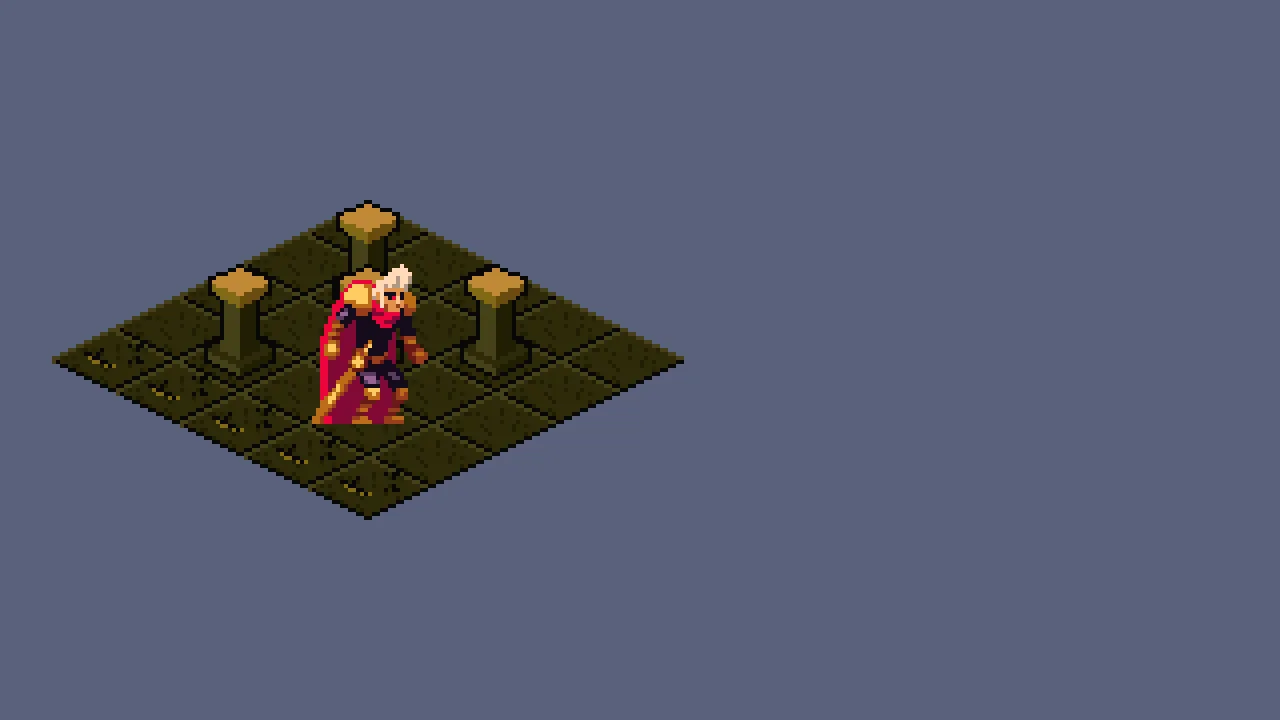
Of the two pillars on the room’s middle screen column, the nearer, 2, 2, has its head over the farther’s foot, and draws its foot and its head after the farther’s head: the nearer pillar stands in front, whole. Each foot draws just before its own head.
Stood north of a pillar, his feet higher up the screen than its foot, he draws before its foot and its head; stood south of it, after both. On a copy with him at Position 48, 40, north of the pillar at cell 3, 1:
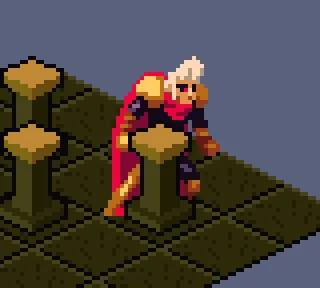
- In Play, float him with D and W to behind the pillar up and to his right, at cell
3,1, his feet just above its foot. Then hold S for a moment.

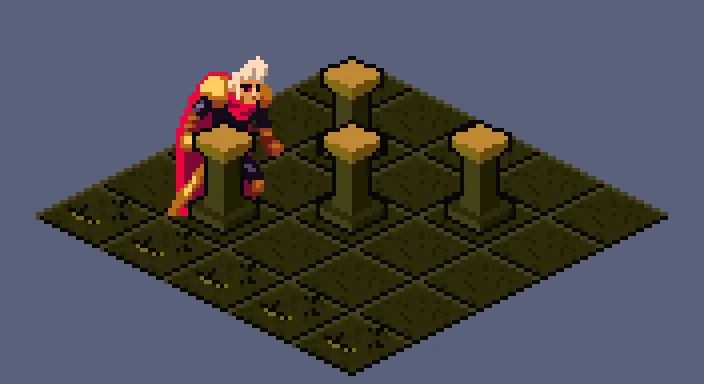
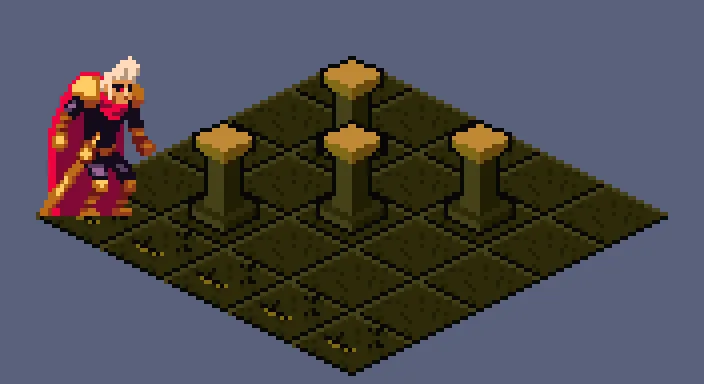
He floats through a pillar, as nothing stops him. Stood west of the room’s middle screen row, at -56, 40, and floated east with D held, he passes through the west pillar and on, 160 east in two seconds at his Speed of 80. Half a second in, he is where the pillar is:
On a copy with iso-floor’s Collision ticked, the same two seconds:
| Node or file | Parent | Position | Settings |
|---|---|---|---|
iso.tilemap | iso.png, Tile 32 by 16, Columns 4; floor z -1; pillars Solid, Blocks nav; heads; #3 Y sort 1; #4 Art origin 0, -1, Y sort 1 | ||
| the paint | floor: #1 Rect 0, 0 to 4, 4; #2 Line 0, 4 to 4, 4. pillars: #3 and heads: #4, each at 1, 1, 2, 2, 3, 1 and 1, 3 | ||
camera | gallery-iso | 0, 0 | Camera Letterbox, Extent 180, Width 320, Background as above; Pixel Perfect, Upscale Render Texture and Crop Frame ticked |
room | gallery-iso | -84, -40 | Node; Sort children by Y ticked |
iso-floor | room | 0, 0 | Tilemap iso.tilemap, Tile Size 32, 16, Grid Isometric, Figures, Collision unticked |
wanderer | room | 16, 56 | Sprite pilgrim.png 38 by 48, Anchor 0.5, 1, Figures; Animated Sprite pilgrim.anim, idle, Frame Size ticked; Character Body Floating, Speed 80 |
A staggered map
The same tiles on a map numbered by the rows of the screen. An isometric map’s rows run down to the right; a staggered map’s rows run straight across, every other one half a cell on, so a long strip of diamonds is a map of few rows and many columns. It draws on Ground and collides with nothing, its one Solid layer left empty.
- Press F5 again to stop. Select
gallery-iso, press + Add node and choose Node: the menu opens on Add child of gallery-iso. Rename itroom-staggered, and type its Position36,-40, east of the room. - Select
room-staggered, press + Add node and choose Tilemap: the menu opens on Add child of room-staggered. Rename itstaggered-floor, and leave its Position at0,0. - In its TileMapComponent, type Tile Size
32,16, set Grid to IsometricStaggered and Sort Layer to Ground. Leave Collision ticked: its only Solid layer will stay empty. - In the Tilemap tab, drop
art/iso.pngon New tilemap…: a second map from one picture isart/iso-2.tilemap. In Assets, rename itstaggered.tilemap. In the Tileset band, type Tile32and16, and Columns4, as the room’s. - Leave both layers as they come. Click
back’s row and tile#1, and with Rect drag from cell0,0to2,8:27diamonds, x0to112and y0to80from the node. - Click tile
#2, and with Line drag from cell0,4to2,4: the three cells of row4. Press the tab’s Save, and Ctrl+S.
- The TileMap’s Grid: IsometricStaggered
- The same diamonds, numbered by the rows of the screen: each row of the map is one row of the screen, its cells a cell’s width apart, and every odd row half a cell across and half a cell down from the even one above it. Row
4, the worn one, is three diamonds side by side on one line,32apart.
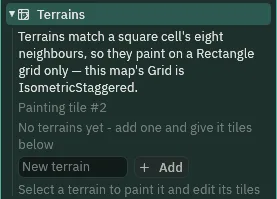
- Terrains, on square grids only
- A terrain’s rules are a square cell’s eight neighbours, and a diamond’s or a hexagon’s neighbours are other cells, so the band paints on a Rectangle grid only, and on any other it is greyed under the reason. The gallery’s grids are painted tile by tile, with Brush, Rect and Line.
- A wide brush on these grids
- The Tools band’s Size, wider than
1, paints a square of cells counted along the map’s own rows and columns, as Scatter’s footprint does. On a staggered or a hex grid that square is not a square on the screen, so leave Size at1there.
- Press F5.
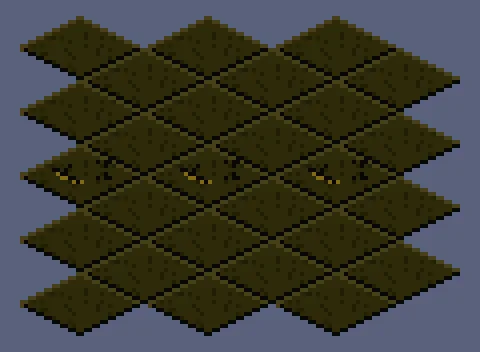
4 is one row of the screen.Every tile it draws is one of iso.png’s, the sheet the room cuts the same way: only the numbering differs. The worn row is three diamonds on one line, a cell’s width apart, and the row above it, an odd one, stands half a cell across from it.
| Node or file | Parent | Position | Settings |
|---|---|---|---|
staggered.tilemap | iso.png, Tile 32 by 16, Columns 4; back and ground as they come | ||
| the paint | back: #1 Rect 0, 0 to 2, 8; #2 Line 0, 4 to 2, 4 | ||
room-staggered | gallery-iso | 36, -40 | Node |
staggered-floor | room-staggered | 0, 0 | Tilemap staggered.tilemap, Tile Size 32, 16, Grid IsometricStaggered, Ground |
Two boards of hexes
Two boards of grass with a marsh winding down each, one of pointy-topped hexes and one of flat-topped. A token stands on each; each press of a direction steps both tokens into a neighbouring hex, onto its centre, adds up what the hex costs, shows its name, and turns it to trodden earth. The boards draw on Ground and the tokens over them, on Figures, their words on Words. The boards’ Collision is left as it comes: the tokens are moved by their script, which nothing stops.
- Press F5 again to stop, then Ctrl+S, and start
gallery-hexas the first section says: a new scene, its rootgallery-hex, saved asscenes/gallery-hex.ron, and itscamera. - Select
gallery-hex, press + Add node and choose Tilemap: the menu opens on Add child of gallery-hex. Rename itboard-pointy, and type its Position-140,-56. - In its TileMapComponent, type Tile Size
24,24, set Grid to HexPointyTop and Sort Layer to Ground. Leave Collision ticked. - In the Tilemap tab, drop
art/hex-pointy.pngon New tilemap…:art/hex-pointy.tilemap. The picture,72by24, came with the starter: three hexes of24by24, grass, marsh and trodden earth. In the Tileset band, type Tile24and24, and Columns3.
- The TileMap’s Grid: HexPointyTop and HexFlatTop
- Hexagon cells, each in a
24square. HexPointyTop lays pointy-topped hexes in rows18apart, every odd row12on, so a hex has neighbours east and west and four on the slants, and none straight up. HexFlatTop lays flat-topped hexes in columns18apart, every odd column12down, so a hex has neighbours north and south and none straight across.
Each tile carries two values a script reads wherever it is painted: what the hex costs to enter, and its name.
- Click tile
#1, the grass. Under Data, press Add value and choose Int: a row namedkey. Typecostover its name, press Enter, and type its value1. - Press Add value again and choose Text. Type
nameover the new row’s name, press Enter, and typegrassin its box.
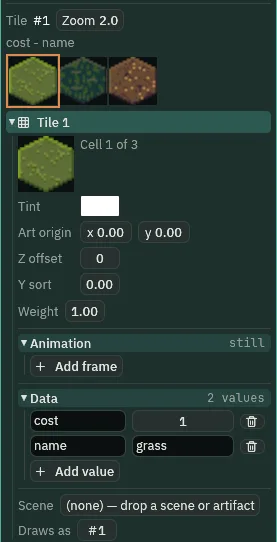
#1: Data cost 1 and name grass.- Click tile
#2, the marsh, and give it the same two rows:cost2andnamemarsh. - Click tile
#3, the trodden earth, and give it one row alone: Text,name,trodden.
- A tile’s Data: Int and Text, and Add value
- Chapter 4’s named values, two more kinds of them. Add value offers Bool, Int, Float and Text, and each adds a row named
keyat its kind’s blank:0for an Int or a Float, unticked for a Bool, empty for a Text. Int is a whole number, read bytile_number; Text is words, read bytile_text. The trodden earth has nocostrow, so a hex trodden again costs nothing.
- Click
ground’s row, and tile#1. With Rect, drag from cell0,0to4,5:30hexes, x0to132and y0to114from the node. - Click tile
#2. With Line, drag from cell2,0to2,5; with Brush, click cell3,4.backstays empty. Press the tab’s Save. - Select
gallery-hexand add a second Tilemap the same way:board-flat, at Position24,-66, Tile Size24,24, Grid HexFlatTop, Sort Layer Ground. Dropart/hex-flat.pngon New tilemap…, cut it the same, and give its three tiles the same rows. - On its
ground, paint#1with Rect from cell0,0to5,4,#2with Line from2,0to2,4, and#2with Brush at3,3. Press the tab’s Save, and Ctrl+S.
The pointy board covers x -140 to -8 and y -56 to 58 in the world, the flat one x 24 to 138 and y -66 to 66. Now a token for each.
- In Assets, with Assets clicked in the path bar, click Create, choose New script, type
tokenand press Enter. Click the Code tab, thentoken.rgsin its Scripts list, replace everything in it with the script below, and press Ctrl+S. Click the Viewport tab.
/// A token on a board of hexes. Each press of a direction steps it into a
/// neighbouring hex, onto the hex's centre. The hex turns to trodden earth,
/// its cost is added to the token's, and its name shows over the token.
component Token {
    /// The board the token walks: the node whose tilemap holds its hexes.
    #[node_path]
    board: i32 = 0,
    /// What the hexes the token has entered cost, added up.
    #[readonly]
    cost: f32 = 0.0,

    fn loop() {
        // Right (D, or the right arrow), left (A, or the left arrow), up (W,
        // or the up arrow) and down (S, or the down arrow) each step it.
        if pressed("right") || pressed("left") || pressed("up") || pressed("down") {
            // Each aims at a point a little under a hex's width from the
            // token's middle, a little to one side of straight. A board of
            // pointy-top hexes has no neighbour straight up, and one of
            // flat-top hexes none straight to the right; aimed this way, a
            // press lands well inside one neighbouring hex on either board,
            // never on the edge between two.
            let aim = vec2(0.0, 0.0);
            if pressed("right") {
                aim = vec2(21.0, -6.0);
            } else if pressed("left") {
                aim = vec2(-21.0, 6.0);
            } else if pressed("up") {
                aim = vec2(6.0, -21.0);
            } else if pressed("down") {
                aim = vec2(-6.0, 21.0);
            }
            // The hex the aim falls in. A cell with no hex painted on the
            // board's ground layer is off its edge, and the token stays put.
            let cell = cell_at(node(board), position() + aim);
            if tile_at(node(board), "ground", cell) != 0 {
                // The token stands on the hex's centre.
                move_to(cell_centre(node(board), cell));
                // The hex's Data rows, read as they were when the step began:
                // its cost is added to the token's, and its name is shown.
                cost += tile_number(node(board), "ground", cell, "cost");
                let name = tile_text(node(board), "ground", cell, "name");
                set_text("WorldTextComponent", "text", name);
                // The hex turns to trodden earth, tile 3, from the next step.
                set_tile(node(board), "ground", cell, 3);
            }
        }
    }
}
component Token,boardandcost- A script with no base.
boardis#[node_path], a node picker in the Inspector, Board: the map whose hexes the token walks.costis#[readonly], greyed, the hexes’ costs added up, to watch. - The aims
- Each press aims at a point a little under a hex’s width from the token’s middle, a little to one side of straight: right at
21,-6, left at-21,6, up at6,-21and down at-6,21. Each lands well inside one neighbouring hex on either board, never on an edge. One script serves both boards, so up steps up and to the right on the pointy board, which has no hex straight up, and right steps right and up on the flat one, which has none straight across. - cell_at, tile_at and node
cell_atis the cell of the board’s grid a point in the world falls in, a hexagon here, as chapter 4’s found a square.tile_atis the tile painted there onground,0for none: off the board’s edge the token stays put.- cell_centre and move_to
cell_centreis the middle of a cell in the world, on any grid: on odd rows and odd columns too, half a cell on.move_tostands the token there.- tile_number and tile_text
- The value of a Data row of the tile in a cell, by its name:
tile_numberan Int’s or a Float’s as a number,tile_texta Text’s as words. A tile with no such row gives0, or no words: trodden earth has nocost, so it adds0. - set_tile and set_text
set_tileturns the hex to tile3, trodden earth, in the map’s own copy for the run, as chapter 12’s bridge was laid: the.tilemapon disk is as painted.set_textwrites the hex’s name on the token’s World Text.- What a step reads
- Every tile a script reads in a step is as the step began, and a
set_tilelands from the next step. So the hex’s cost and name are its own, not trodden earth’s, whichever line comes first: reading before writing, astoken.rgsdoes, changes nothing.
- Select
gallery-hex, press + Add node and choose Shape: the menu opens on Add child of gallery-hex. Rename ittoken-pointy, and type its Position-92,-26: the centre ofboard-pointy’s cell1,1. - In its Shape, set Kind to Circle, type Size
12,12, and leave Anchor at0.5,0.5. Type Color and Outline Color as the table below gives them, Outline1, and set Sort Layer to Figures. - Press Add component and choose WorldTextComponent. Clear its Text, type Offset
0,-14, and set Sort Layer to Words. Leave the rest as it comes. - Drag
token.rgsonto its Inspector: it adds Token, a Board row, empty, and Cost greyed. Click Board and chooseboard-pointy. - Right-click
token-pointyin the Hierarchy and choose Duplicate:token-pointy copyappears straight after it. Rename ittoken-flat, type its Position54,-18, the centre ofboard-flat’s cell1,1, and set its Board toboard-flat. Press Ctrl+S.
| Typed | |
|---|---|
| Color, the signposts’ bone | 0.93, 0.86, 0.66, alpha 1 |
| Outline Color, their words’ brown | 0.18, 0.10, 0.05, alpha 1 |
On the screen each token is a cream disc with a thin brown rim, the rim lighter than its numbers look, as a colour typed in linear light shows.
- The World Text’s Offset, over the token
0,-14: the words stand14above the token’s middle, clear of the disc. They draw on Words, over the boards and the tokens.
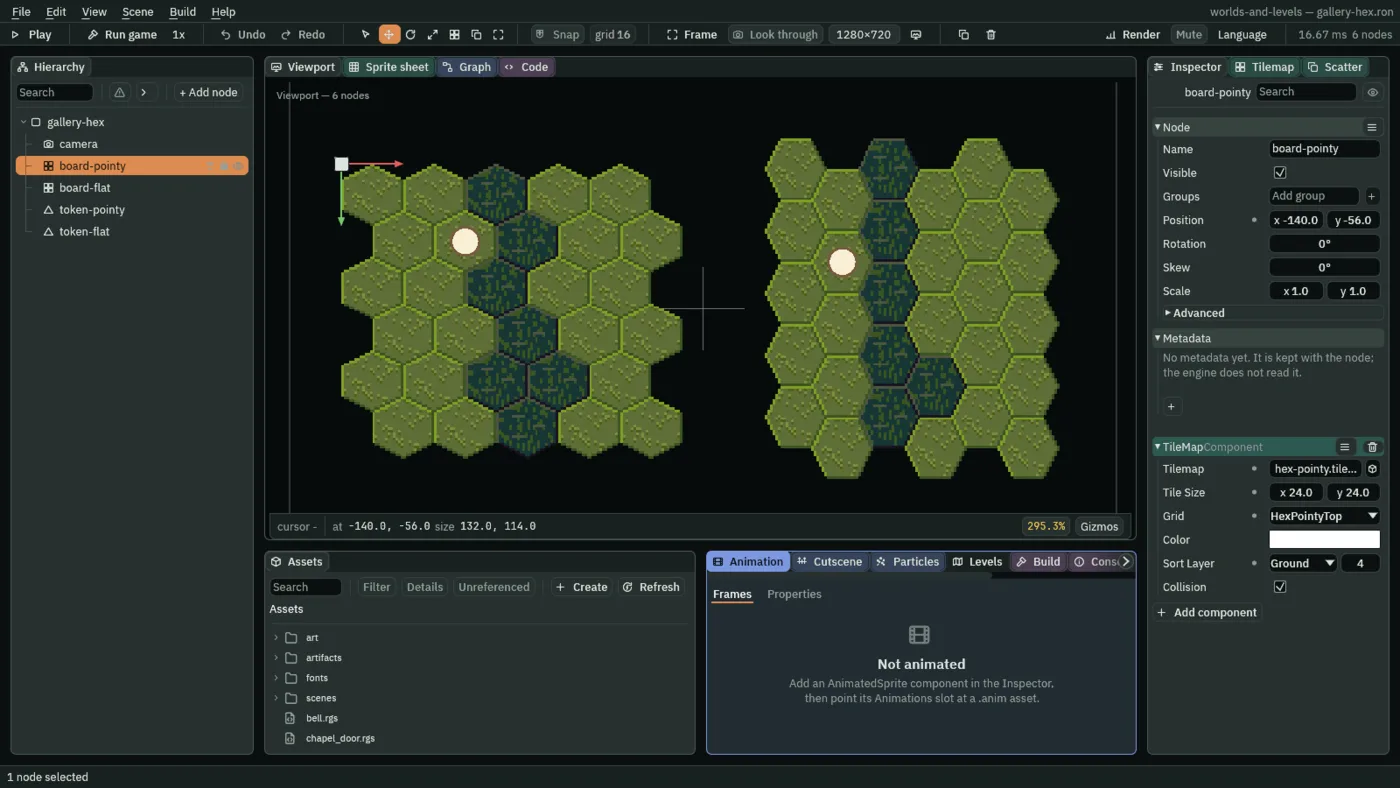
- Press F5. Press D twice, then S twice, A twice and W twice, a moment between each: a ring of eight presses.

Round the ring each token stands on a hex’s centre at every press, on odd rows and columns as on even ones, and ends where it began. Each hex it enters reads trodden in the map’s copy for the run, and the exported game’s map is as it was painted.
- Press F5 twice, to stop and play again: the trodden earth goes with the run. Select
token-pointy, to watch its Cost in the Inspector, and press D, D, then A.
The first right steps each token onto marsh, adding its cost of 2 and reading “marsh”; the second, onto grass, adds 1 and reads “grass”; and the left, back onto the marsh just trodden, adds 0 and reads “trodden”.
| Node or file | Parent | Position | Settings |
|---|---|---|---|
hex-pointy.tilemap, hex-flat.tilemap | their pictures, Tile 24 by 24, Columns 3; Data: #1 cost 1, name grass; #2 cost 2, name marsh; #3 name trodden | ||
| the paint | pointy ground: #1 Rect 0, 0 to 4, 5; #2 Line 2, 0 to 2, 5 and 3, 4. Flat ground: #1 Rect 0, 0 to 5, 4; #2 Line 2, 0 to 2, 4 and 3, 3 | ||
board-pointy | gallery-hex | -140, -56 | Tilemap hex-pointy.tilemap, Tile Size 24, 24, Grid HexPointyTop, Ground |
board-flat | gallery-hex | 24, -66 | Tilemap hex-flat.tilemap, the same, Grid HexFlatTop |
token-pointy | gallery-hex | -92, -26 | Shape Circle 12 by 12, Outline 1, colours as above, Figures; WorldTextComponent, empty, Offset 0, -14, Words; Token, Board board-pointy |
token-flat | gallery-hex | 54, -18 | a duplicate of token-pointy, Board board-flat |
A dungeon cut with its gutters
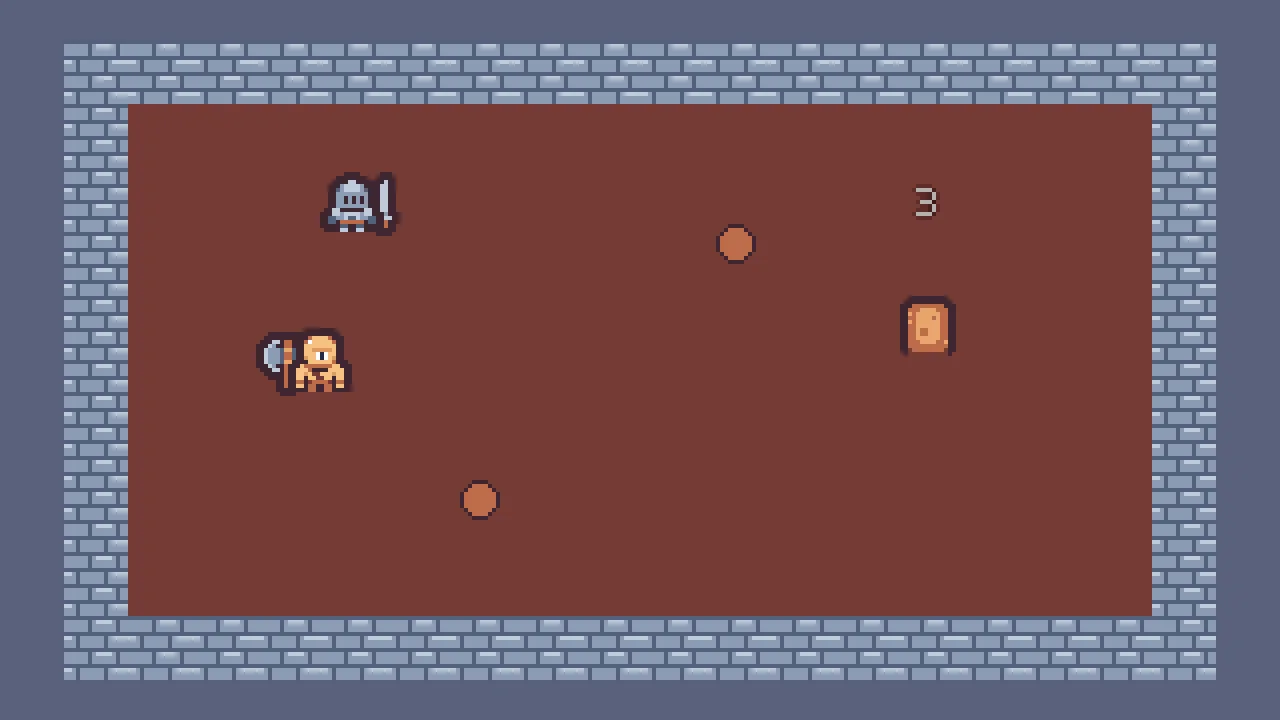
A room seen from straight above, walled in stone, with a knight who walks it and an orc who stands still, each with a weapon in hand, and two pots between them. Its tiles come from Kenney’s Tiny Dungeon, whose sheet has a gutter of one pixel between every two tiles. The map draws on Ground and its walls stop the knight; the figures and the pots draw on Figures, sorted by their feet under hall.
- Press F5 again to stop. Copy the picture above into
art, and press Refresh in Assets. - Double-click
art/tiny-dungeon.pngin Assets: the Sprite sheet tab opens on it,203by186, cut in cells of32as it opens. - In the Grid band, press Detect grid: it reads the cells off the picture’s gaps, Cell
16and16, Margin0and0, Spacing1and1,12x11cells. Typing those does the same. - Name five regions, one cell each, as the table below gives them: click the cell, type its name in the box beside Name it under Regions, and press Name it. Then click the Viewport tab.
| Region | Cell (column, row) | From (x, y) |
|---|---|---|
knight, the armoured knight | 0, 8 | 0, 136 |
sword | 8, 8 | 136, 136 |
orc, the one-eyed brute | 1, 9 | 17, 153 |
axe, a double axe | 10, 9 | 170, 153 |
dummy, a wooden target | 6, 5 | 102, 85 |
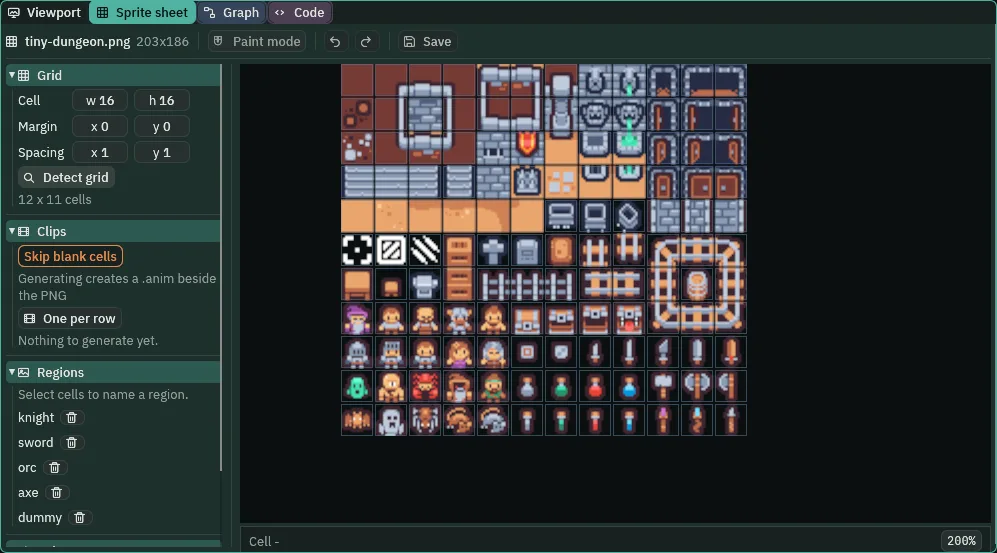
Each region starts 17 pixels on from the one before it, across or down: a tile and its gutter. The knight in column 0, row 8, is at 0, 136, not the 0, 128 a sheet with no gutter would give.
- Press Ctrl+S, and start
gallery-dungeonas the first section says: a new scene, its rootgallery-dungeon, saved asscenes/gallery-dungeon.ron, and itscamera. - Select
gallery-dungeon, press + Add node and choose Tilemap: the menu opens on Add child of gallery-dungeon. Rename itdungeon, leave its Position at0,0, and set Sort Layer to Ground. Leave Tile Size16,16, Grid Rectangle and Collision ticked as they come: the walls stop the knight. - In the Tilemap tab, drop
art/tiny-dungeon.pngon New tilemap…. In Assets, renameart/tiny-dungeon.tilemapdungeon.tilemap. New tilemap cuts it in tiles of16, twelve to a row, all that fit across203. - In the Tileset band, type Spacing
1and1, and leave Margin at0.
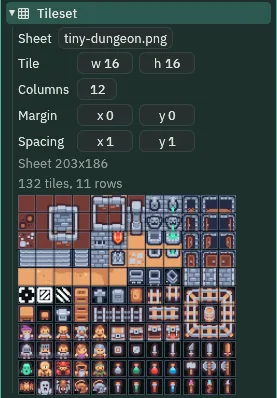
132 tiles, eleven rows of twelve.- The Tileset band’s Spacing
- The gutter between tiles on the sheet, in pixels, across and down:
1and1here, where chapter 2’s sheet had none. Tilenof the cut, counting from0, starts at17× its column and17× its row: the stone wall,#41, the cell40, at68,51, four gutters across and three down, not the64,48a sheet with no gutter would give. The Sprite sheet tab’s Spacing is the same gutter, for regions.
- Rename
backfloorandgroundwalls.floorstays as it comes, not Solid;wallsstays Solid with Blocks nav, both at z0. - Click
floor’s row and tile#49, the plain sand floor. With Rect, drag from cell-8,-4to7,3:128cells, x-128to128and y-64to64. - Click
walls’ row and tile#41, stone bricks. With Line, draw the four sides of a ring round the floor, as the table below gives them:52cells, x-144to144and y-80to80, a room18by10.
| Wall | From cell | To cell |
|---|---|---|
| north | -9, -5 | 8, -5 |
| south | -9, 4 | 8, 4 |
| west | -9, -4 | -9, 3 |
| east | 8, -4 | 8, 3 |
The room is painted in sand. The sheet has a brown dungeon floor too, tile #1, and the room is to be brown: rather than repaint 128 cells, the sand is told to draw as the brown.
- Click tile
#49in the picker. In the Tile band, type Draws as1. Press the tab’s Save.
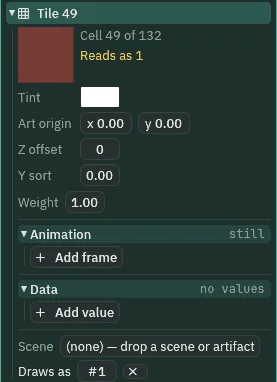
#49, drawn as #1: every cell painted with it shows the brown floor.- A tile’s Draws as
- Chapter 4’s, for real: every cell painted with
#49draws#1’s art, and the band says Reads as 1, its preview the brown. The file still holds the sand in all128cells, so nothing is repainted, and pressing the cross beside Draws as gives the sand back. It is for a sheet whose art is changed after a room is painted on it, or a room re-skinned at a stroke.
Then the figures. Each is a Sorting Group holding its body and its weapon, so the two sort as one by the group’s place, its feet, and nothing of another figure comes between them.
- Select
gallery-dungeon, press + Add node and choose Node: the menu opens on Add child of gallery-dungeon. Rename ithall, leave its Position at0,0, and in its Node’s Advanced fold tick Sort children by Y. - Select
hall, press + Add node and choose Sorting Group: the menu opens on Add child of hall. Rename itknight, type its Position-72,-32, his feet, and set Sort Layer to Figures. Leave Depth and Enabled as they come. - Press Add component and choose CharacterBodyComponent. Set Motion Mode to Floating, type Speed
80and Size12,8: a footprint at his feet. Leave Driven By at Keys. - Select
knight, press + Add node and choose Sprite: the menu opens on Add child of knight. Rename itknight-body, and leave its Position at0,0. In its Sprite, dragart/tiny-dungeon.pngonto Texture, typeknightin Atlas Region, Size16,16and Anchor0.5,1, and set Sort Layer to Figures. - Select
knightagain and add a second Sprite:knight-sword, at Position8,-7, beside his right hand. The same picture, Atlas Regionsword, Size16,16, Anchor left at0.5,0.5, Sort Layer Figures. - Select
hall, and add a second Sorting Group:orc, at Position-80,8, Sort Layer Figures. It has no body: it stands still. - Select
orcand add a Sprite as the knight’s body:orc-body, at Position0,0, Atlas Regionorc, Size16,16, Anchor0.5,1, Sort Layer Figures. - Select
orcagain and add a second Sprite:orc-axe, at Position-8,-7, Atlas Regionaxe, Size16,16, Anchor left at0.5,0.5, Sort Layer Figures.
- The Sorting Group’s Sort Layer, under a parent that sorts by Y
- The group draws its children as one, on its own Sort Layer, Figures, sorted by Y among
hall’s other children by the group’s own place, the figure’s feet. A weapon stands7above its figure’s feet: inside its group it draws with the body, behind it; sorted on its own by its own Y, it would slice the figure whenever another’s feet were up to7above his.
Two pots, outlined Circles among the figures.
- Select
hall, press + Add node and choose Shape: the menu opens on Add child of hall. Rename itpot-1, and type its Position-40,40. - In its Shape, set Kind to Circle, type Size
10,10and Anchor0.5,1, its foot. Type Color and Outline Color as the table below gives them, Outline1, and set Sort Layer to Figures. - Right-click
pot-1in the Hierarchy and choose Duplicate:pot-1 copyappears straight after it. Rename itpot-2, and type its Position24,-24. Press Ctrl+S.
| Typed | |
|---|---|
| Color, the sheet’s brown | 0.509, 0.150, 0.068, alpha 1 |
| Outline Color, its dark outline | 0.050, 0.019, 0.031, alpha 1 |
Typed in linear light, the brown shows lighter than its numbers look, as the sheet’s terracotta, ringed in a dark plum.
- The Shape’s Outline, and where the ring sorts
- An outlined Circle draws its fill and its ring as one, in one draw, so the ring sorts with its fill, by the pot’s foot: with the knight’s feet just above the pot’s it draws over both his parts, ring and all, and with his feet just below, under them.
- Press F5, and hold S.

On every frame the knight’s body and his sword draw together, with nothing of the orc between them: before both the orc’s parts while his feet are above the orc’s, after both once they are below, through the band where each part sorted by its own place would have sliced him.
| Node or file | Parent | Position | Settings |
|---|---|---|---|
tiny-dungeon.png | regions knight, sword, orc, axe, dummy, cut on Cell 16, Spacing 1 | ||
dungeon.tilemap | tiny-dungeon.png, Columns 12, Spacing 1, 1; floor, walls; #49 Draws as 1 | ||
| the paint | floor: #49 Rect -8, -4 to 7, 3. walls: #41, four Lines, the ring above | ||
dungeon | gallery-dungeon | 0, 0 | Tilemap dungeon.tilemap, Ground |
hall | gallery-dungeon | 0, 0 | Node; Sort children by Y ticked |
knight | hall | -72, -32 | Sorting Group, Figures; Character Body Floating, Speed 80, Size 12, 8 |
knight-body, knight-sword | knight | 0, 0; 8, -7 | Sprites, regions knight, Anchor 0.5, 1, and sword; 16 by 16, Figures |
orc | hall | -80, 8 | Sorting Group, Figures |
orc-body, orc-axe | orc | 0, 0; -8, -7 | Sprites, regions orc, Anchor 0.5, 1, and axe; 16 by 16, Figures |
pot-1, pot-2 | hall | -40, 40; 24, -24 | Shape Circle 10 by 10, Anchor 0.5, 1, Outline 1, colours as above, Figures |
A damage counter
A practice dummy in the dungeon, and over it, about every 0.6 seconds, a number saying how hard it was struck, which rises and fades and is gone. Each number is a World Text made by a Spawner and gone when its script is done; it draws on Words, over everything, and collides with nothing.
- Press F5 again to stop. In Assets, with Assets clicked in the path bar, click Create, choose New script, type
numberand press Enter. Click the Code tab, thennumber.rgsin its Scripts list, replace everything in it with the script below, and press Ctrl+S. Click the Viewport tab.
/// A number rising over the practice dummy. It shows how hard the blow was,
/// a whole number from 1 to 19, rises and fades for 0.8 of a second, and is
/// gone.
component Number {
    fn on_create() {
        // random gives a number from 1 up to, but never, 20; floor drops what
        // comes after the point, and text writes it with none.
        set_text("WorldTextComponent", "text", text(floor(random(1.0, 20.0))));
        // Over 0.8 of a second the words rise from the node to 16 above it,
        // quickly at first and slowing as they arrive...
        anneal_point("WorldTextComponent", "offset", vec2(0.0, -16.0), 0.8, .OutCubic);
        // ...and over the same 0.8 they fade evenly until nothing is left.
        await anneal_colour("WorldTextComponent", "color", vec4(1.0, 1.0, 1.0, 0.0), 0.8, .Linear);
        // Faded out, the number is gone.
        destroy_self();
    }
}- on_create
- Runs once, as the copy is made: each number shows, rises and fades of its own accord, and nothing else need tell it to.
- random, floor and text
random(1.0, 20.0)is a number from1up to, but never,20;floordrops what comes after its point;textwrites it as words, with no point. A whole number from1to19, new for every copy.- Two anneals at once, and destroy_self
- Chapter 10’s
anneal_pointandanneal_colour, on the words’ Offset and Color. The first is not awaited, so both run together for0.8seconds: the words rise to16above the node, fast then slowing, and fade evenly to nothing. The second is awaited, and once it is done the copy takes itself away.
- Press Ctrl+S. Choose File → New scene: an empty scene takes the dungeon’s place.
- Press + Add node and choose World Text. Rename it
number. Clear its Text, and set Sort Layer to Words. Leave the rest as the preset gives it: Pixel Size, Offset0,0, white, outlined black, Copies, the project’s face. - Drag
number.rgsonto its Inspector: it adds Number, with nothing to set. - Right-click
numberin the Hierarchy and choose Save as artifact…, and save it inartifactsasnumber.artifact. - Double-click
scenes/gallery-dungeon.ronin Assets. The editor asks Save the open scene?: press Discard. The number is in its artifact, and the scene round it is not wanted.
- In Assets, with Assets clicked in the path bar, click Create, choose New script, type
dummyand press Enter. Click the Code tab, thendummy.rgsin its Scripts list, replace everything in it with the script below, and press Ctrl+S. Click the Viewport tab.
/// A practice dummy. Every 0.6 of a second it takes a blow, and a number
/// saying how hard rises over it: a copy of the artifact its Spawner names
/// number.
component Dummy {
    fn loop() {
        // The number is made at the end of the step, 24 above the dummy's
        // feet, just over its head. Then 0.6 of a second's wait before the
        // next blow.
        spawn("number", position() + vec2(0.0, -24.0));
        await wait(0.6);
    }
}- spawn and
awaitwait - Chapter 13’s: a copy of the artifact the dummy’s Spawner names
number, made at the end of the step24above its feet, then0.6seconds beforeloop()comes round again. The loop starts its next turn a step after its wait ends, so the numbers come37steps apart: about every0.6seconds.
- Select
hall, press + Add node and choose Sprite: the menu opens on Add child of hall. Rename itdummy, and type its Position72,0. - In its Sprite, drag
art/tiny-dungeon.pngonto Texture, typedummyin Atlas Region, Size16,16and Anchor0.5,1, and set Sort Layer to Figures. - Press Add component and choose SpawnerComponent. Press the + beside Entries, open the new row, type
numberinto Name, and dragartifacts/number.artifactfrom Assets onto Artifact. - Drag
dummy.rgsonto its Inspector: it adds Dummy. Press Ctrl+S. - Press F5.

Over four seconds a number appears every 0.6 seconds, give or take two steps, each a whole number from 1 to 19. It rises to 16 above its node within 0.8 seconds, and fades evenly: half of it is left 0.4 seconds in, and it is gone within a second of appearing.
| Node or file | Parent | Position | Settings |
|---|---|---|---|
number.artifact | World Text number, empty, Words; Number | ||
dummy | hall | 72, 0 | Sprite, region dummy, 16 by 16, Anchor 0.5, 1, Figures; Spawner, number, number.artifact; Dummy |
A far ridge
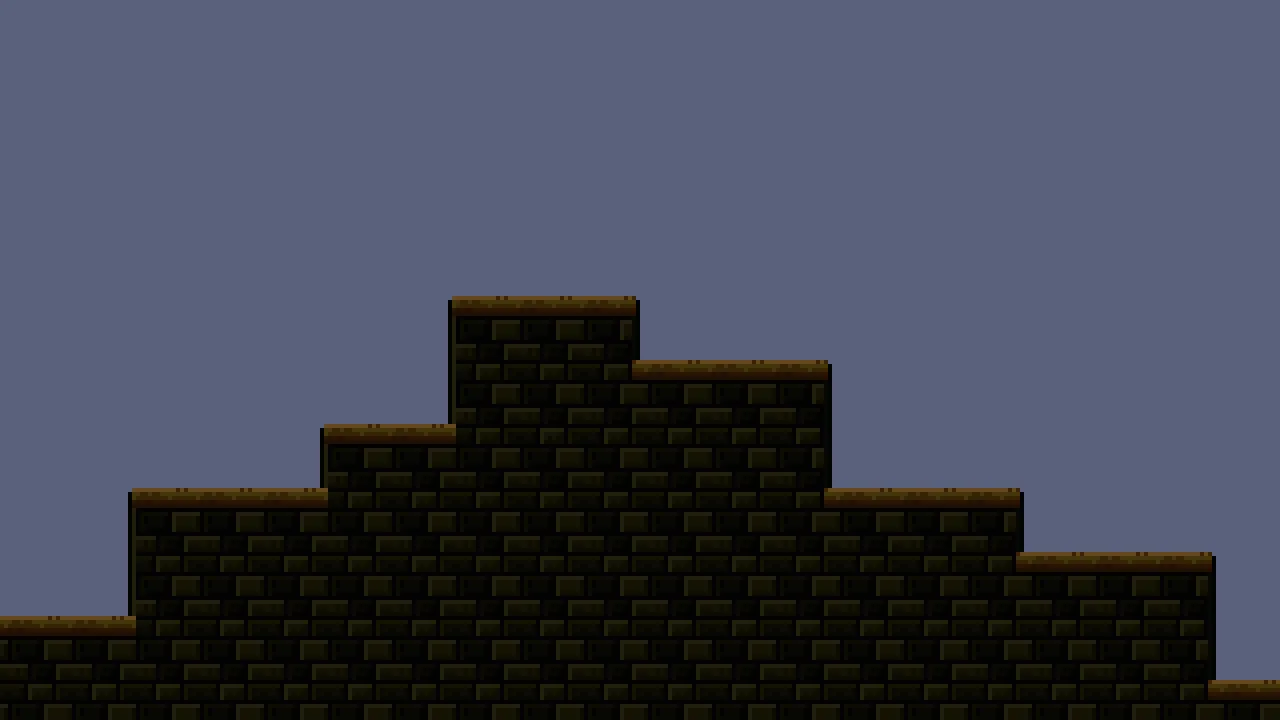
A skyline of stone far behind, which the camera pans along and which drifts slower than the camera. The ridge is the crypt’s stone on a second map, laid with chapter 3’s blob terrain and tinted dim. It rides a Parallax plane, draws on Far, and collides with nothing.
- Press F5 again to stop, then Ctrl+S, and start
gallery-lookoutas the first section says: a new scene, its rootgallery-lookout, saved asscenes/gallery-lookout.ron, and itscamera. - In Assets, with Assets clicked in the path bar, click Create, choose New script, type
panand press Enter. Click the Code tab, thenpan.rgsin its Scripts list, replace everything in it with the script below, and press Ctrl+S. Drag it ontocamera’s Inspector: it adds Pan. Click the Viewport tab.
/// The lookout's camera. Held left or right (A or D, or the arrows), it pans
/// along the far ridge, 80 a second.
component Pan {
    fn loop(dt: f32) {
        // Across only: the ridge is a skyline, and the spyglass looks along
        // it.
        if held("left") {
            translate(vec2(-80.0 * dt, 0.0));
        }
        if held("right") {
            translate(vec2(80.0 * dt, 0.0));
        }
    }
}- held and translate
held("right")is true on every step D or the right arrow is down.translatemoves the camera’s node by80×dt, the step’s share of a second:80units a second, left or right.
- Select
gallery-lookout, press + Add node and choose Node: the menu opens on Add child of gallery-lookout. Rename itridge, and leave its Position at0,0. - Press Add component and choose ParallaxComponent. Type its Factor
0.4,1. Leave Repeat X ticked, and Offset, Autoscroll and Color as they come. - Select
ridge, press + Add node and choose Tilemap: the menu opens on Add child of ridge. Rename itridge-tiles, and type its Position-192,-16. Set Sort Layer to Far, and type Color as the table below gives it. Leave Collision ticked for now. - In the Tilemap tab, drop
art/crypt-stone.pngon New tilemap…: the editor writesart/crypt-stone-3.tilemap, as the status line says, and pointsridge-tilesat it: the names chapter 2’s and chapter 13’s maps left still hold their ids. In Assets, rename itridge.tilemap. It is cut as it comes:16pixels, Columns8. Leave both layers as they come,backand a Solidground. - In the Terrains band, type
stonein the box and press Add. Click thestonerow: it lights, armed. 47-tile blob from reads#1: press Add blob, as in chapter 3. - Click
ground’s row, and click thestonerow again. With Rect, drag the foot row, from cell0,7to23,7; then each run of columns in the table below, from its top row down to row7. Press the tab’s Save, and Ctrl+S.
| Color | |
|---|---|
| The ridge’s map | 0.25, 0.25, 0.35, alpha 1 |
| Columns | From row |
|---|---|
1 to 3 | 5 |
4 to 6 | 3 |
7 and 8 | 2 |
9 to 11, the peak | 0 |
12 to 14 | 1 |
15 to 17 | 3 |
18 to 20 | 4 |
21 and 22 | 6 |
That is 114 cells, each the blob tile its neighbours call for, 24 cells, 384, wide. Both ends are the foot row alone, under the view, so where Repeat X lays the next copy, 384 on, the two meet out of sight. At the start the ridge is x -192 to 192 and y -16 to 112, its peak x -48 to 0, just left of the middle.
- Press F5.
- The Parallax’s Factor,
0.4 - How much of the camera’s pan the plane is carried along by: at
0.4across, panned80the ridge is carried32, so it slides past0.6as fast as the camera, far away.1down: the camera never moves down. Repeat X lays a copy every ridge’s width, so the skyline never runs out. - The TileMap’s Color, on the ridge
- A tint over every tile, white as it comes:
0.25,0.25,0.35dims the crypt’s stone, as a far skyline is. Typed in linear light, it keeps more of the stone than the numbers suggest: dark olive, still lipped in brown.
With its Collision ticked, as it comes, the Problems tab has a row for the map:

- The row for a map under a plane
- “This tilemap is on or under the Parallax plane "ridge", which moves what it draws but not what it collides with”: a plane carries the ridge’s tiles as the camera pans, but its Solid
groundwould collide where the map stands without the plane, an invisible ridge in the wrong place. A backdrop should collide with nothing.
- Press F5 again to stop. Select
ridge-tilesand untick Collision: the row goes. Press Ctrl+S.
Panned right for a second, the camera moves 80 and the ridge is drawn 32 further along, and its map puts up no solid anywhere. On a copy with its Collision ticked, its tiles do collide, where the map would be without the plane.
| Node or file | Parent | Position | Settings |
|---|---|---|---|
ridge.tilemap | crypt-stone.png, 16 pixels, Columns 8; terrain stone, Add blob from #1; ground: the foot row and eight runs, 114 cells | ||
camera | gallery-lookout | 0, 0 | as every gallery’s; Pan |
ridge | gallery-lookout | 0, 0 | Node; ParallaxComponent Factor 0.4, 1, Repeat X ticked |
ridge-tiles | ridge | -192, -16 | Tilemap ridge.tilemap, Far, Color as above, Collision unticked |
A spyglass
A round view of the ridge in a dark shade: a Sprite Mask under the camera writes a disc, and a dark Sprite over the whole view draws everywhere outside it. Both ride with the camera, on Words over everything, and neither collides.
- Select
camera, press + Add node and choose Sprite Mask: the menu opens on Add child of camera. Rename itlens, and leave its Position at0,0. - In its Sprite Mask, drag
art/reveal.pngonto Texture, chapter 11’s soft reveal, and type Size128,128. Leave Alpha Cutoff at0.5, and set Sort Layer to Words. Leave Anchor, Channel0and Enabled as they come. Problems says nothing reads channel0, until the next steps. - Select
camera, press + Add node and choose Sprite: the menu opens on Add child of camera. Rename itshade, and leave its Position at0,0. - In its Sprite, drag
art/shade.pngonto Texture, a small white square that came with the starter, type Size336,196, the view and8to spare each side, type Color as the table below gives it, and set Sort Layer to Words. - Tick Mask, and untick Inside: it draws outside the lens. The row in Problems goes. Press Ctrl+S.
| Color | |
|---|---|
| The shade | 0.02, 0.02, 0.05, alpha 0.85 |
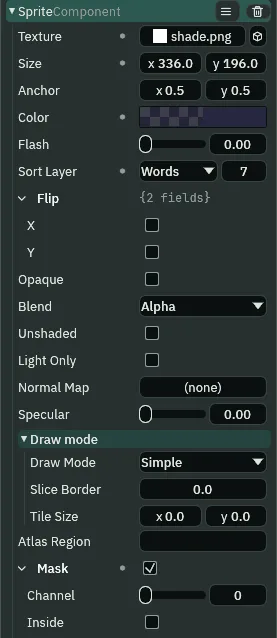
shade: Mask ticked, reading channel 0, Inside unticked.- The Sprite Mask’s Size and Alpha Cutoff, a hard disc
- The reveal’s alpha falls evenly from
1at its middle to0at32of its64pixels out. At0.5the disc keeps half of those,16, and laid at128, two units a pixel, it is a disc of radius32, (1 − 0.5) × 64. Two units a pixel is a whole number, so its edge steps evenly, a step every two units. - The Sprite’s Inside, unticked
- Chapter 11’s murals read their channel from the inside, and showed only where the lantern wrote it. Unticked, the shade draws only where channel
0is not written: everywhere but the lens.
- Press F5.
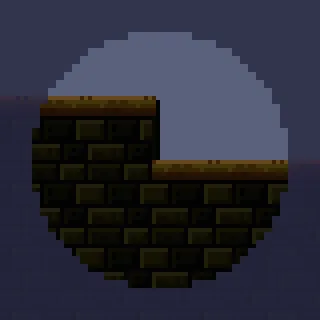
Inside the disc, 32 about the camera, every pixel is what the view would show with no shade; outside it every pixel is darkened 0.85 of the way to the shade’s near black, its alpha. Hold D:

0.6 as fast as the camera, while the lens and the shade stay put.| Node or file | Parent | Position | Settings |
|---|---|---|---|
lens | camera | 0, 0 | Sprite Mask reveal.png, Size 128, 128, Alpha Cutoff 0.5, Words, Channel 0 |
shade | camera | 0, 0 | Sprite shade.png, Size 336, 196, Color as above, Words; Mask ticked, Channel 0, Inside unticked |