Tutorials · Worlds and Levels · Chapter 6
Water and stone
By the end
- A region,
tumbled, cut from Gothic Horror’s sheet in the Sprite sheet tab: the fallen tower alone - The cliff,
cliff, in place ofcliff-block: a Polygon traced from the tower with Generate physics shape,14points, earth tiled over it, Opaque on Back - The mere,
mere, in place ofmere-block: the Polygon preset’s square drawn into six points, its water tiled at twice its size and see-through on Water - A colour chosen by its screen numbers, typed in linear light
On this page
When to reach for a Polygon
Behind the mere the vale still has two grey stand-ins: cliff-block, a box, and mere-block, a strip on the walking line. This chapter replaces both with Polygons: a fallen tower for the cliff, and still water for the mere.
Reach for a Polygon for a flat outline you fill: a pool, a slope seen from the side, a backdrop’s shape. It is one list of points, filled with a picture or a colour, and has no edge art of its own. Chapter 2’s tiles stay the tool for anything on a grid, chapter 5’s Sprite Shape for ground with edges along it, and chapter 7’s Mesh for a shape you colour and map point by point.
What collides, what draws, what sorts: a Polygon draws its outline filled, and collides with nothing; what collides is a Collider, and neither the cliff nor the mere has one, so he walks in front of both. It sorts as one node on its Sort Layer: the cliff on Back, the mere on Water in front of it, and the hills’ turf, on Ground, over the mere’s near shore.
The fallen tower
The cliff is a fallen tower, drawn at the right-hand end of Gothic Horror’s sheet among its tiles. First the tower is cut out of the sheet as a region of its own: a rectangle of the picture with a name, which a Sprite can show in place of the whole sheet.
- Copy the picture above into
art, and press Refresh in Assets. - Double-click
art/gothic-horror-tiles.pngin Assets. The Sprite sheet tab opens on it.
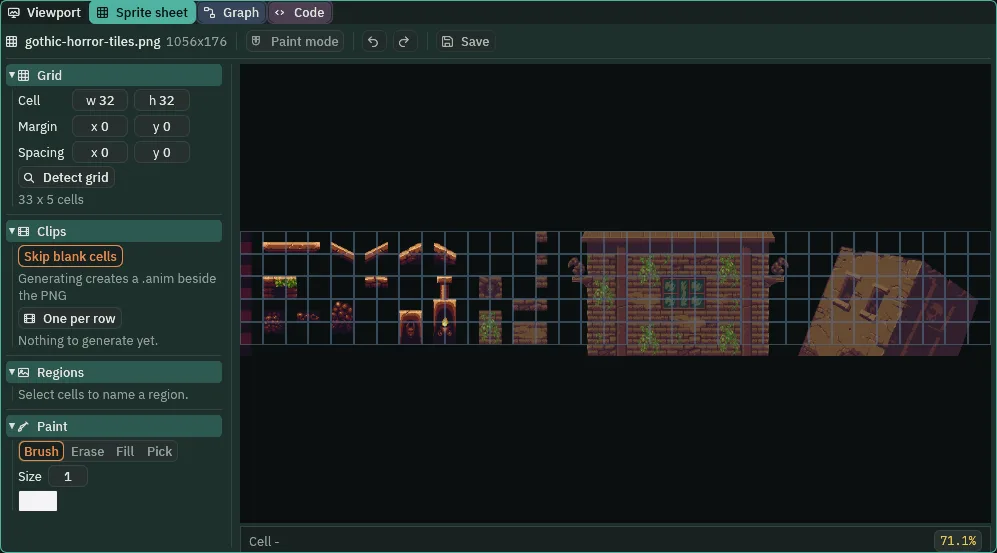
- In the Grid band, type Cell
254and154, and Margin784and22. The line under them reads 1 x 1 cell: the grid’s one cell is the tower alone. - Click the cell, the tower, in the picture. Under Regions, type
tumbledin the box beside Name it, and press Name it.tumbledis listed under it.
- The Sprite sheet tab’s Cell and Margin
- How the tab cuts the picture into a grid: Cell is one cell’s width and height, in the picture’s pixels; Margin is the blank border before the first cell, across and down. The tower is
254wide and154tall, starting784pixels across and22down, so it is x784to1038and y22to176of the sheet. These numbers are only the tab’s way of cutting: what is kept is the region named from them. - Name it
- Names the cells selected, as one rectangle, a region of the picture, and writes it into the picture’s settings beside it, where every Sprite that shows the picture can name it in its Atlas Region. Its hover says the rectangle:
254x154 at 784, 22. A name already on the sheet is refused, and the bin beside a region takes it off.
The cliff, traced
A Polygon could be drawn round the tower point by point. Instead the tower is shown on a Sprite, and the Sprite’s picture is traced: the editor follows the edge of its opaque pixels and writes the outline into a Polygon.
- With
scenes/vale.ronopen, selectcliff-block, press Delete, and press Delete in the box that asks; do the same formere-block. - Select
vale, press + Add node and choose Sprite. Rename itcliff, and type its Position1200,48: 48 under where the grey cliff stood, so the tower’s top is in view while he walks and its foot is behind the hills. - In its Sprite, drag
art/gothic-horror-tiles.pngonto Texture and typetumbledin Atlas Region. Type Size254,154, the region’s, and Anchor0.5,1, so it stands on its foot. - In the Sprite’s Physics shape fold, leave Alpha above at
8, Tolerance at2 pxand Min area at16, and press Generate physics shape. The line under it says it wrote14vertices, and a PolygonComponent appears under the Sprite. - Press the bin on the SpriteComponent’s head, and Remove in the box that asks. The Polygon stays, white.
- In the Polygon, drag
art/earth.pngonto Texture and set Fit to Tile; leave Tile Scale at1. Set Color to0.16,0.15,0.20, alpha1, which darkens the earth to a dark brown, set Sort Layer to Back, and tick Opaque.
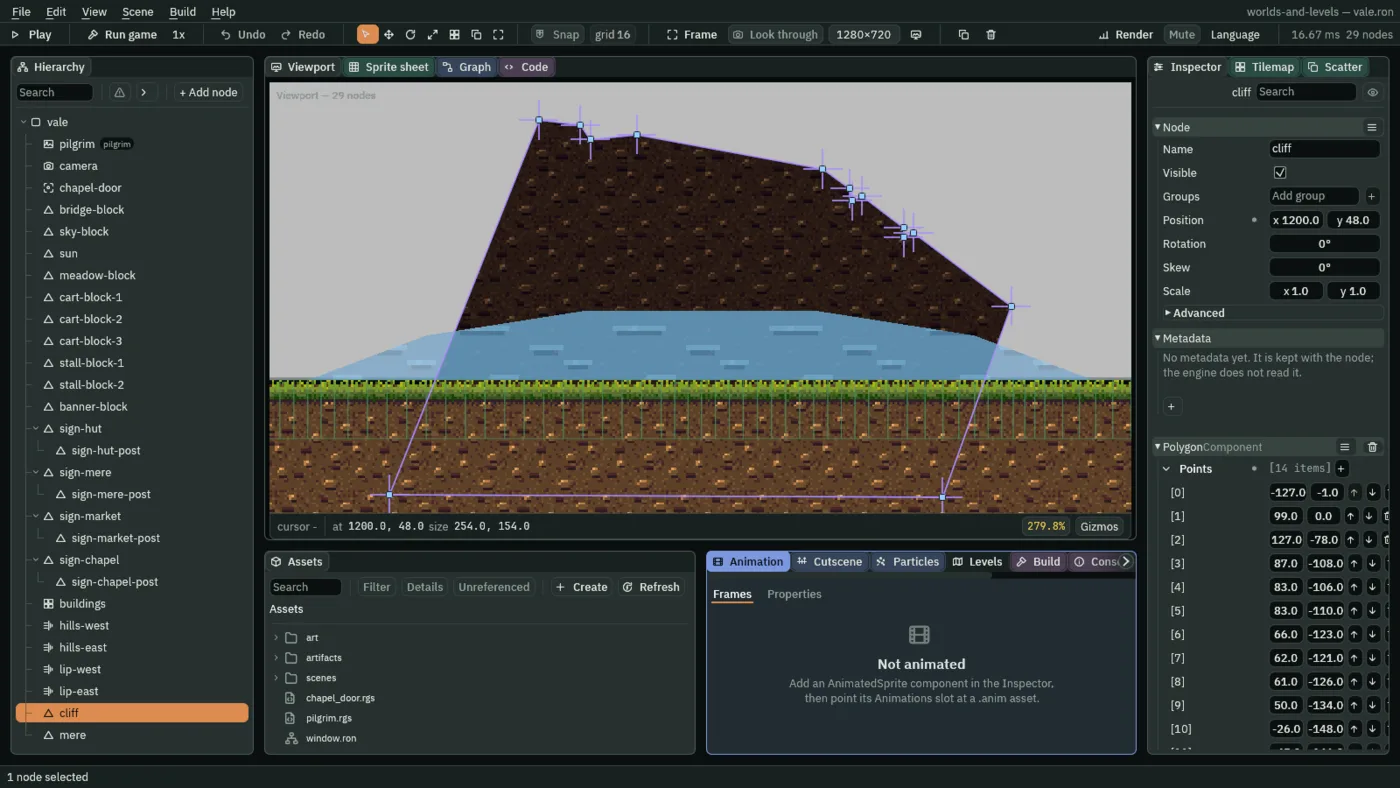
14 points.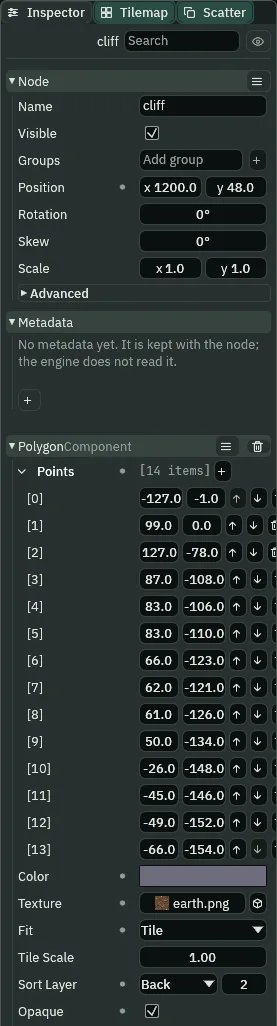
- Generate physics shape
- Under a Sprite’s Physics shape fold: traces the edge of the picture the Sprite shows, at its Size and from its Anchor, and writes the outline into the node’s Polygon, adding one if it has none. With an Atlas Region it traces that region alone, not the whole sheet: the whole sheet traces to another outline, of
49points. Alpha above is how opaque a pixel must be to count,8as it comes; Tolerance how far, in pixels, the outline may stray from the traced edge to save points,2 px; Min area the smallest island worth an outline,16square pixels. The line under the button says how many points it wrote. One undo takes it back. - The Polygon’s Points
- The outline, in order, each point a place in the node. The last joins the first: a Polygon is always closed. Its points are dragged in the Viewport, or typed in this list,
[0]onwards. - The Polygon’s Texture
- The picture the outline is filled with, laid as Fit says; none fills with flat Color.
- The Polygon’s Fit: Stretch and Tile
- Stretch, as it comes, spreads the picture once across the outline’s whole extent. Tile repeats it at its own size times Tile Scale, counted from the node’s origin.
- The Polygon’s Tile Scale
- World units each pixel of the picture covers under Tile:
1draws it at its own size, the earth’s32pixels a repeat of32units;2at twice that. - The Polygon’s Color
- A tint over the fill, alpha included: alpha under
1lets what is behind show through. White as it comes. A colour is light, typed in linear light: see below. - The Polygon’s Sort Layer
- The sorting layer the Polygon draws on. The cliff is on Back, behind the mere on Water and the hills on Ground.
- The Polygon’s Opaque
- Draws the fill without blending, for a backmost shape nothing shows through: its see-through parts, and a see-through Color, come out dark instead of showing what is behind. The cliff is ticked: only the sky is behind it.
The mere, drawn
The mere is drawn by hand, from the Polygon preset’s square. Its points are a shallow bowl: its far shore at y -28 under the cliff, its near shore on the walking line. art/mere.png, a tile of still water, came with the starter.
- Select
vale, press + Add node and choose Polygon: the menu lists it after Sprite Shape. Rename itmere, and type its Position1200,0. Click the Viewport tab, since the Sprite sheet tab is still in front of it, and press Frame: the square is in the middle of the view. - With Snap off, drag the square’s four corners, in the order the list holds them, top left, bottom left, bottom right, top right, onto
[0]to[3]of the table below. - Double-click the top edge, the one from
[3]back to[0], halfway along: a point is inserted after[3]. Drag it near[4]. Double-click the edge from[4]back to[0]and drag the new point near[5]. - In the Inspector, type each point’s
xandyfrom the table, so every point is exactly where the table puts it.
| Points | x | y | In the world |
|---|---|---|---|
| [0] | -112 | -18 | 1088, −18 |
| [1] | -160 | 0 | 1040, 0 |
| [2] | 160 | 0 | 1360, 0 |
| [3] | 112 | -18 | 1312, −18 |
| [4] | 48 | -28 | 1248, −28 |
| [5] | -48 | -28 | 1152, −28 |
- Drag
art/mere.pngonto Texture, set Fit to Tile and Tile Scale to2. - Set Color to
0.263,0.571,0.831, alpha0.7, from the table in the next section, and Sort Layer to Water. Leave Opaque unticked. Press Ctrl+S.
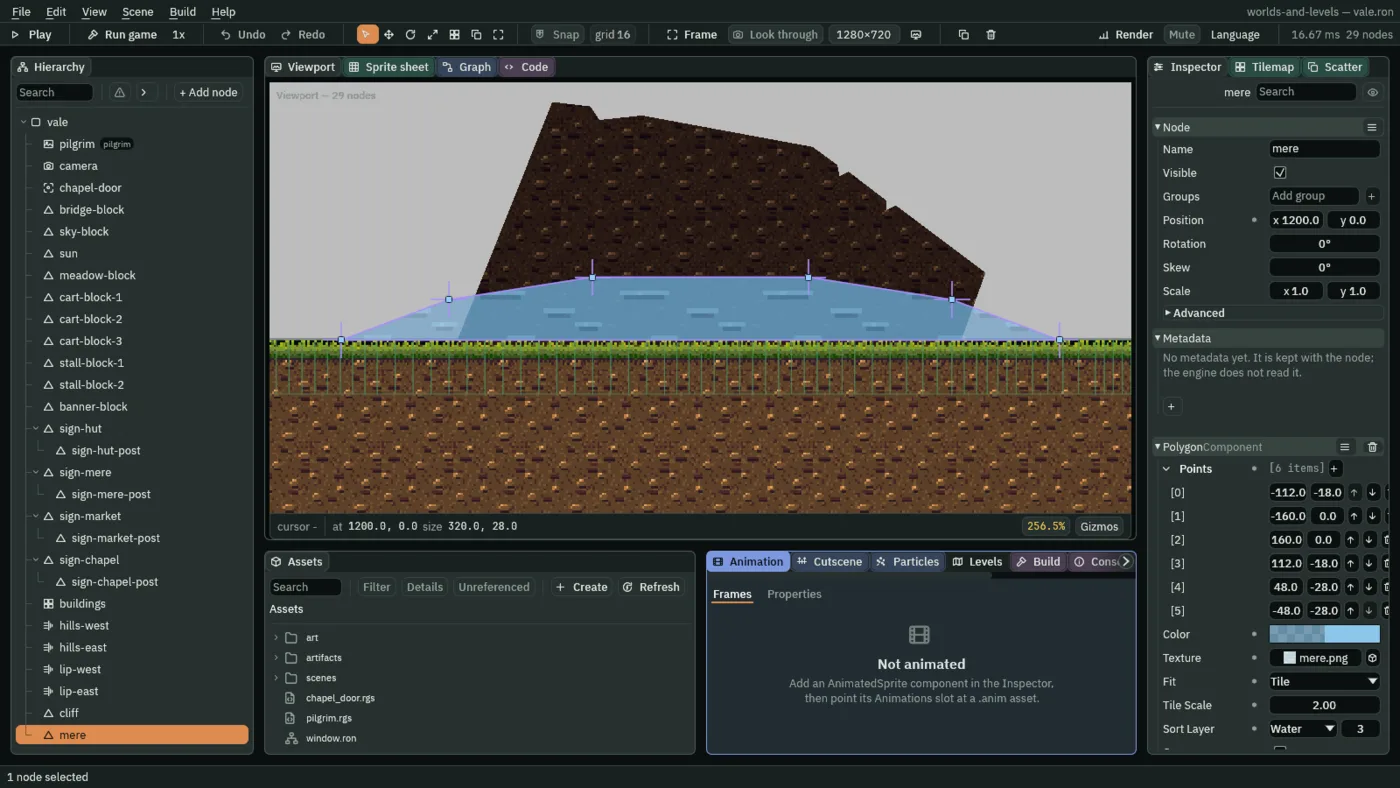
2.A Polygon’s points are edited as chapter 5’s Sprite Shape’s are: drag a point; double-click an edge to insert one; hover a point and press Delete to take it off. A Polygon keeps three, the fewest that enclose anything: at three, the status line says “This outline keeps at least 3 points — move off its points to delete the node”.
- The first three points
- A Polygon with fewer than three points draws nothing, and Problems says so: “This Polygon has 2 points, and it takes three to enclose anything, so it draws nothing — click in the Viewport to place its points, or add them under Points”. While one is selected, a plain click in the Viewport puts its next point where the click lands, rather than picking a node in front of it, each click one step to undo. To stop drawing, select another node in the Hierarchy.
Colours in linear light
The mere’s water is meant to show on the screen as 0.55, 0.78, 0.92, a pale blue. Typed as those numbers, it draws paler still. Its Color is typed as the numbers below instead.
| Color | On the screen | |
|---|---|---|
| The mere | 0.263, 0.571, 0.831, alpha 0.7 | 0.55, 0.78, 0.92 |
- Typed in linear light
- A Color is light, not a screen number. The game adds light up in linear light and writes the frame as screen numbers, which brightens all but the ends: a light of
0.263shows as0.55, so a colour typed as its screen numbers draws paler than chosen. A colour chosen by its screen numbers is typed as the light that shows as them. In the picker’s F mode, as this tutorial gives every colour, the numbers are the light; its U8 mode shows the screen’s, out of255. The sky, the meadow and the signposts in the chapters ahead are given the same way, each with the screen numbers it shows as. Alpha is not light, and is typed as it is.
In the game
Press Run game and hold D until he stands by the mere, at x 1200. The tower stands behind the water on Back, its foot behind the hills, its top in view.
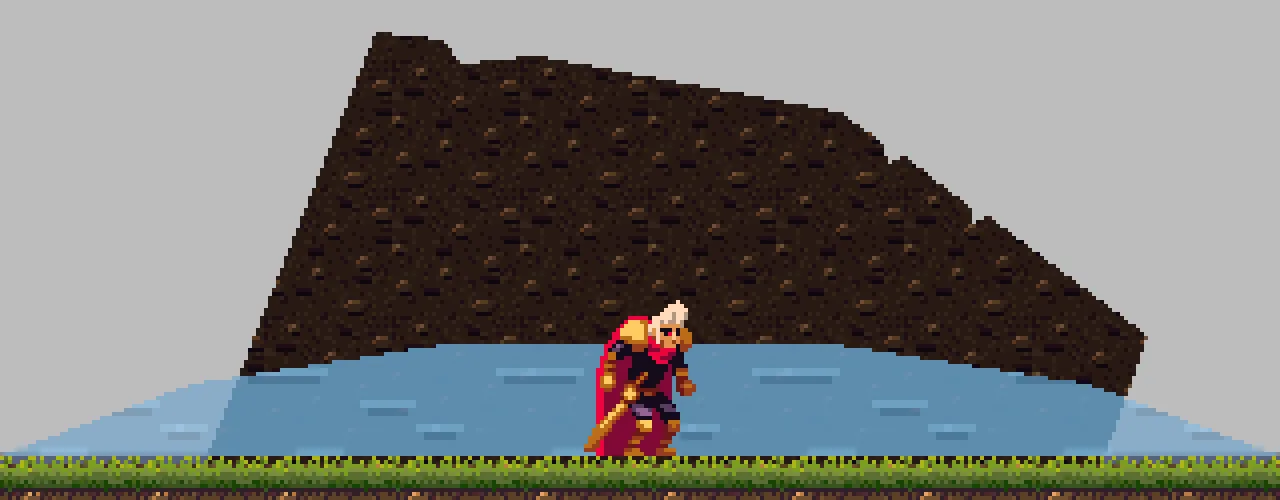
The water repeats every 64 units, one 32-pixel picture at Tile Scale 2, 256 pixels on the screen, and not every 32. It lets through 0.3 of the tower behind it, one less its alpha of 0.7: measured, 0.302. The cliff draws without blending, where the hills’ earth in the same frame blends. Its outline is the trace of tumbled alone, 14 points within its 254 by 154.
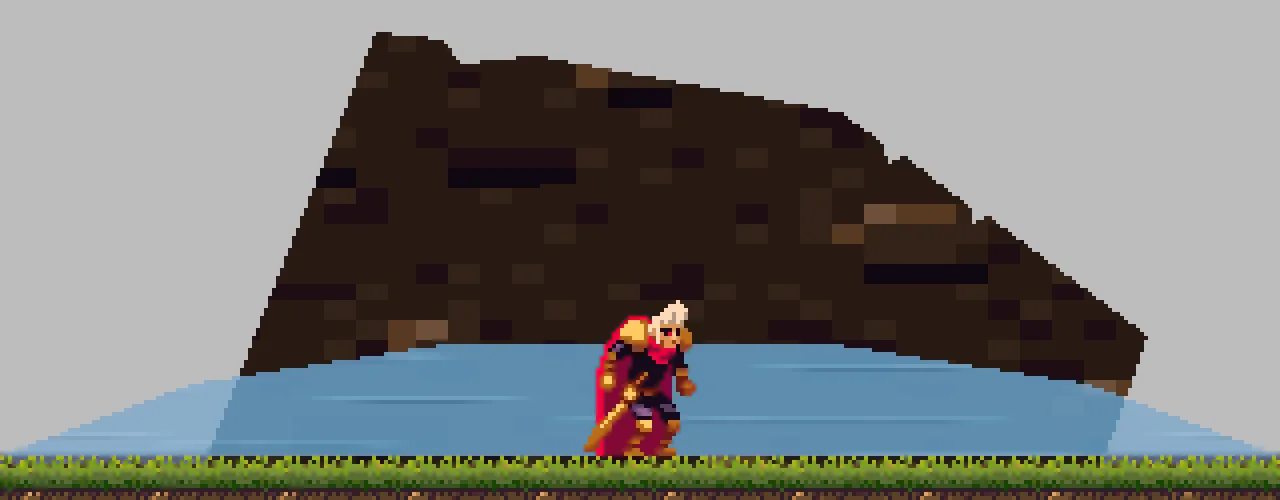
Why Tile: a copy with both Polygons back on Stretch, as the preset comes, spreads each picture once across its outline.
And why the mere’s Opaque stays unticked: a copy with it ticked draws the water without blending.
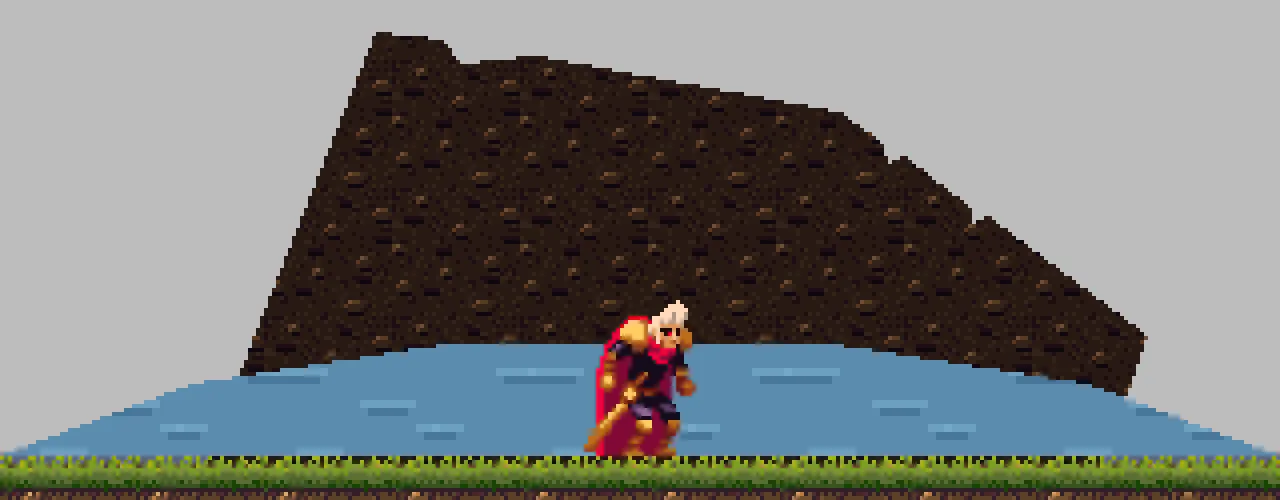
Its see-through Color comes out darker instead of showing what is behind: one blue in front of the tower and the sky alike. The cliff takes Opaque because nothing but the sky is behind it.
The two Polygons
| Field | cliff | mere |
|---|---|---|
| Node Position | 1200, 48 | 1200, 0 |
| Points | 14, traced from tumbled at 254 by 154, Anchor 0.5, 1 | six, the table above |
| Texture, Fit, Tile Scale | earth.png, Tile, 1 | mere.png, Tile, 2 |
| Color | 0.16, 0.15, 0.20, 1 | 0.263, 0.571, 0.831, 0.7 |
| Sort Layer | Back | Water |
| Opaque | ticked | unticked |
The region tumbled on gothic-horror-tiles.png: Cell 254 by 154 at Margin 784, 22. cliff-block and mere-block are gone.