Tutorials · Worlds and Levels · Chapter 12
Cause and effect
By the end
lever.rgs, one script for every lever: thrown once with E, it sayspulledto whatever its Signal names- A drawbridge in place of
bridge-block: an empty Solidbridgelayer on the vale’s map, whichdrawbridge.rgsfills plank by plank whenbridge-leveris thrown - Two artifacts, a cracked block and a gate whose lever names its own grate; the gate dropped twice and each copy renamed
- A cracked wall, a column of scene tiles on a
crackedlayer, which the pilgrim’s strike brings down in one step - The tower lever, and
keyhole.rgstaking the door away when it hears it
On this page
When to reach for a Signal
The vale’s ravine is still crossed by chapter 1’s grey bridge-block. This chapter takes it away and gives the world levers, and things they work: a drawbridge over the ravine, two gates in the crypt’s east, and the tower door; and a cracked wall the pilgrim strikes down. Four levers, one script: what each one works is the node its Signal names.
Reach for a Signal when one thing should set off another somewhere else: a lever and what it opens. The lever’s script says a name, pulled, and its Signal says who hears it; the hearer’s script listens for the name. Neither script names the other, so one lever script serves every lever. Reach for the tile writes, set_tile and clear_tile, when the map itself should change while the game plays: a bridge laid plank by plank, a door taken away.
What collides, what draws, what sorts: a Signal draws nothing and collides with nothing; it is a list of names and who hears each. A lever is a Sprite on Props, and its Area notices him and stops nothing. The drawbridge’s planks are tiles on a Solid layer, so each holds him up once it is laid. A grate is a Sprite on Props with a Collider, and a cracked block a Sprite on Ground with a Collider of its own, which the map places as a scene tile.
A lever
Every lever in Hollowmere is one picture, art/lever.png, 16 by 16, which came with the starter, a lever thrown to the left, and one script, lever.rgs.
- Double-click
scenes/vale.ronin Assets. In Assets, click Assets in the path bar, so the script is written at the project’s top, then click Create, choose New script, typeleverand press Enter. Click the Code tab, thenlever.rgsin its Scripts list, replace everything in it with the script below, and press Ctrl+S. Click the Viewport tab.
/// A lever. Standing at it, the pilgrim throws it with the action key: its
/// handle swings over, and it says pulled to whoever its Signal is wired
/// to. A lever is thrown once and stays thrown. Every lever in Hollowmere
/// is this script; what each one works is the node its Signal names.
component Lever : Area {
    /// Whether the pilgrim is within reach: inside the lever's Area.
    #[readonly]
    near: bool = false,
    /// Whether it has been thrown.
    #[readonly]
    pulled: bool = false,

    fn on_enter(other: NodeId) {
        // Something has come within reach. Only the pilgrim, who is in the
        // group pilgrim, can throw it.
        if in_group(other, "pilgrim") {
            near = true;
        }
    }

    fn on_exit(other: NodeId) {
        if in_group(other, "pilgrim") {
            near = false;
        }
    }

    fn loop() {
        // The action key (E) throws it, once: its picture is flipped, so the
        // handle leans the other way, and whoever its Signal names hears
        // pulled on the next step.
        if near && !pulled && pressed("action") {
            pulled = true;
            set_flag("SpriteComponent", "flip.x", true);
            emit("pulled");
        }
    }
}
component Lever : Area,nearandpulled- A script with an Area base: the lever’s Area is its reach.
nearis whether he is inside it, set byon_enterand cleared byon_exit;pulledis whether it has been thrown. Both are#[readonly], greyed in the Inspector, to watch. - pressed
- Whether an action went down this step:
actionis E or Enter. - set_flag with
flip.x - Ticks the Sprite’s Flip X: the picture is mirrored, and the handle leans the other way. The lever’s base is its own mirror, so only the handle moves.
- emit
- Says a name,
pulled, to whoever the node’s Signal wires it to. They hear it on the next step, never the same one.!pulledkeeps a lever from saying it twice: a lever is thrown once.
The drawbridge
The drawbridge is laid by the vale’s map itself, into a layer of its own, empty until the lever is thrown.
- Select
buildingsand click the Tilemap tab. Clickground’s row and press +: an empty layer goes in overgroundand lights. Double-click its name and rename itbridge. - Open
bridge’s gear and tick Solid. Leave the rest as a new layer comes: z0, its eye open, One-way, Blocks nav and Occluder unticked. Paint nothing on it. Press Ctrl+S.
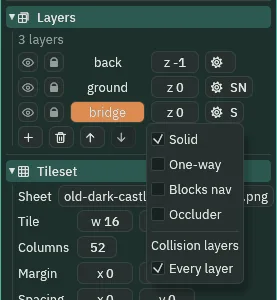
bridge’s gear: Solid, the rest as a new layer comes.- In the Hierarchy, select
bridge-block, press Delete, and press Delete in the box that asks: the ravine is open. - In Assets, with Assets clicked in the path bar, click Create, choose New script, type
drawbridgeand press Enter. Click the Code tab, thendrawbridge.rgsin its Scripts list, replace everything in it with the script below, and press Ctrl+S. Click the Viewport tab. - Select
buildings, and dragdrawbridge.rgsfrom Assets onto its Inspector: it adds Drawbridge, with nothing to set. Press Ctrl+S.
/// The drawbridge over the ravine, laid by the vale's tilemap itself. When
/// the lever by the ravine is pulled, planks are laid across, one at a
/// time, west to east, into the map's bridge layer. The layer is solid, so
/// a plank laid there can be walked on.
component Drawbridge {
    fn loop() {
        // Wait for the lever: its Signal sends pulled to this map.
        await signal("pulled");
        // Then the planks, a tenth of a second apart: the slab, tile 489,
        // into row 0, the row under the walking line, of this map's bridge
        // layer, from column 120, at the ravine's west lip, to column 129,
        // at its east. They are written out one by one because a for loop
        // runs all its turns in one step and cannot wait between them, and
        // there is no while.
        set_tile(this(), "bridge", vec2(120.0, 0.0), 489);
        await wait(0.1);
        set_tile(this(), "bridge", vec2(121.0, 0.0), 489);
        await wait(0.1);
        set_tile(this(), "bridge", vec2(122.0, 0.0), 489);
        await wait(0.1);
        set_tile(this(), "bridge", vec2(123.0, 0.0), 489);
        await wait(0.1);
        set_tile(this(), "bridge", vec2(124.0, 0.0), 489);
        await wait(0.1);
        set_tile(this(), "bridge", vec2(125.0, 0.0), 489);
        await wait(0.1);
        set_tile(this(), "bridge", vec2(126.0, 0.0), 489);
        await wait(0.1);
        set_tile(this(), "bridge", vec2(127.0, 0.0), 489);
        await wait(0.1);
        set_tile(this(), "bridge", vec2(128.0, 0.0), 489);
        await wait(0.1);
        set_tile(this(), "bridge", vec2(129.0, 0.0), 489);
        // The bridge is laid. The loop goes round and waits again, for a
        // lever that is thrown only once.
    }
}
component Drawbridgeandawaitsignal- A script with no base, on the map’s node.
signal("pulled")waits until that name reaches this node: the lever’s Signal will send it here. - set_tile and this
- Paints a tile, by its number, into a cell of a layer of a map, from the next step: here the slab,
#489, the one the hut’s step is painted with, into row0of this map’sbridgelayer, columns120to129, x1920to2080.this()is the node the script is on, the map. awaitwait- Waits that many seconds, then goes on with the next line: a plank each tenth of a second. A wait counts down a step of
1/60s at a time, and six steps leave a sliver of the tenth still to run, so it runs out on the seventh: the planks are7steps apart. - Why the planks are written out
- A
forruns all its turns in one step and cannot wait between them, and there is nowhile. A field counting the columns, a plank each turn ofloop(), would come round a step later each turn. - Writing tiles while the game plays
set_tileandclear_tilechange a map’s cells for the run only: the map’s file, in the editor and in an export, and the scene the next time it is entered, are as painted. Herebridgestays empty in the file.
Now the lever. Every lever is built the same way; this first one stands on the hills’ top by the ravine, 16 short of its west lip at x 1888.
- Select
vale, press + Add node and choose Sprite: the menu opens on Add child of vale. Rename itbridge-lever, and type its Position1872,0. - In its Sprite, drag
art/lever.pngonto Texture, type Size16,16, its own, and Anchor0.5,1, so it stands on its foot, and set Sort Layer to Props. - Press Add component and choose AreaComponent. In its Shape, type Size
24,32and Offset0,-16, and leave the Area’s Layer and Mask as they come,pilgrim, as his: x1860to1884, y-32to0, his reach. - Drag
lever.rgsfrom Assets onto its Inspector: it adds Lever, Near and Pulled greyed. - Press Add component and choose SignalComponent. Press the + beside Connections: a row,
[0]. Open it, typepulledinto Signal, and for To click it and choosebuildingsfrom the list, or dragbuildingsfrom the Hierarchy onto it. Press Ctrl+S.
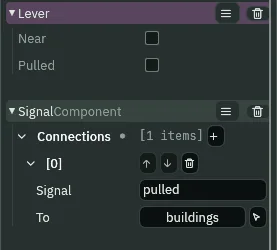
bridge-lever’s Signal: pulled, to buildings.- The Signal’s Connections
- The names this node says, and who hears each: a row a name and a hearer. + adds a row; its arrows move it, and its bin takes it off. A name with no hearer, or a hearer with no name, is a row still being typed, and draws no wire.
- The connection’s Signal and To
- Signal is the name, as the script says it,
pulled. To is the node that hears it, chosen from the list or dragged from the Hierarchy. The scene keeps the node by its number, not its name.
With the lever selected, the Viewport draws where its signals go.
- Select
bridge-lever, press Frame, and pick25%from the zoom menu at the Viewport’s foot.
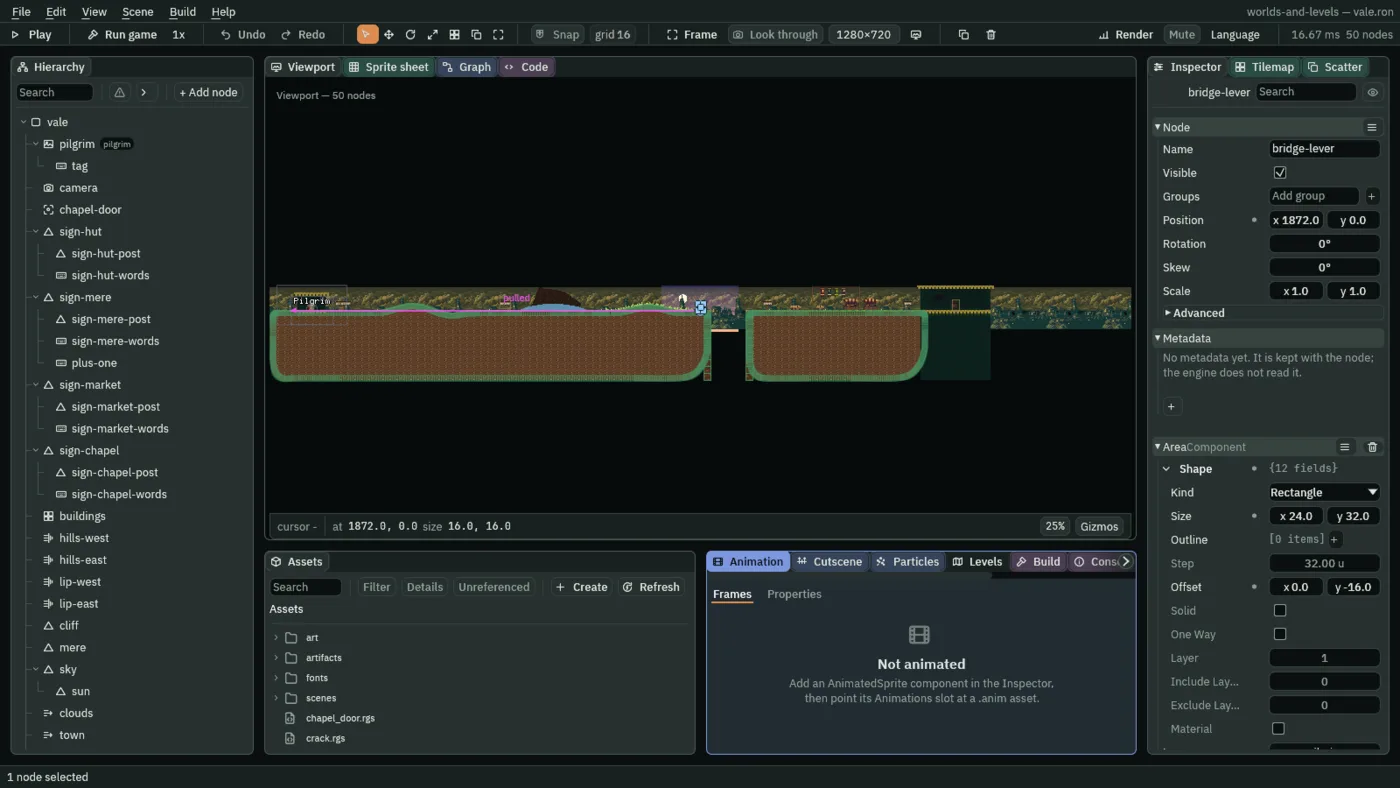
bridge-lever’s wire: west, to buildings, the map, whose node is at the vale’s west end. The Assets list already shows crack.rgs, which you make in the next section.- Click Gizmos at the Viewport’s foot.
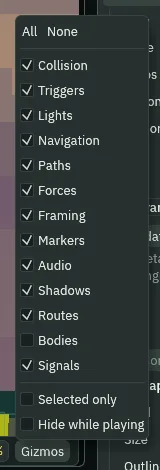
- A Signal’s wires
- While a node with a Signal is selected, the Viewport draws an arrow from it to each node it names, and over the arrow’s middle the names that travel it, in the order of its rows. They follow the nodes in Play too. A hearer that is not in the scene draws none: Problems says so.
- The Gizmos menu’s Signals
- Draws a selected node’s wires; untick it to hide them. Ticked as it comes.
- Press Run game: it runs the startup scene, the vale. Walk him east to the lever, and on past it.
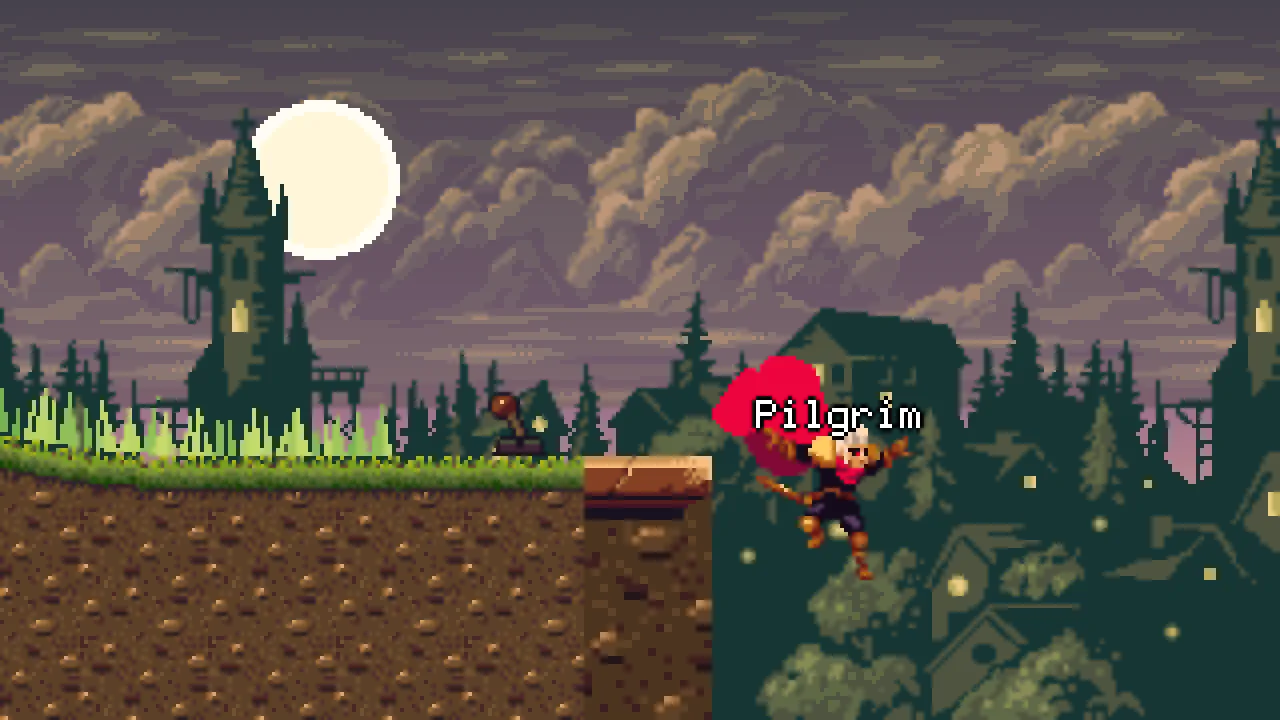
Without the lever, the ravine swallows him: from the lever, with D held, he walks off the lip and falls.
- Close the game’s window, or press Stop game, which stands where Run game was while it runs. Then press Run game again, walk him to the lever, stop on it and press E.

Each plank comes 7 steps after the one before, and all ten are laid within 1.2 seconds of the tap, out to x 2080, past the view’s edge here. With D held he walks across, to x 2200 on the far side, never below the walking line.
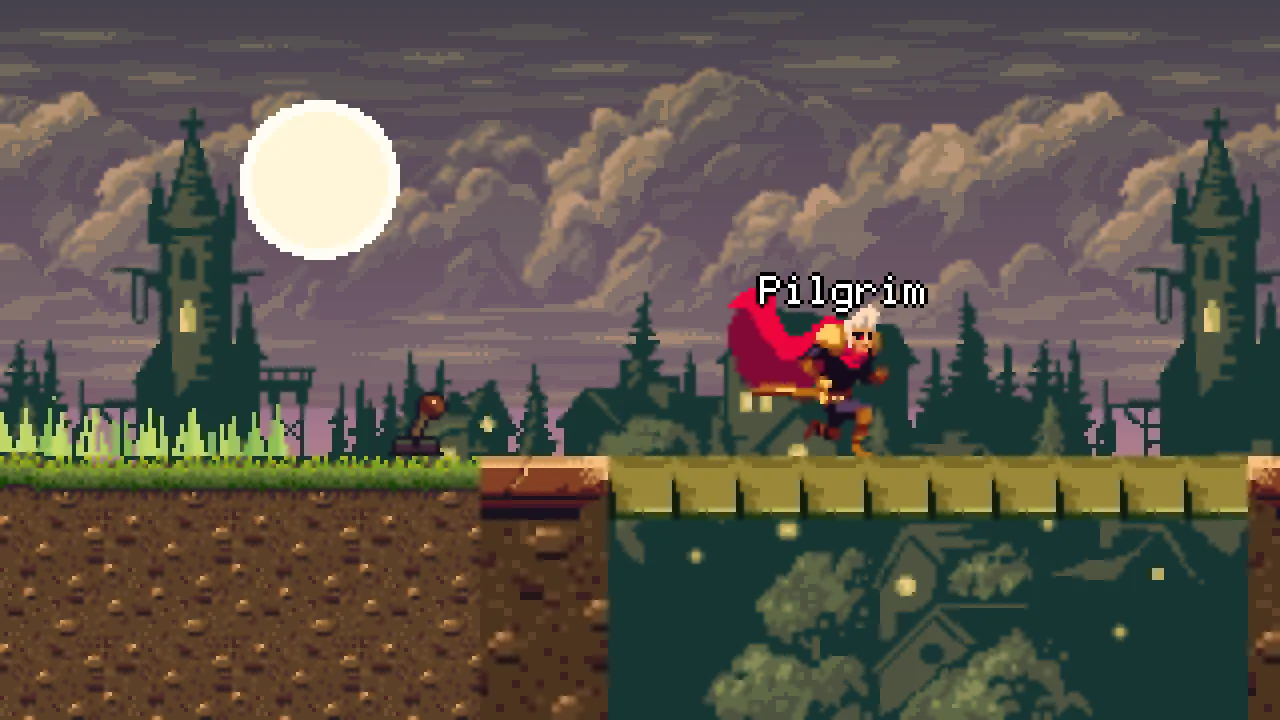
A second E lays nothing more: the lever stays as it was, says nothing, and no cell changes after the tenth. The planks are laid in the map’s own copy for the run; its file keeps bridge empty.
Two artifacts
The crypt’s cracked wall and its gates are each made once and saved as artifacts: a cracked block, which the map places in a column of cells, and a gate, a lever and its grate, dropped twice. Each is made in a new scene and never saved there, so the crypt is left as it was. Their pictures came with the starter: art/crack.png, 16 by 16, the crypt sheet’s tile #59 pixel for pixel, and art/grate.png, 16 by 64, a gate’s iron bars.
- In Assets, with Assets clicked in the path bar, click Create, choose New script, type
crackand press Enter. Click the Code tab, thencrack.rgsin its Scripts list, replace everything in it with the script below, and press Ctrl+S. Click the Viewport tab.
/// A cracked block in a wall. It is a scene tile: the map places one on
/// every cell painted with it. When a block is struck and goes, the block
/// above it comes down too, and that one brings down the next, up the wall.
component Crack {
    fn on_destroy() {
        // The map this block stands in: the nearest node in the group map.
        let map = nearest("map");
        // The cell above this one, 16 up, is cleared on the cracked layer.
        // Its block goes the same way, and tells the one above it in turn.
        clear_tile(map, "cracked", cell_at(map, position() - vec2(0.0, 16.0)));
    }
}- A scene tile’s farewell, on_destroy
- Runs once, as the node goes. A scene tile’s node goes when its cell is emptied or painted over, so a block’s farewell runs when the block is struck or cleared.
- nearest
- The nearest node in a group, as the step began: here
map, whichhallsjoins below, so each block finds the map it stands in. - clear_tile, cell_at and position
clear_tileempties a cell of a layer of a map;cell_atis the cell a point in the world falls in;position()is where this node is. Here thecrackedcell16above the block: the block above goes the same way, and tells the one above it in turn.
- Double-click
scenes/crypt.ronin Assets and press Ctrl+S. Choose File → New scene: an empty scene takes the crypt’s place. - Press + Add node and choose Sprite. Rename it
crack. In its Sprite, dragart/crack.pngonto Texture, type Size16,16, its own, and set Sort Layer to Ground. Leave Anchor at0.5,0.5: a scene tile’s node stands on its cell’s middle. - Press Add component and choose ColliderComponent. Type its Size
16,16; leave its Offset at0,0and Solid ticked. - Drag
crack.rgsfrom Assets onto its Inspector: it adds Crack. - Right-click
crackin the Hierarchy and choose Save as artifact…. In the save dialog, open theartifactsfolder and save the file ascrack.artifact.
Now the gate, whose grate rises when its lever is thrown.
- In Assets, with Assets clicked in the path bar, click Create, choose New script, type
grateand press Enter. Click the Code tab, thengrate.rgsin its Scripts list, replace everything in it with the script below, and press Ctrl+S. Click the Viewport tab.
/// A gate's grate. When its lever is pulled, it rises out of the way, up
/// in front of the stone over the gate, and stays up.
component Grate {
    /// Whether it has risen. A grate opens once.
    #[readonly]
    open: bool = false,

    fn loop() {
        // Its lever's Signal sends pulled here. Heard, the grate slides up
        // by its own height, 64, over a second, easing in and out.
        if !open && heard("pulled") {
            open = true;
            await anneal_by(vec2(0.0, -64.0), 1.0, .InOutSine);
        }
    }
}
component Grate,openand heard- A script with no base.
heard("pulled")is true on a step that name reached this node;openkeeps the grate from rising twice. - anneal_by
- Moves this node by a distance over the seconds it is given, along a curve: up
64, the grate’s own height, over a second, easing in and out.
- Choose File → New scene: an empty scene takes its place, without asking, and the unsaved copy of
crackgoes with it. - Press + Add node and choose Node. Rename it
gate. - Select
gate, press + Add node and choose Sprite: the menu opens on Add child of gate. Rename itlever, type its Position-32,0, and build it asbridge-leverwas built: its picture, its AreaComponent and Lever. Leave its Signal for now. - Select
gateagain, press + Add node and choose Sprite. Rename itdoor. In its Sprite, dragart/grate.pngonto Texture, type Size16,64and Anchor0.5,1, and set Sort Layer to Props. - Press Add component and choose ColliderComponent. Type its Size
16,64and Offset0,-32: x-8to8, y-64to0. Draggrate.rgsonto its Inspector: it adds Grate. - Select
lever, add its SignalComponent, press +, typepulledinto Signal, and choosedoorfor To. - Right-click
gatein the Hierarchy, choose Save as artifact…, and save it inartifactsasgate.artifact. - Double-click
artifacts/gate.artifactin Assets. The editor asks Save the open scene?: press Discard. The artifact opens as a scene of its own. Selectlever, press Frame, and pick400%from the zoom menu.
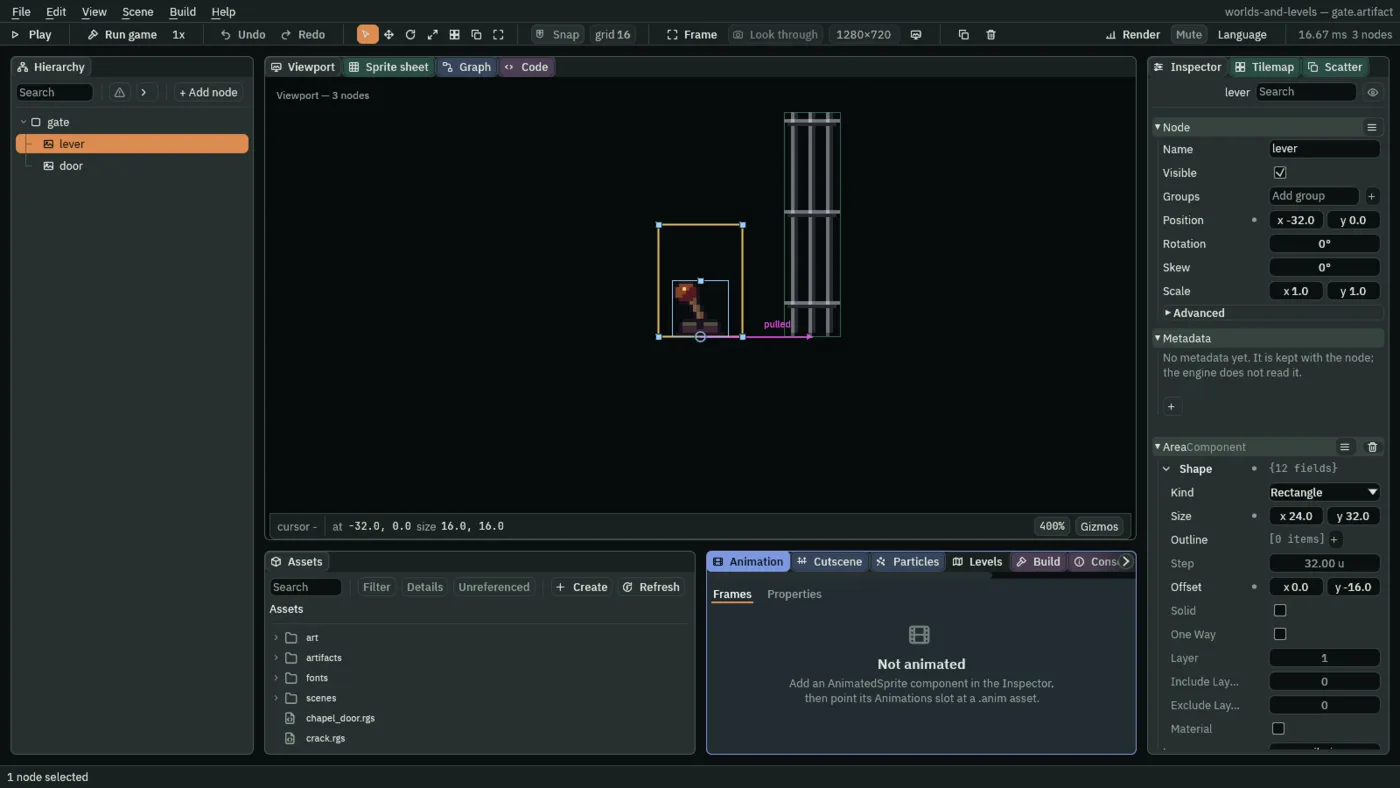
gate.artifact: one lever, wired to its own grate.- Save as artifact…
- In a node’s right-click menu in the Hierarchy: writes the node and everything under it into a file, an artifact, and puts a copy of that file in its place, as one step to undo. A copy follows its artifact; what is changed on a copy, its name among them, is the copy’s own.
- One artifact’s lever names its own door
- Inside the artifact the lever’s To is the artifact’s
door. Each copy dropped into a scene is numbered afresh, and its lever’s To is its own copy’s door: two copies, two levers, each opening its own grate.
- Double-click
scenes/crypt.ronin Assets to go back to the crypt.
The crypt’s map
- Select
hallsand click the Tilemap tab. Click tile#59, the cracked block, in the picker, and dragartifacts/crack.artifactfrom Assets onto Scene’s slot in the Tile band.
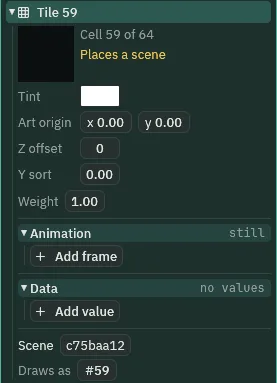
#59: its Scene holds the cracked block, by the start of its id.- Click
ground’s row and press +, and rename the new layercracked. Leave it as it comes, not Solid: each block stops him with its own Collider. - With
#59held, draw a Line up column132, from cell132,-12to132,-1: twelve blocks, x2112to2128, y-192to0. - Click
ground’s row, then thestonerow in the Terrains band, armed. With Rect, lay the stone over each gate in the table below, from the ceiling’s underside down to y-64, over the two columns its grate will stand across.
| Over | Cells (column; row) | World (x; y) |
|---|---|---|
gate-1 | 141 and 142; -12 to -5 | 2256 to 2288; -192 to -64 |
gate-2 | 172 and 173; -12 to -5 | 2752 to 2784; -192 to -64 |
Each Rect changes 18 cells, 16 new and the ceiling’s row over them laid again; each is the edge its neighbours call for, so there is no plain stone for Variety to roll. The grate, 64 tall, will meet the stone: shut, it hangs from it, and he cannot jump over it; open, it slides up in front of the stone, on Props over Ground, its foot level with the stone’s, y -64, high over his 30.
- Click
torches’ row and tile#57, the torch’s bracket, in the picker: the brush is on tiles again. With Brush, click cell135,-6: x2160to2176, y-96to-80. Press Ctrl+S.
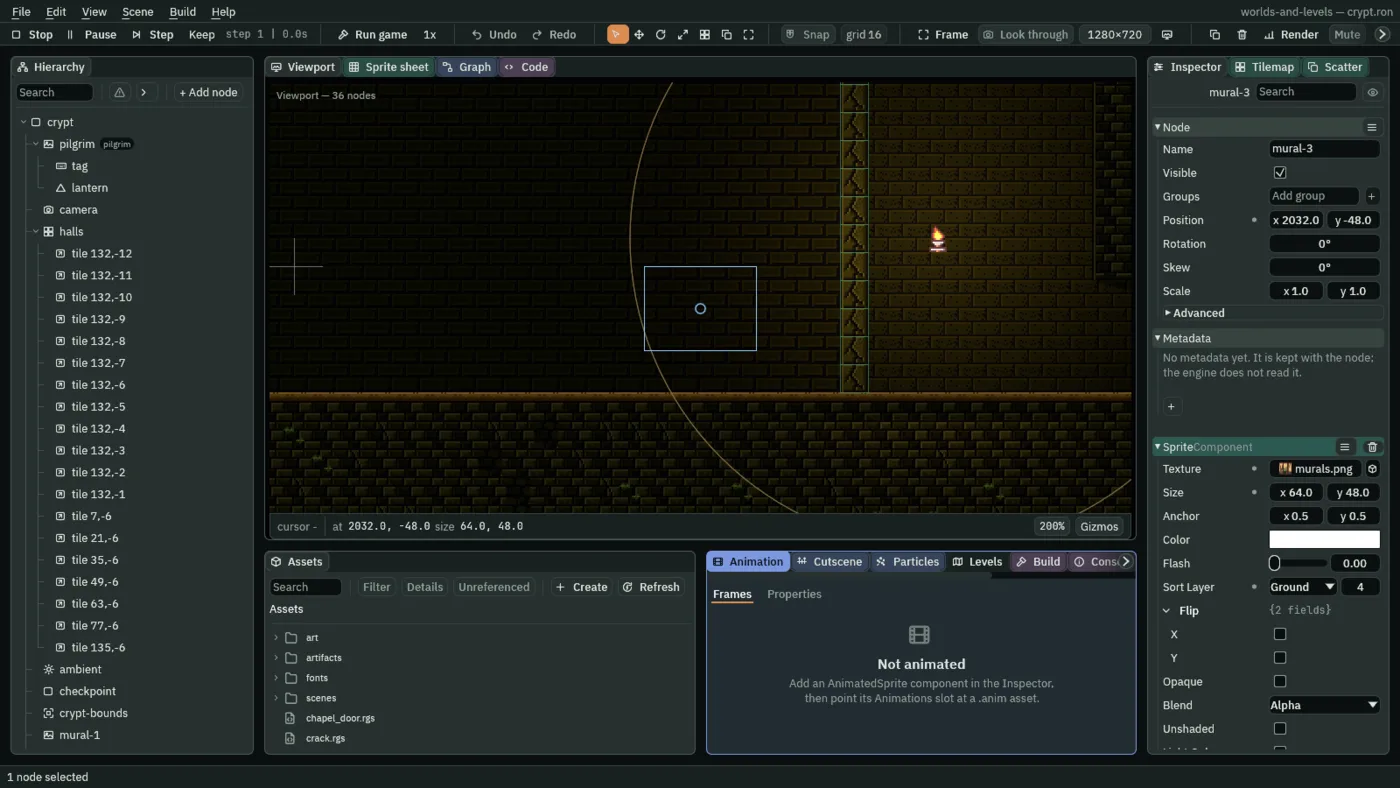
Its light, at 2168, -88, two cells east of the cracked column at the halls’ torches’ height, lights the column, so it reads as a thing to strike, and the rubble the strike will leave; mural-3’s wall it barely reaches.
In the Viewport each cell painted with a scene tile shows only its marker, as the torches’ cells do, and in the cracked column the twelve markers’ labels lie over one another. Play shows the blocks themselves.
- Press F5: Play runs the open scene. Select
mural-3, press Frame, and pick200%from the zoom menu.
The strike
The pilgrim strikes with the action key: a cracked block just ahead of him is painted over with rubble, #60, and its farewell brings down the rest.
- Press F5 again to stop. Select
halls, and in its Node’s Groups typemapand press +:crack.rgs’snearest("map")finds the map by it. - Double-click
pilgrim.rgsin Assets. In the Code tab, replace its first two lines, its///comment, with the three below.
/// The pilgrim in the crypt. Down drops him through a ledge he stands on,
/// a tile that hurts sends him back to the checkpoint, and the action key
/// strikes the wall in front of him, which breaks a cracked block.- At the end of
loop(), after the hazards’if, add the strike below, and press Ctrl+S. Click the Viewport tab.
        // The action key (E) strikes the wall just ahead of him: the cell 20
        // east of his feet and 4 above them. A cracked block there, tile 59
        // on the cracked layer, breaks into rubble, tile 60.
        if pressed("action") {
            let ahead = cell_at(node(map), position() + vec2(20.0, -4.0));
            if tile_at(node(map), "cracked", ahead) == 59 {
                set_tile(node(map), "cracked", ahead, 60);
            }
}- tile_at and node
tile_atis the tile painted in a cell of a layer, as the step began: its number,0for an empty cell.node(map)is the map the script’s Map row picked,halls, as the calls take it.set_tileover a scene tile- Painting
#60over a cracked block’s cell takes the block away: its node goes, and its farewell runs.
The strike reads the cell 20 east of his feet and 4 above them. Stand close to the wall: from anywhere between x 2092 and the wall’s face, which stops his feet at 2106, it reaches the column; further back it reads an empty cell.
- Press F5, walk him east to the cracked wall until it stops him, and press E.

The whole column falls in the strike’s own step: rows -12 to -2 emptied, and the rubble in row -1. With D held he walks on through where it stood. Nothing past the column changes, and a second strike, on the rubble, changes nothing. On a copy whose crack.rgs has no farewell, only the struck block goes, and the eleven above it stand.
Two gates
Two copies of the gate go further east in the crypt, under the stone laid for them.
- Press F5 again to stop. Select
halls, and dragartifacts/gate.artifactfrom Assets into the Viewport: a copy of the gate lands where you drop it. Type its Position2272,0. - In the Inspector’s Name row, rename it
gate-1. Select itsleverand rename itgate-1-lever, and itsdoor,gate-1-door. - Select
gate-1itself, not its door, and dropgate.artifactagain. Type its Position2768,0, and rename it and its twogate-2,gate-2-leverandgate-2-door. Press Ctrl+S.
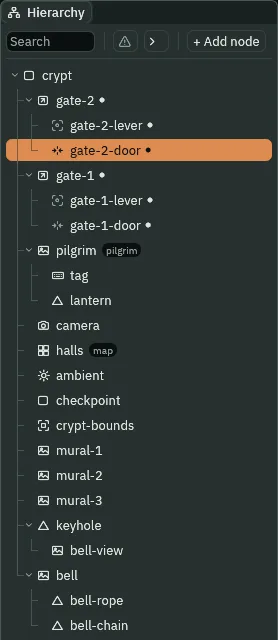
- A drop
- An artifact dragged from Assets into the Viewport makes a copy of it where it lands. The copy goes into the selected node’s parent, at the head of its list: each gate lands in
crypt, and the second over the first. - A member renamed, an override
- A copy’s nodes follow the artifact, but a name typed in the Inspector’s Name row is the copy’s own, an override, and so is a Position typed: the Hierarchy marks each with a dot after its name. A member renamed in the Hierarchy instead, its row double-clicked, keeps its name the same way.
- Press F5, walk him east, strike the cracked wall down with E, and walk on to
gate-1’s lever. Press E there.

Each lever raises its own grate 64 within 1.2 seconds, while the other gate stays shut: in the game, each copy’s lever names its own copy’s door. A shut gate cannot be jumped: the grate and the stone over it are one wall.
The tower door
The fourth lever stands at the tower door, inside the keyhole’s Area, and its Signal tells the keyhole, whose script now takes the door away.
- Press F5 again to stop. Select
crypt, press + Add node and choose Sprite: the menu opens on Add child of crypt. Rename ittower-lever, type its Position3328,0, and build it as every lever, its Signal’s Tokeyhole. - Double-click
keyhole.rgsin Assets, replace everything in it with the script below, and press Ctrl+S. Click the Viewport tab. - Select
keyhole: its Keyhole has a Map row now, empty. Click it and choosehalls. Press Ctrl+S.
/// The keyhole in the tower's door. While the pilgrim stands before the
/// door he peers through it, and the bell beyond shows in the keyhole's
/// shape. When he steps away, the keyhole is only a keyhole again. When the
/// tower lever is pulled, the door is taken away, and with it the keyhole.
component Keyhole : Area {
    /// The crypt's tilemap, whose ground layer holds the door.
    #[node_path]
    map: i32 = 0,

    fn on_enter(other: NodeId) {
        // Something has come to the door. Only the pilgrim, who is in the
        // group pilgrim, peers through, and only while the door is there:
        // while the cell the keyhole is in still holds the keyhole's planks,
        // tile 63. The keyhole hangs from the cell's foot, so its cell is the
        // one 8 above it.
        let cell = cell_at(node(map), position() - vec2(0.0, 8.0));
        if in_group(other, "pilgrim") && tile_at(node(map), "ground", cell) == 63 {
            // The keyhole's mask is switched on, so what lies behind the
            // door shows in its shape.
            set_flag("SpriteMaskComponent", "enabled", true);
        }
    }

    fn on_exit(other: NodeId) {
        // The pilgrim steps back from the door: the mask is switched off,
        // and the bell is hidden again.
        if in_group(other, "pilgrim") {
            set_flag("SpriteMaskComponent", "enabled", false);
        }
    }

    fn loop() {
        // The tower lever's Signal sends pulled here. Heard, the door's six
        // cells are cleared from the ground layer: the keyhole's cell and the
        // one beside it, east, on the keyhole's row and the rows above and
        // below it. The keyhole is switched off, for there is nothing left
        // to peer through.
        if heard("pulled") {
            let keyhole = cell_at(node(map), position() - vec2(0.0, 8.0));
            for row in -1..2 {
                for column in 0..2 {
                    clear_tile(node(map), "ground", keyhole + vec2(column, row));
                }
            }
            set_flag("SpriteMaskComponent", "enabled", false);
        }
    }
}#[node_path]andmap- A field the Inspector shows as a node picker, Map: the map whose cells the keyhole reads and clears. Nothing picked is
0, nobody. - The keyhole’s cell
- The keyhole hangs from its cell’s foot, so its cell is the one
8above its node. On entering, it switches on only while that cell still holds#63. heardinloop()- True on the step the tower lever’s
pulledreaches the keyhole: then the door’s six cells, the keyhole’s, the one east of it, and those above and below both, are cleared fromground, and the mask is switched off.
- Press F5 and walk him east, striking the wall and throwing each gate’s lever as before, to the tower lever at the door. Press E there.

The door’s six cells are cleared within three steps of the keyhole hearing the lever, and the keyhole is off. He walks through to the tower, x 3440, the doorway level with the floor; back at the door the keyhole stays dark, since its cell holds no keyhole any more.
- Press F5 again to stop.
The levers and what they work
| Lever | Position | Its Signal’s To | What it works |
|---|---|---|---|
bridge-lever, in vale | 1872, 0 | buildings | drawbridge.rgs: ten planks on bridge |
gate-1-lever, in gate-1 | -32, 0 | gate-1-door | grate.rgs: up 64 over a second |
gate-2-lever, in gate-2 | -32, 0 | gate-2-door | the same |
tower-lever, in crypt | 3328, 0 | keyhole | keyhole.rgs: the door’s six cells cleared |
| What | Settings |
|---|---|
| Every lever | Sprite lever.png, 16 by 16, Anchor 0.5, 1, Props; AreaComponent 24 by 32 at 0, -16; Lever; a Signal, pulled |
crack.artifact | Sprite crack.png, 16 by 16, Ground; ColliderComponent 16 by 16; Crack |
gate.artifact | gate; its lever; its door: Sprite grate.png, 16 by 64, Anchor 0.5, 1, Props; ColliderComponent 16 by 64 at 0, -32; Grate |
gate-1, gate-2 | copies at 2272, 0 and 2768, 0 |
| the vale’s map | bridge: Solid, empty |
| the crypt’s map | tile #59’s Scene crack.artifact; cracked, a column of #59; stone over each gate; a torch at 135, -6 |
halls | Groups map |
keyhole | Map halls |