Tutorials · Worlds and Levels · Chapter 7
Made to measure
By the end
- A sky,
sky, in place ofsky-block: a Mesh of six vertices typed in linear light, night to dusk to dawn, carried by a Parallax so it holds still on the screen, the sun under it - One region cut from Gothic Horror’s clouds and two from its town, and two Parallax planes drifting behind the vale, the clouds on their own as well
- Four banners,
banner-1tobanner-4, in place ofbanner-block: a Polygon pennant made a Mesh with Make a Mesh, its Uvs typed onto its own quarter of one sheet - A rope between two poles, three Shapes, for the banners to hang from
On this page
When to reach for a Mesh
Two of the vale’s grey stand-ins are this chapter’s: sky-block, a grey wall behind everything, and banner-block, a grey box over the market. It replaces the first with a sky and the second with four banners.
Reach for a Mesh for a shape you colour and map yourself, point by point: a colour at each corner, blended across the shape, or a part of a picture pinned to each point. A Mesh is points and the triangles between them, typed in the Inspector, and has no handles to drag. The Polygon of chapter 6 stays the tool for an outline drawn by hand: draw one, then make it a Mesh, as the banners are made.
What collides, what draws, what sorts: a Mesh draws its triangles, coloured by its points and its Texture, and collides with nothing. It sorts as one node on its Sort Layer, and there it draws before a picture it ties with.
The sky
The sky is a Mesh of two bands, each a rectangle of two triangles: night along the top fading to dusk across the middle, and dusk fading to dawn along the foot. Each colour is a vertex’s, blended across the triangles between them. A Parallax at Factor 1 carries it with the camera, so its numbers are places on the screen from the view’s middle, and it never runs out.
- With
scenes/vale.ronopen, selectsky-block, press Delete, and press Delete in the box that asks; do the same forbanner-block. - Select
vale, press + Add node and choose Mesh: the menu lists it after MultiMesh. Rename itskyand leave its Position at0,0. It comes white, a64-unit square of four Vertices and the Indices012023. - Press Add component and choose ParallaxComponent. Type its Factor
1,1, and leave the rest as it comes. - In the Mesh, press + beside Vertices twice, for six. Open each of
[0]to[5]and type its Position and Color from the table below; leave each Uv as it is. - Press + beside Indices six times, for twelve, and type the six new ones
145152. Tick Opaque. Leave Texture at none, Color white and Sort Layer on Sky.
| Vertices | Position | Color | |
|---|---|---|---|
| [0] | -176, -106 | 0.0100, 0.0134, 0.0732, 1 | night, top left |
| [1] | -176, 0 | 0.2633, 0.1329, 0.2633, 1 | dusk, middle left |
| [2] | 176, 0 | 0.2633, 0.1329, 0.2633, 1 | dusk, middle right |
| [3] | 176, -106 | 0.0100, 0.0134, 0.0732, 1 | night, top right |
| [4] | -176, 106 | 1.0, 0.4770, 0.2633, 1 | dawn, bottom left |
| [5] | 176, 106 | 1.0, 0.4770, 0.2633, 1 | dawn, bottom right |
The colours are typed in linear light, as chapter 6’s mere is: night shows on the screen as 0.10, 0.12, 0.30, dusk as 0.55, 0.40, 0.55 and dawn as 1.0, 0.72, 0.55. The Indices 0 1 2 0 2 3 are the top band and 1 4 5 1 5 2 the bottom one: 352 by 212 about the view’s middle, 16 past each of its edges, the bands meeting at its middle row. Blue holds at 0.2633 down the bottom band, so each colour runs one way from the top to the foot, and never back.
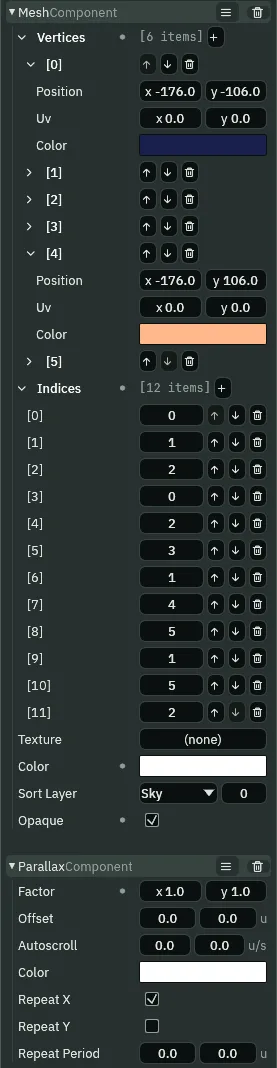
[0] and [4] open, and the Parallax that carries it.- Vertices
- The Mesh’s points, each opened by its arrow to show its rows; + adds one at the end, and the bin takes one off. They have no handles in the Viewport: they are typed here, or made from a Polygon with Make a Mesh.
- The vertex’s Position, Uv and Color
- Position is the point’s place in the node. Uv is which point of the Texture is drawn at it,
0,0the picture’s top-left corner and1,1its bottom-right; with no Texture nothing reads it. Color is the point’s own colour, typed in linear light, blended across every triangle the point is a corner of. - Indices
- Which points make each triangle, three at a time, counted from
0in the order of Vertices. While a count is not a multiple of three, Problems says so: “This Mesh has 7 Indices, which is not a multiple of three, so the last 1 make no triangle and are not drawn — each triangle is three Indices”. An Index past the last point is named too, and its triangle not drawn. - The Mesh’s Texture
- The picture the triangles are drawn with, each point showing the part its Uv names; none draws flat colour, the points’ own.
- The Mesh’s Color
- A tint multiplied with every point’s own colour. White as the preset comes, so the sky’s points show as they are typed.
- The Mesh’s Sort Layer
- The sorting layer the Mesh draws on: the sky on Sky, behind everything.
- The Mesh’s Opaque
- Draws the triangles without blending, for a backmost shape nothing shows through. The sky is ticked: nothing is behind it.
- The Parallax’s Factor
- How much of the camera’s motion the node is carried along by, across and up and down. At
1it moves as the camera does, so it holds still on the screen; at0.5, half as far, so it drifts behind. - The Parallax’s Repeat X
- Copies the pictures and tilemaps under the node side by side so the layer never runs out, ticked as it comes. It copies no mesh: the sky is drawn once, and needs no copy, since it moves with the camera.
The sun under the sky
- In the Hierarchy, drag
sunontosky: it becomes the sky’s child, carried with it. Type its Position-80,-45, a place on the screen.
The sun keeps its Shape, a Circle 40 across with its ring, and its Sort Layer, Far, in front of the sky on Sky. Its disc lies inside the view’s top-left quarter wherever he walks.
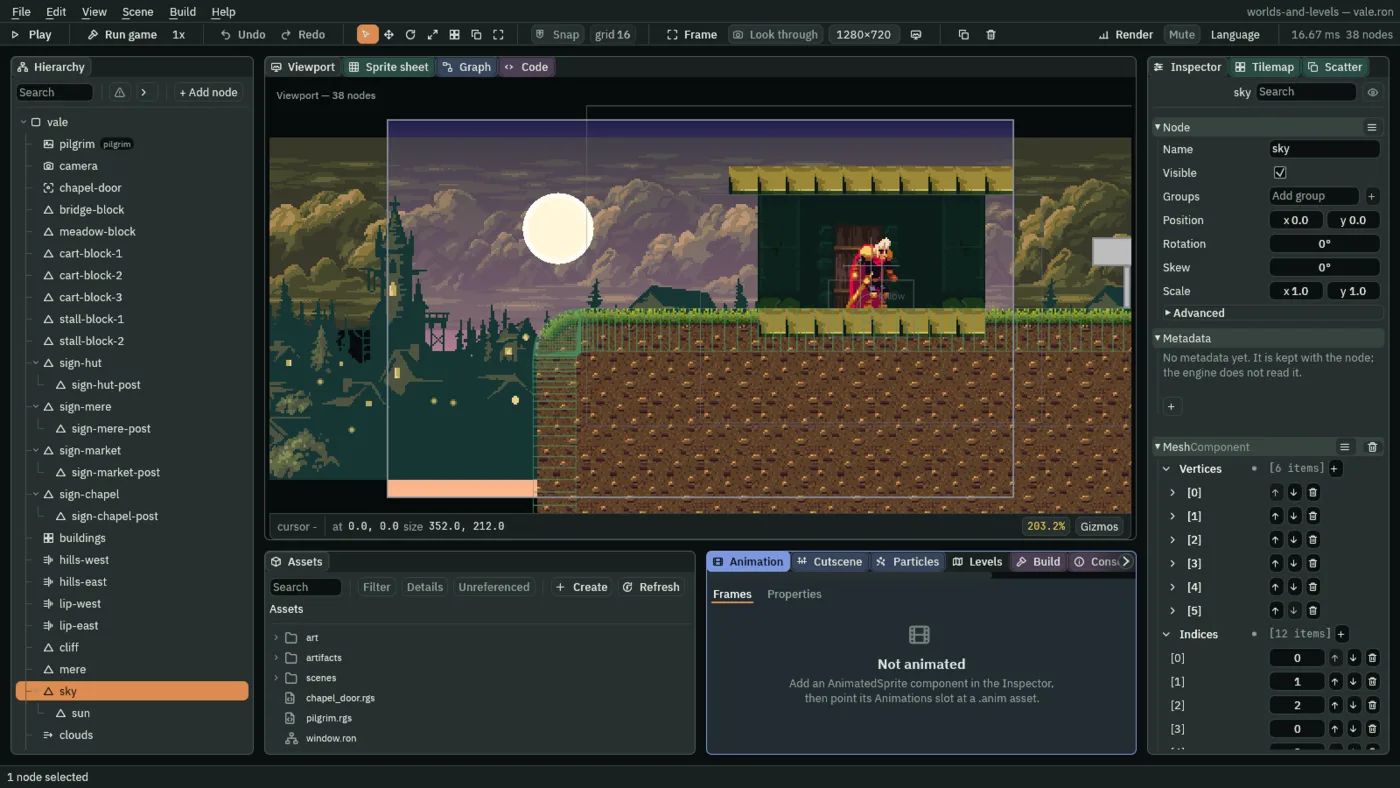
352 by 212, carried to the middle of the view.Clouds and a town
Behind the vale, two pictures from Gothic Horror drift: its clouds and its town at night. Each is cut into regions first, in the Sprite sheet tab, as chapter 6 cut the tower, so that a plane shows only the rows it needs.
- Copy both pictures above into
art, and press Refresh in Assets. - Double-click
art/gothic-horror-clouds.pngin Assets: the Sprite sheet tab opens on it. If its top and foot are cut off, pick200%from the zoom menu at the tab’s foot to see it whole.
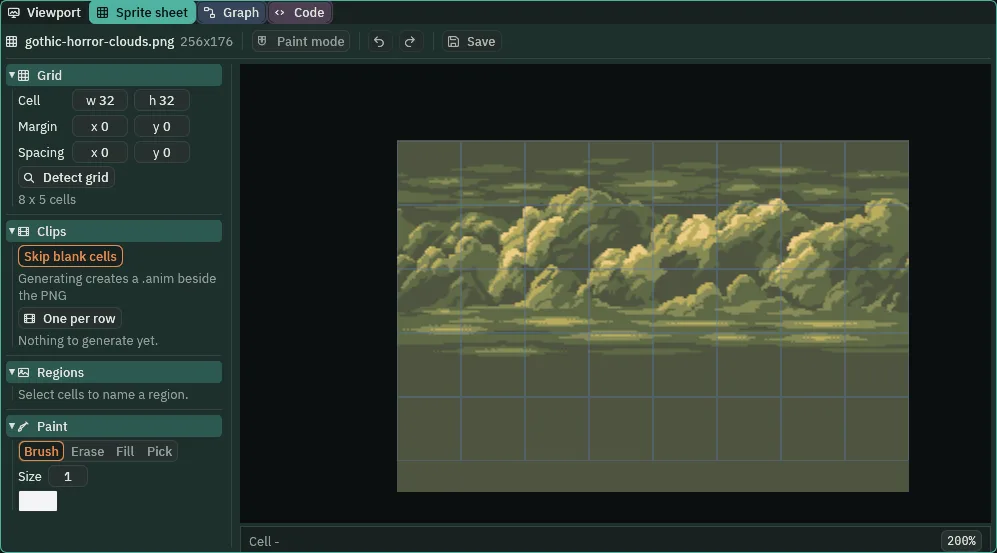
200%, before the cut: the clouds above, a flat band below.- Type Cell
256and108, and Margin0and0: one cell, the picture’s rows0to107. Click it, typebandbeside Name it, and press Name it. - Double-click
art/gothic-horror-town.png: the tab opens on it. Again, if its top and foot are cut off, pick200%from the zoom menu at the tab’s foot.
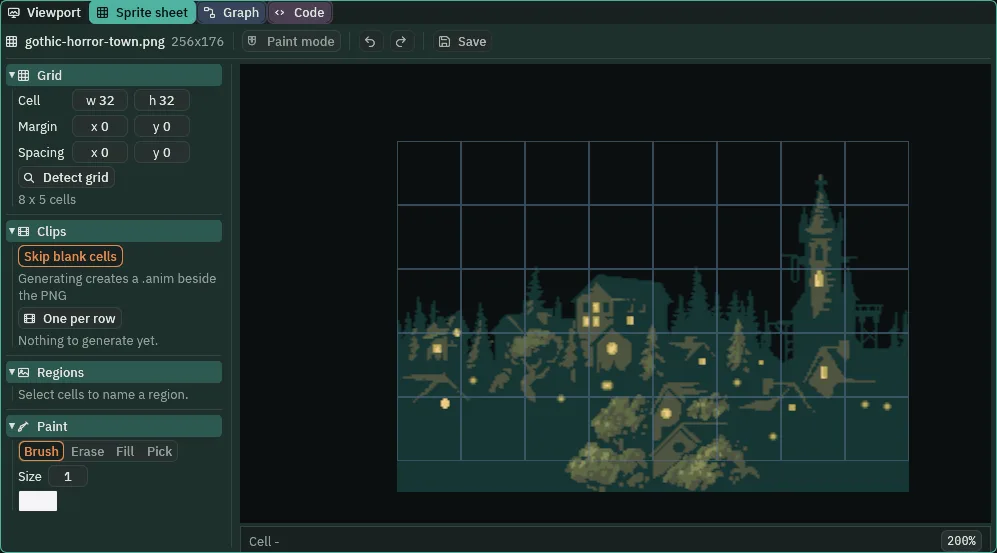
200%, before the cuts: empty rows, the skyline, the ground.- Type Cell
256and96, and Margin0and16: the houses, rows16to111. Click the cell, typeskylineand press Name it. - Type Cell
256and64, and Margin0and112: the ground, rows112to175. Click the cell, typegroundand press Name it.
Why cut them: the clouds’ rows 108 to 175 are one flat colour, which laid over the sky would wash the dawn olive; the town’s rows 0 to 15 are empty; and its ground, rows 112 to 175, is opaque, so it can be drawn on its own, without blending.
- Select
vale, press + Add node and choose Parallax: a Parallax with a Sprite beside it. Rename itcloudsand type its Position0,-42. In the Parallax, type Factor0.9,1and Autoscroll-4,0; leave Repeat X ticked. - In its Sprite, drag
art/gothic-horror-clouds.pngonto Texture, typebandin Atlas Region and Size256,108, and set Color to1.0,0.86,0.78, alpha0.5. Leave its Sort Layer on Sky. - Select
valeagain, and add a second Parallax:town, at Position0,-16, Factor0.5,1. In its Sprite, dragart/gothic-horror-town.pngonto Texture, typeskylinein Atlas Region and Size256,96, and set Sort Layer to Far. - Right-click
townin the Hierarchy and choose Duplicate:town copyappears straight after it. Rename ittown-ground, type its Position0,64, and in its Sprite typegroundin Atlas Region and Size256,64, and tick Opaque.
At a Factor of 1 up and down, a Position is a place on the screen up and down from the view’s middle. The clouds’ band, at -42, covers the view’s top edge, its lower edge behind the skyline; the skyline stands at -16; and town-ground, at 64, covers the view’s foot under the bridge. town-ground is the town’s duplicate, so the two tile alike. The clouds are faded by their Sprite’s Color; the Parallax’s own Color stays white.
- The Parallax’s Autoscroll
- World units a second the node drifts on its own, on top of what Factor carries it: the clouds’
-4,0drifts them west. - Pictures tied on one Sort Layer
- Front and back are the Sort Layer first, whatever the Hierarchy’s order. Two pictures tied on one Sort Layer draw in the order of their textures, not the scene’s: on Far, the clouds would draw over the town whichever came first in the Hierarchy. So the clouds stay on Sky, as their Sprite comes, where they draw over the sky, since a mesh draws before a picture it ties with, and under the sun and the town on Far. To put one picture in front of another, give it a later Sort Layer.
The cost: a plane that blends is paid for at every pixel it covers, and on a phone that is the cost that bites. With the clouds cut to their band and the town’s ground drawn Opaque, only the band and the skyline blend: 1.10 views of blending, where the whole pictures were 1.89.
The banners
Four banners hang over the market, each a swallowtail pennant 16 wide and 48 long, all four showing their own quarter of one sheet, art/banners.png, 64 by 48, which came with the starter. Each is drawn as a Polygon, by hand, and then made a Mesh, so its points can be pinned to its quarter of the sheet.
- Select
valeand add a Polygon. Rename itbanner-1and type its Position2432,-104. Click the Viewport tab, since the Sprite sheet tab is still in front of it, and press Frame: the square is in the middle of the view. - With Snap off, drag the square’s four corners, top left, bottom left, bottom right, top right, onto
[0],[1],[3]and[4]of the table below. Double-click the bottom edge halfway along: a point goes in there, between the two bottom corners. Drag it up to0,36, the notch. - In the Inspector, type each point from the table, so all five are exact.
| Points | x, y |
|---|---|
| [0] | -8, 0 |
| [1] | -8, 48 |
| [2] | 0, 36 |
| [3] | 8, 48 |
| [4] | 8, 0 |
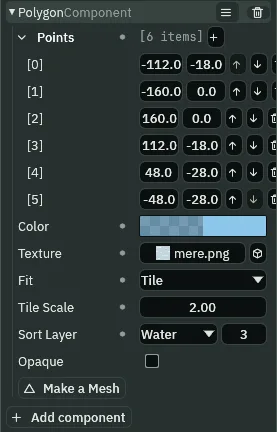
- Under the Polygon’s rows, press Make a Mesh. The Polygon is replaced by a Mesh of its five points and three triangles, the Indices
401412234. - In the Mesh, drag
art/banners.pngonto Texture, and set Sort Layer to Props. - Open each of the five Vertices and type its Uv from
banner-1’s row of the table below. - Do the same for
banner-2,banner-3andbanner-4, selectingvalebefore each add:banner-2at Position2464,-104,banner-3at Position2496,-104andbanner-4at Position2528,-104, each typing its own row. Setbanner-4’s Mesh Color to0.9,0.9,1.0, alpha1; leave the rest white.
| Uv | [0] | [1] | [2] | [3] | [4] |
|---|---|---|---|---|---|
| banner-1 | 0, 0 | 0, 1 | 0.125, 0.75 | 0.25, 1 | 0.25, 0 |
| banner-2 | 0.25, 0 | 0.25, 1 | 0.375, 0.75 | 0.5, 1 | 0.5, 0 |
| banner-3 | 0.5, 0 | 0.5, 1 | 0.625, 0.75 | 0.75, 1 | 0.75, 0 |
| banner-4 | 0.75, 0 | 0.75, 1 | 0.875, 0.75 | 1, 1 | 1, 0 |
Each banner’s Uvs are a quarter of the sheet across, from its left edge to its right, and the whole of it down: banner k shows the sheet’s x 16(k − 1) to 16k, a pixel of the sheet to a unit of the world. The notch’s Uv is 0.75 down, as its point is 36 of the 48.
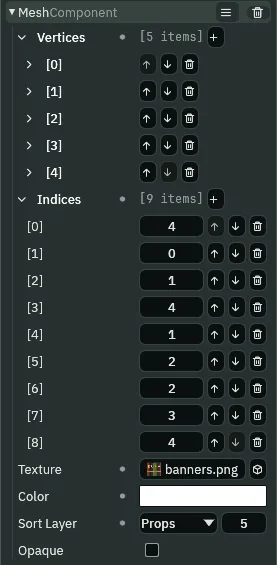
banner-1’s Mesh at the chapter’s end.- Make a Mesh
- Under a Polygon’s rows: replaces the Polygon with a Mesh of the triangles it is drawn with, each point’s Uv where it stands in the outline’s box and every point white. Its Color, Texture, Sort Layer and Opaque come across, so the Mesh looks as the Polygon did. A Mesh has no Fit, so a Polygon set to Tile comes out stretched, and the button’s hover says so. One undo puts the Polygon back. It is greyed on a node that already has a Mesh, and on an outline of fewer than three points.
A rope between two poles
- Add a Shape three times, for the table below, selecting
valebefore each add, so all three are its children: rename each, type its Position, and in its Shape type its Size and Anchor. - Give each Color
0.147,0.064,0.022, alpha1and Outline Color0.033,0.013,0.005, alpha1, a dark wood, which chapter 10 gives the signposts too, Outline1, and set Sort Layer to Props. Press Ctrl+S.
| Node | Position | Anchor | Size |
|---|---|---|---|
banner-pole-west | 2384, 0 | 0.5, 1 | 4, 112 |
banner-pole-east | 2600, 0 | 0.5, 1 | 4, 112 |
banner-rope | 2492, -108 | 0.5, 0 | 220, 4 |
The poles stand in the market’s gaps, clear of the carts and the stalls, and the rope runs between their tops, x 2382 to 2602, the banners hanging from its foot at y -104.
In the game
Press Run game and hold D. The sky and the sun hold still on the screen; the town and the clouds drift behind.

Held two seconds, the camera moves 268.5 units east and the sky with it, not a pixel on the screen, the sun in the view’s top-left quarter before and after. In one second the town moves on half as far as the camera, so on the screen it falls back by half the camera’s motion; the clouds move on nine tenths as far, and 4 a second west of their own, so they fall back by a tenth and their drift.

With all but the sky hidden, down the middle of the window each colour never turns back: between night and dusk at the top, nearer night; dusk on the middle row, where the bands meet; and between dusk and dawn at the foot, nearer dawn. In the game the clouds cover the view’s top edge, and the ground its foot.
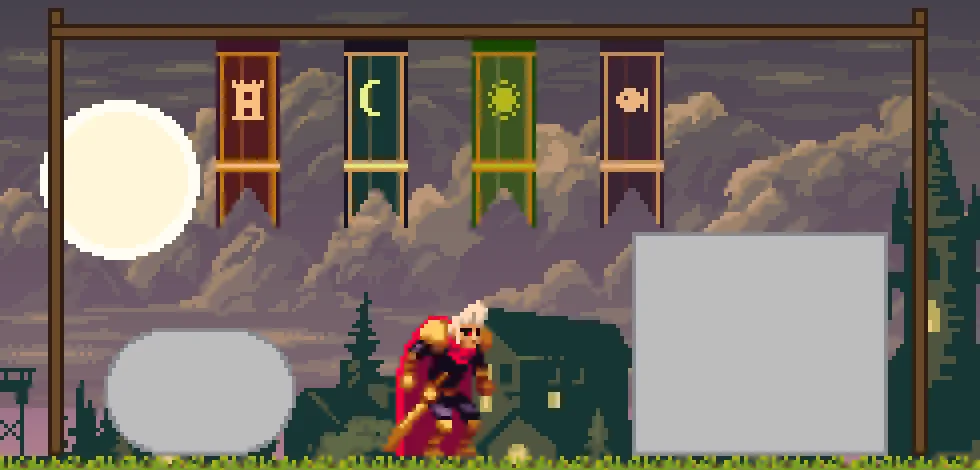
Each banner is drawn from the sheet once, at its node, with its own Uvs: four draws of one picture, and four different pennants. The clouds and the town show only the regions cut for them, each copy at its region’s size; every copy of the clouds draws before the town’s, and town-ground draws Opaque under the skyline, which blends.
The sky, the planes and the banners
| Node | Position | Factor | Autoscroll | Picture | Sort Layer |
|---|---|---|---|---|---|
sky | 0, 0 | 1, 1 | 0, 0 | a Mesh, the table above, Opaque | Sky |
clouds | 0, -42 | 0.9, 1 | -4, 0 | band, 256 by 108, Color 1.0, 0.86, 0.78, 0.5 | Sky |
town | 0, -16 | 0.5, 1 | 0, 0 | skyline, 256 by 96 | Far |
town-ground | 0, 64 | 0.5, 1 | 0, 0 | ground, 256 by 64, Opaque | Far |
| Region | Picture | Cell | Margin |
|---|---|---|---|
band | gothic-horror-clouds.png | 256, 108 | 0, 0 |
skyline | gothic-horror-town.png | 256, 96 | 0, 16 |
ground | gothic-horror-town.png | 256, 64 | 0, 112 |
The sun, under sky, at -80, -45. The banners at x 2432, 2464, 2496 and 2528, y -104, each the pennant’s five points and its own row of Uvs, banners.png, Props, banner-4 tinted 0.9, 0.9, 1.0. sky-block and banner-block are gone.