Tutorials · Interfaces · Chapter 1
A canvas and a plate
By the end
- A Screen canvas,
hud, that fits any window, and the HUD’s plate,hud_plate, anchored to its top left corner - A nine-sliced panel, a tiled strip of bricks and a title with an outline and a shadow
- The interface drawn in the pack’s own face
On this page
Open the starter
Interfaces does not start from an empty folder. It starts from The Delve with the room built, the hero walking and every pickup placed, and no interface at all, so everything you add from here is an interface you made.
- Download interfaces.zip, the starter (the overview says what is in it), and unzip it somewhere outside your other projects. You get one folder,
interfaces. - Open Rengy. In the launcher, choose Open project… and pick the
interfacesfolder. - The editor opens the project’s startup scene,
scenes/delve.ron. On the toolbar, click Look through, so that the Viewport shows the room as the game’s camera sees it. - Press F5. Walk the hero with W A S D or the arrow keys, and pick something up by walking into it. Press F5 again to stop.
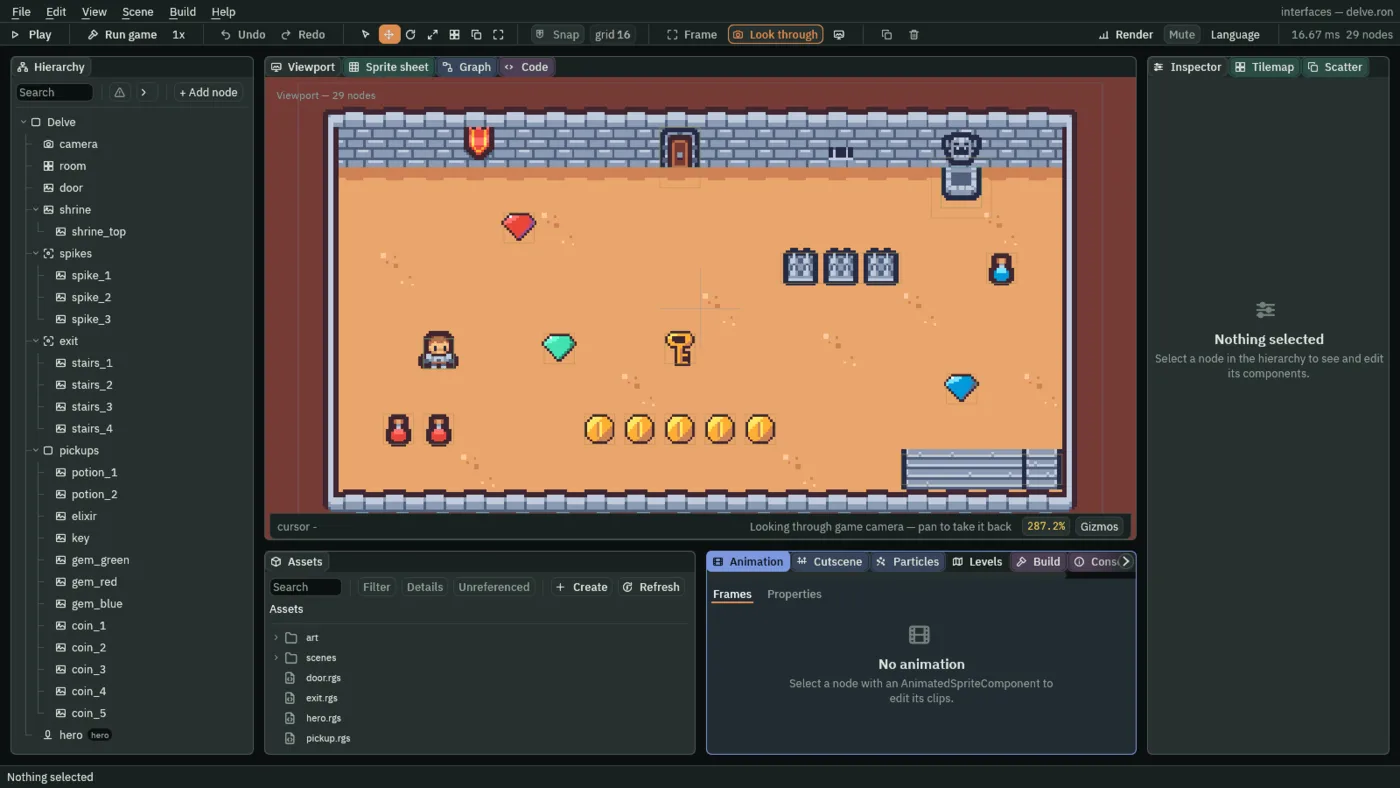
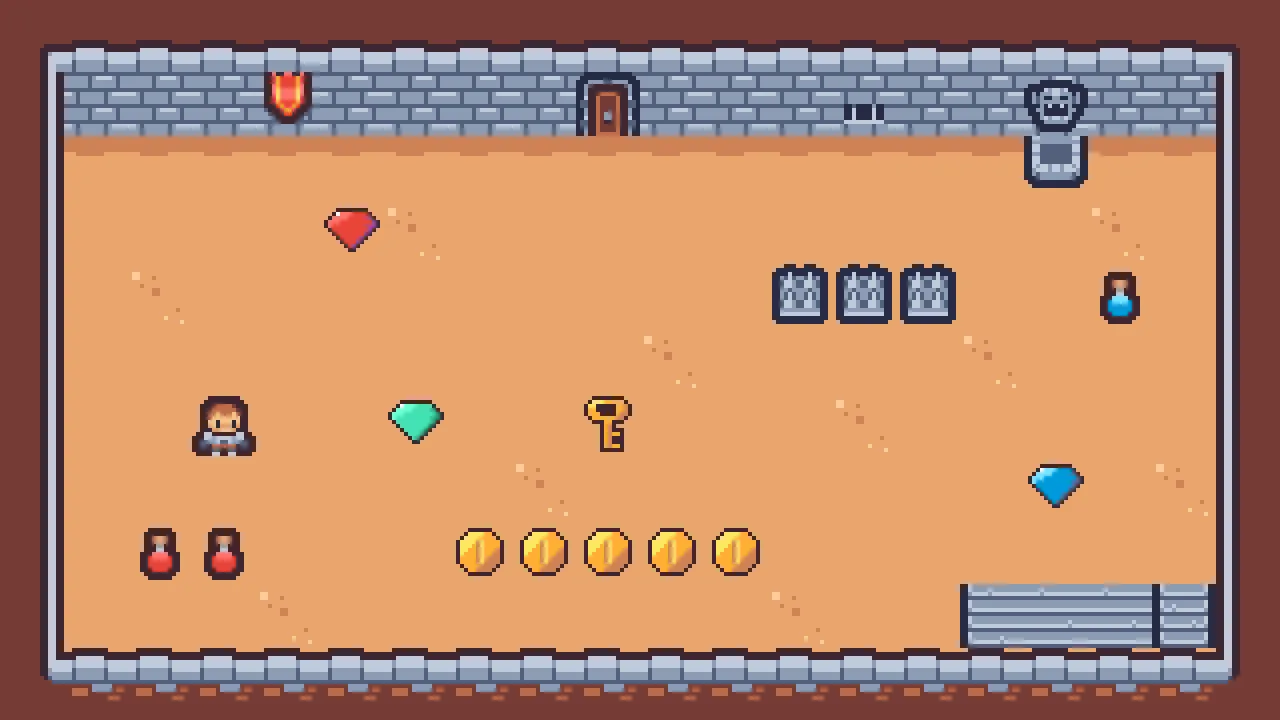
The Hierarchy holds Delve and everything under it. room is the floor and the walls, a tilemap of Tiny Dungeon’s sheet. hero is a Character Body that the keys walk four ways. pickups holds two potions, an elixir, a key, three gems and five coins, and each adds to a number the game keeps (potions, elixirs, keys, gems or coins) as the hero takes it. spikes take health from the hero while it stands on them. door is locked until the hero brings it the key, and shrine and exit, the stairs, only stand there for now.
Six scripts make this work: door.rgs, exit.rgs, hero.rgs, pickup.rgs, shrine.rgs and spikes.rgs. They are Rengy Script, and chapter 5 is the first to open one. The art folder holds the pictures the room uses, and five more drawn for later chapters: brick.png, bar_back.png, bar_fill.png, items.png and lock.png.
The interface’s face
Every word of an interface is drawn in one face, which the project names once. The Delve’s is Kenney Future Narrow. It comes from the same free downloads as the panels you draw with next, and you need them from here on.
- Download the two packs the list below links, and unzip them somewhere outside your project. The overview lists all five downloads, and says when each is needed.
- In your file manager, open the
interfacesfolder and make a folder in it calledfonts. Theartfolder is already there. - Copy the three files below into
artandfonts, each to where the list says, from where it says it is in the unzipped download. The font takes a new name, so that its path has no spaces or capitals. - Back in the editor, press Refresh in the bar of the Assets panel.
fontsappears, and the two pictures inart.
As it finds each file, the editor writes a small .meta file beside it, holding the file’s id. The id is made from the file’s place in the project, so keep the names in the list and your project gets the same ids as the one this tutorial was made from.
- Choose File → Project settings… and open its Font tab.
- Set Face to
fonts/kenney-future-narrow.ttfand Size to32. The line under Face reads “Found fonts/kenney-future-narrow.ttf”. - Leave Build an SDF atlas unticked. Chapter 16 says what it is for.
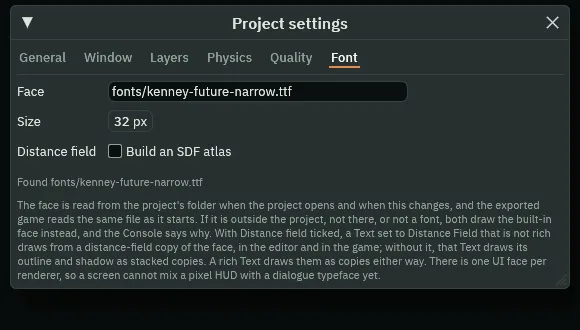
A Text’s Scale, which you set shortly, is a share of the Size: 1 is 32 pixels, and 0.5 is 16.
A canvas
Everything on the screen that is not the room lives under a Canvas. It says where an interface begins, and how its units fit a window of any size. Those are UI units, and every number from here on is in them. Canvas lists its fields.
- Select
Delve, click + Add node and choose Canvas. Rename the nodehud. - In its Canvas, set Scale Mode to ShrinkToFit. Leave the rest as it comes.
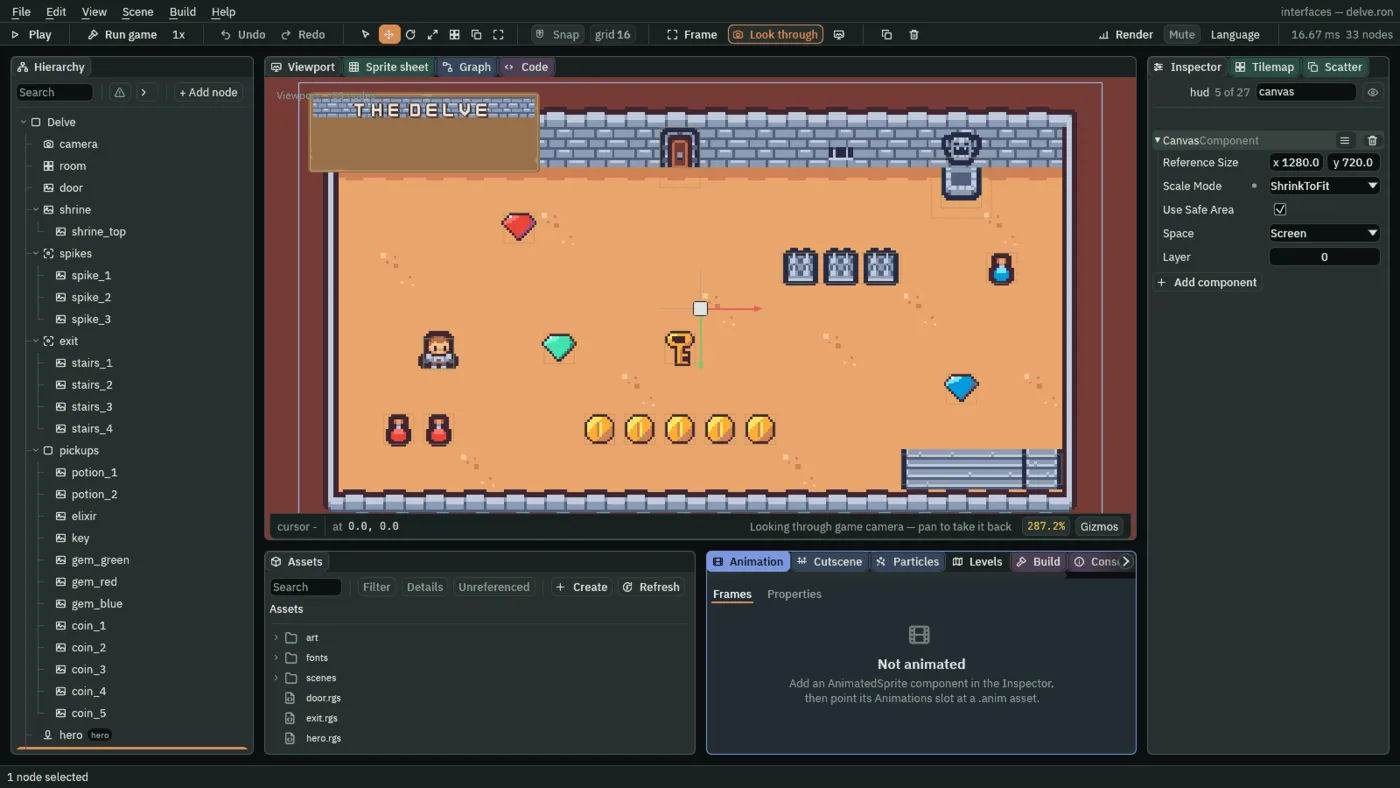
A new Canvas comes with a Theme beside it, at its defaults. Chapter 4 sets it.
- Reference Size
- The canvas’s own size in UI units: the window the layout was drawn for. The Delve opens a
1280by720window, so1280,720, as a new Canvas has it. Every offset under the canvas is in these units. - Scale Mode
- How the canvas fits a window of another size.
ConstantPixeldraws it at its pixel size, one UI unit to a pixel.ScaleWithWidthandScaleWithHeightscale it by one side, until the reference width or height fits.ShrinkToFitscales it to the largest field of its shape that fits inside the window, so nothing is ever cut off. A new Canvas hasScaleWithHeight; the HUD takesShrinkToFit. - Space
Screendraws the canvas over the camera’s picture, on the surface: a HUD, a menu.Worldplaces it in the room, for a label over an enemy’s head, and runs in neither the editor’s Play nor an exported game yet, as the Canvas reference says. This tutorial does not use it.- Layer
- The sort layer of a
Worldcanvas among the room’s own sprites: a lower number draws first. AScreencanvas ignores it, as this one does, so0, as it comes, stays.
The fifth row, Use Safe Area, stays ticked as it comes. Chapter 16 says what it does.
The two pictures below show this chapter’s finished HUD, whose plate you build next, in a window wider than the game’s 16 by 9. With ShrinkToFit the canvas is the largest 16 by 9 field that fits in the window, and the plate is held to that field’s corner, not the window’s.
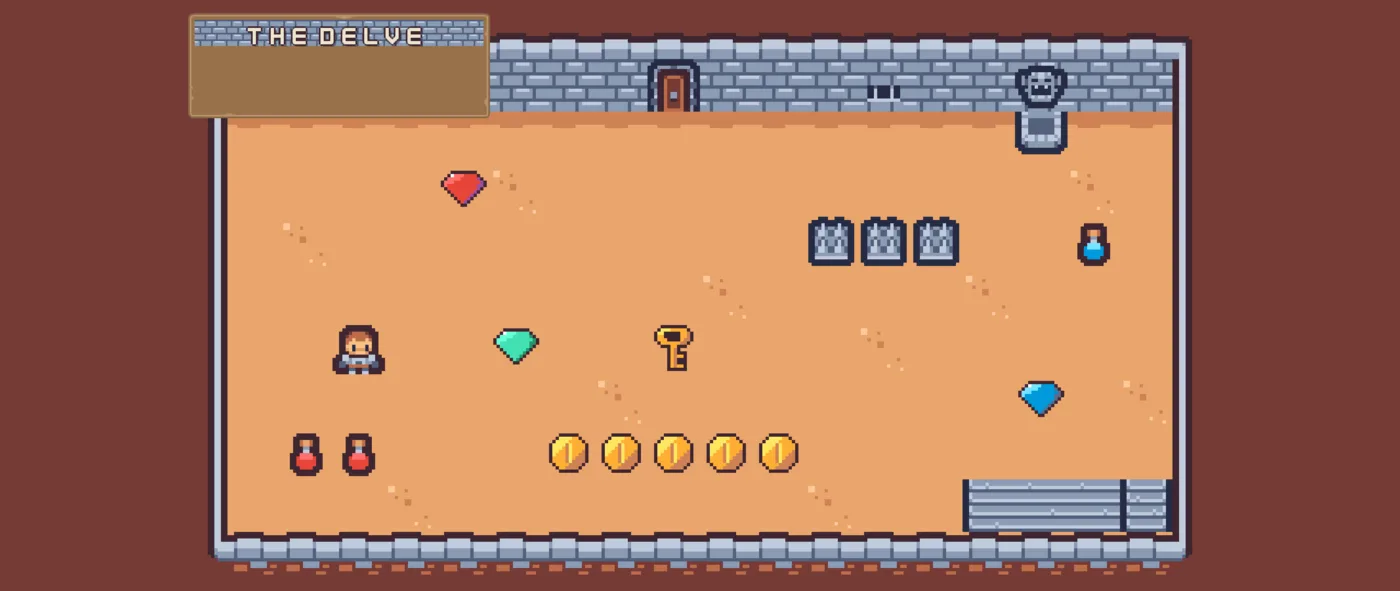
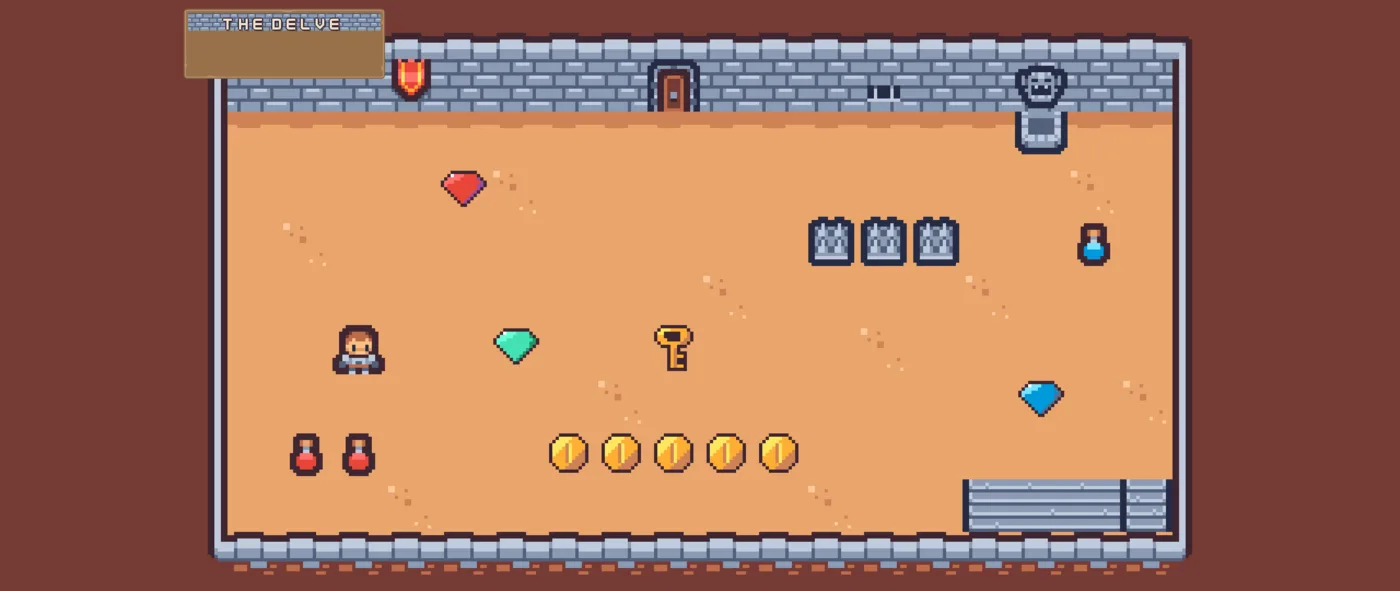
ConstantPixel: the plate drawn at its pixel size, smaller.A plate in the corner
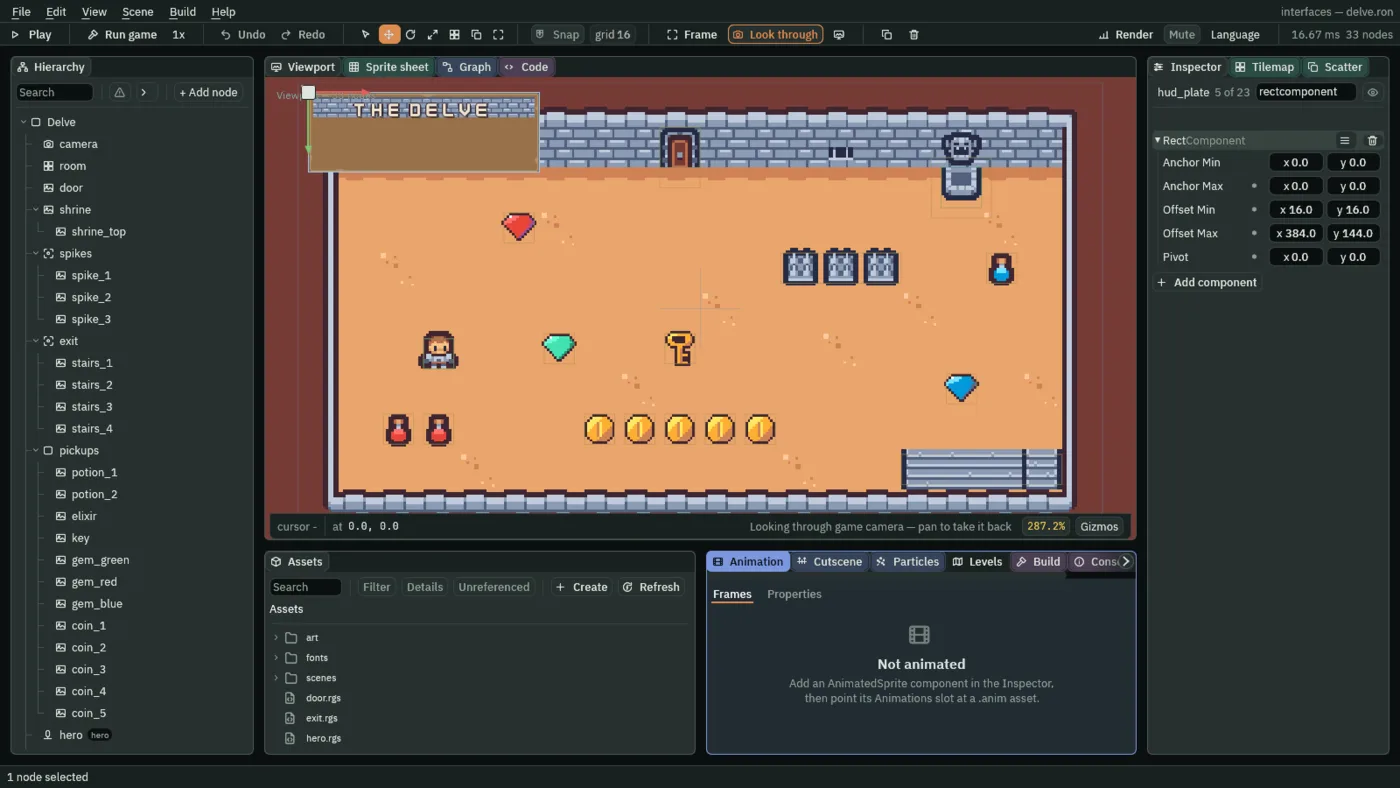
Every node under a canvas has a Rect: where it sits inside its parent, in UI units. A Panel draws a picture in that rect. The HUD’s plate is a Panel held to the canvas’s top left corner.
- Select
hud, click + Add node and choose Panel. Rename the nodehud_plate. - In its Rect, set Anchor Min and Anchor Max both to
0,0, Offset Min to16,16, Offset Max to384,144, and Pivot to0,0. - In its Panel, click Color. The picker that opens has a button at its top left. If it reads F, press it so that it reads U8: the picker then shows each channel from
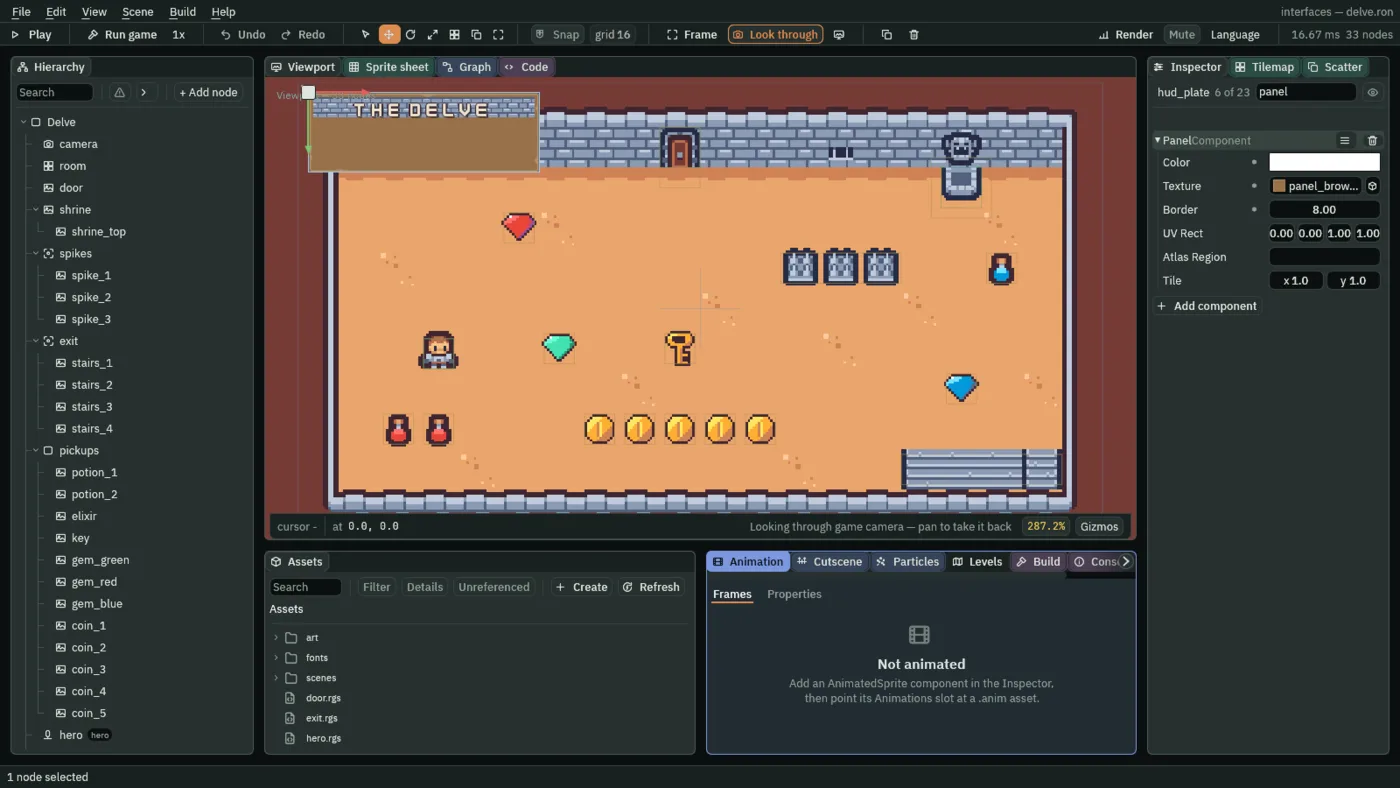
0to255, as this tutorial gives every colour, and it stays so until you close the editor. Set Color to255,255,255, alpha255: white. - Click Texture and choose
panel_brown.pngfromart. Set Border to8.
- Anchor Min, Anchor Max
- Two points of the parent the rect is held to, as fractions of its width and height:
0,0is its top left corner,1,1its bottom right. Both at0,0, the plate is held to the top left corner and keeps its own size. Spread them apart,0,0and1,0, and the rect stretches with the parent between them, as the brick strip below does. - Offset Min, Offset Max
- The rect’s top left and bottom right corners, in UI units from the anchors.
16,16and384,144make the plate 368 wide and 128 high, 16 in from the corner. - Pivot
- The point of the rect, as fractions of its own size, that counts as its position:
0,0is its top left. It does not place the rect: the anchors and the offsets alone do that. The Delve sets it to the corner or edge each rect is held to, so the number names that point. A fitter (chapter 2) has an Anchor of its own, the point that stays put as it resizes.
- Color
- A tint multiplied into the picture. White,
255,255,255, alpha255, draws it as it is; a lower alpha lets the room show through. A new Panel’s is black at half strength, which would darken any picture, so every Panel that draws one is set to white. - Texture
- The picture the Panel draws, stretched to its rect. Empty, it draws a plain block of its Color.
- Border
- How many pixels in from each edge of the picture are its frame, in the picture’s own pixels: the frame’s corners are drawn at their size, its edges stretched one way, and the middle both ways. This is nine-slicing.
8ispanel_brown.png’s corner.0stretches the whole picture, corners and all.
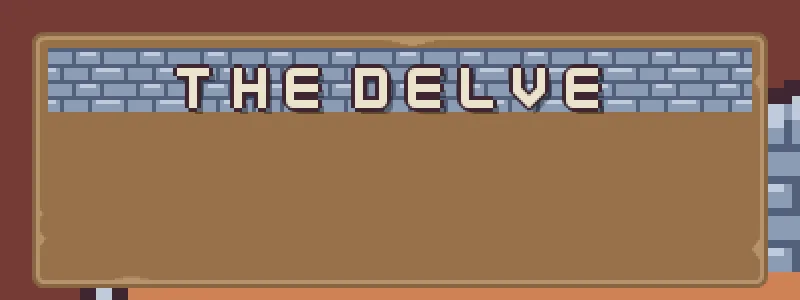
8, the corners kept.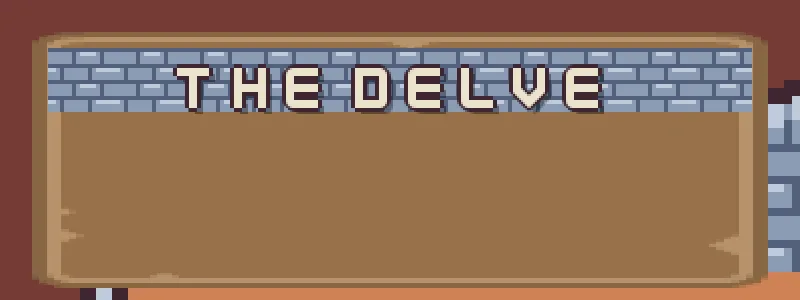
0: the whole picture stretched, its corners with it.A strip of bricks
A strip of bricks along the top of the plate makes a bar for the game’s name. It is a second Panel, inside the first, and its picture repeats.
- Select
hud_plate, click + Add node and choose Panel. Rename the nodebrick_strip. - In its Rect, set Anchor Max to
1,0, Offset Min to8,8, Offset Max to-8,40and Pivot to0.5,0. Anchor Min stays0,0. - In its Panel, set Color to
255,255,255, alpha255. Click Texture and choosebrick.pngfromart: it came with the starter. Set Tile to11and1.
- Tile
- How many times the picture repeats across and down the rect. Each repeat is drawn whole, except the last row and column, which are cut where the rect ends.
1,1, as a new Panel has it, stretches one picture over the rect. The strip is352units wide and32high, so11,1makes eleven bricks of32by32, each the picture’s 16 pixels at twice their size.
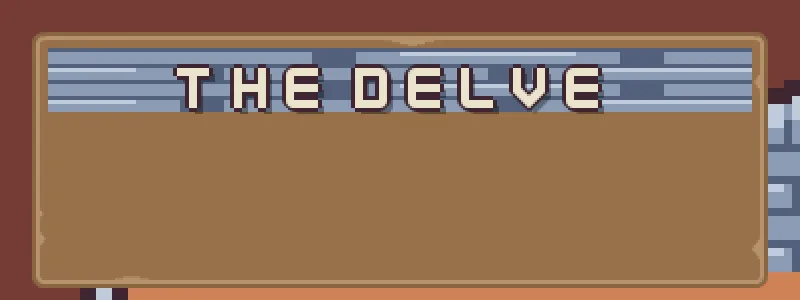
1, 1: one brick stretched along the strip.The game’s name
- Select
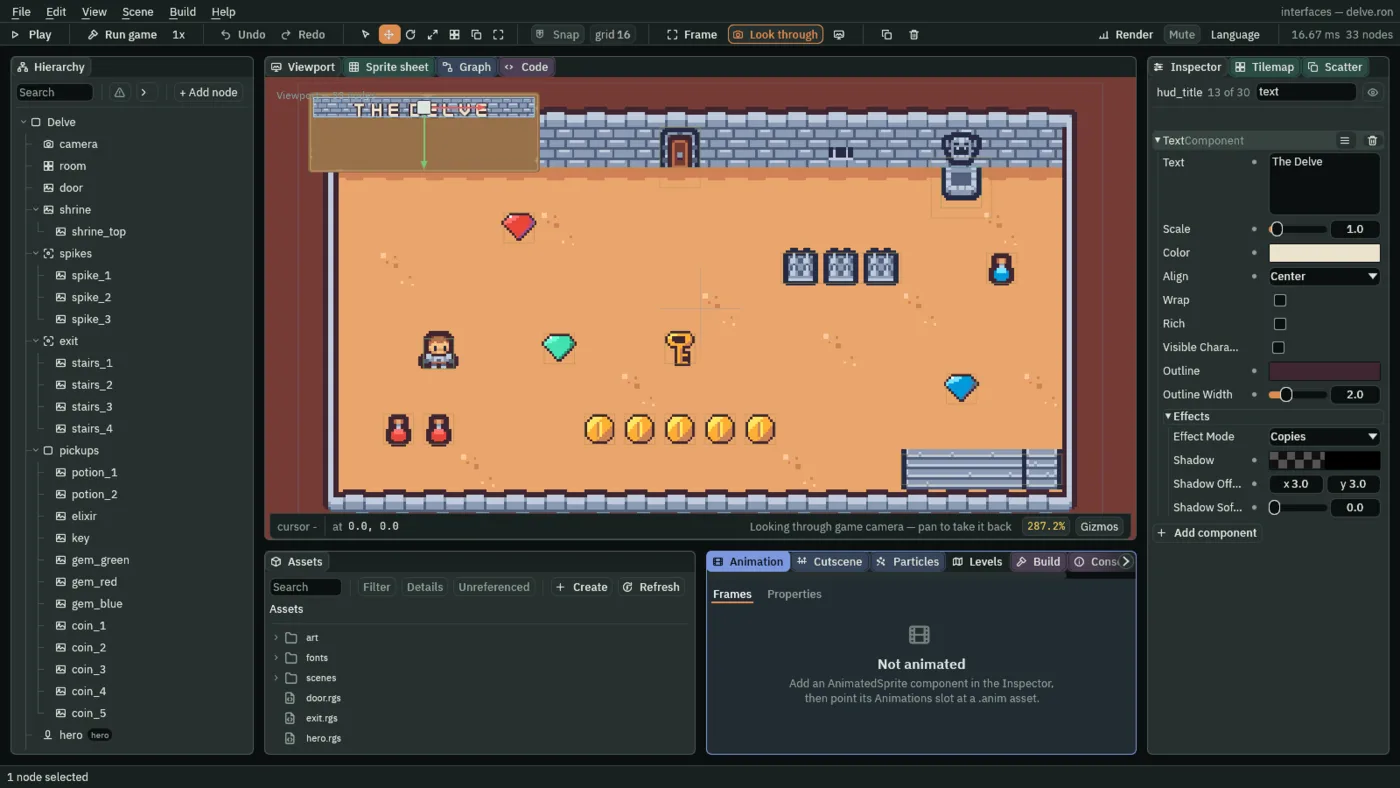
brick_strip, click + Add node and choose Label. Rename the nodehud_title. Its Rect stays as it comes, so it fills the strip. - In its Text, set Text to
The Delve, Scale to1and Align to Center. - Click Color and set it to
236,227,206, alpha255, a warm white. If the picker reads F at its top left, press it back to U8, as for the plate. - Set Outline to
63,38,49, alpha255, a dark plum, and Outline Width to2. - Under Effects, leave Effect Mode as Copies, set Shadow to
0,0,0, alpha153, Shadow Offset to3and3, and Shadow Softness to0.
- Text
- The words. Press Enter in the Inspector’s box to start a new line. The face draws capitals only, so
The Delvereads THE DELVE. - Scale
- How big the letters are, as a share of the face’s
32pixels:1is the whole of it and0.5half. A new Text’s is2. The title takes1; chapter 2’s counters take0.5. - Color
- The letters’ colour, as red, green, blue and alpha, each
0to255in the picker.236,227,206is a warm white that reads on the bricks. - Align
Left,CenterorRight: where the words sit across the rect. The strip is as wide as the plate, soCenterputs the name in the middle. A new Text isLeft.- Outline, Outline Width
- A ring of colour drawn behind each letter, and how far it reaches, in UI units.
2units of dark plum keep the cream letters apart from the bricks behind them;1or2suits a face this size, and more fills the letters in. A new Text’s width is0, which draws none. - Shadow, Shadow Offset, Shadow Softness
- A copy of the letters in the shadow’s colour, drawn behind them and to one side.
0,0,0, alpha153is black at 60% strength. The offset is how far right and down it falls, in UI units:3,3. The softness is how far its edge is blurred, in UI units:0keeps the shadow’s edge a hard pixel line, which suits a pixel face. A new Text’s shadow is clear, so it draws none until you give it an alpha.
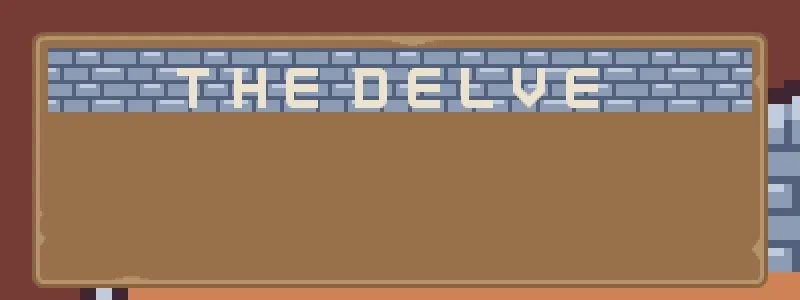
The canvas, the plate, the strip and the title
The HUD’s canvas
| Component | Field | Value |
|---|---|---|
| Canvas | Scale Mode | ShrinkToFit |
Every other field is as a new Canvas has it: Reference Size 1280, 720, Use Safe Area ticked, Space Screen, Layer 0.
The plate
| Component | Field | Value |
|---|---|---|
| Rect | Anchor Min | 0, 0 |
| Anchor Max | 0, 0 | |
| Offset Min | 16, 16 | |
| Offset Max | 384, 144 | |
| Pivot | 0, 0 | |
| Panel | Color | 255, 255, 255, alpha 255 |
| Texture | panel_brown.png | |
| Border | 8 |
The brick strip
| Component | Field | Value |
|---|---|---|
| Rect | Anchor Min | 0, 0 |
| Anchor Max | 1, 0 | |
| Offset Min | 8, 8 | |
| Offset Max | -8, 40 | |
| Pivot | 0.5, 0 | |
| Panel | Color | 255, 255, 255, alpha 255 |
| Texture | brick.png | |
| Tile | 11, 1 |
The title
| Component | Field | Value |
|---|---|---|
| Text | Text | The Delve |
| Scale | 1 | |
| Color | 236, 227, 206, alpha 255 | |
| Align | Center | |
| Outline | 63, 38, 49, alpha 255 | |
| Outline Width | 2 | |
| Shadow | 0, 0, 0, alpha 153 | |
| Shadow Offset | 3, 3 | |
| Shadow Softness | 0 |
The title’s Rect is as a new Label has it, filling the strip. Every other field of every node is as it comes.