Docs · Make it move
Characters and physics
By the end
- A room a character stands in, walks through and jumps around, in the editor’s Play and in an exported game
- Steps it walks up, and a ledge it jumps up through and drops back down from
- Scripts that read the controls and hear the character land
- A pressure plate that opens a door on the other side of the room
On this page
Make the room solid
A Shape is only a picture, and a character falls straight through one. What a character stands on and walks into is a Collider: a box that blocks movement. This guide starts from the room you built in Getting started: clear some floor in it, then give its floor, ceiling, walls and crate 1 one each.
- If
crate 1still carries the Mover from Getting started, remove it with the bin icon at the right of its header. Otherwise the crate slides away through the wall. - Delete
crate 2andcrate 3: select each in the Hierarchy and press Delete. The floor betweencrate 1and the right wall is where this guide puts some steps, a ledge, a plate and a door. - Select
floor. In the Inspector, press Add component, typecolliderand choose ColliderComponent. - Set the Collider’s Size to the Shape’s:
640and24. Both are centred on the node, so now they cover the same box. - Do the same for
ceiling,wall left,wall rightandcrate 1, each Collider the size of its own Shape. Leavebackdropalone: it is the wall behind the room, and nothing stands on it.
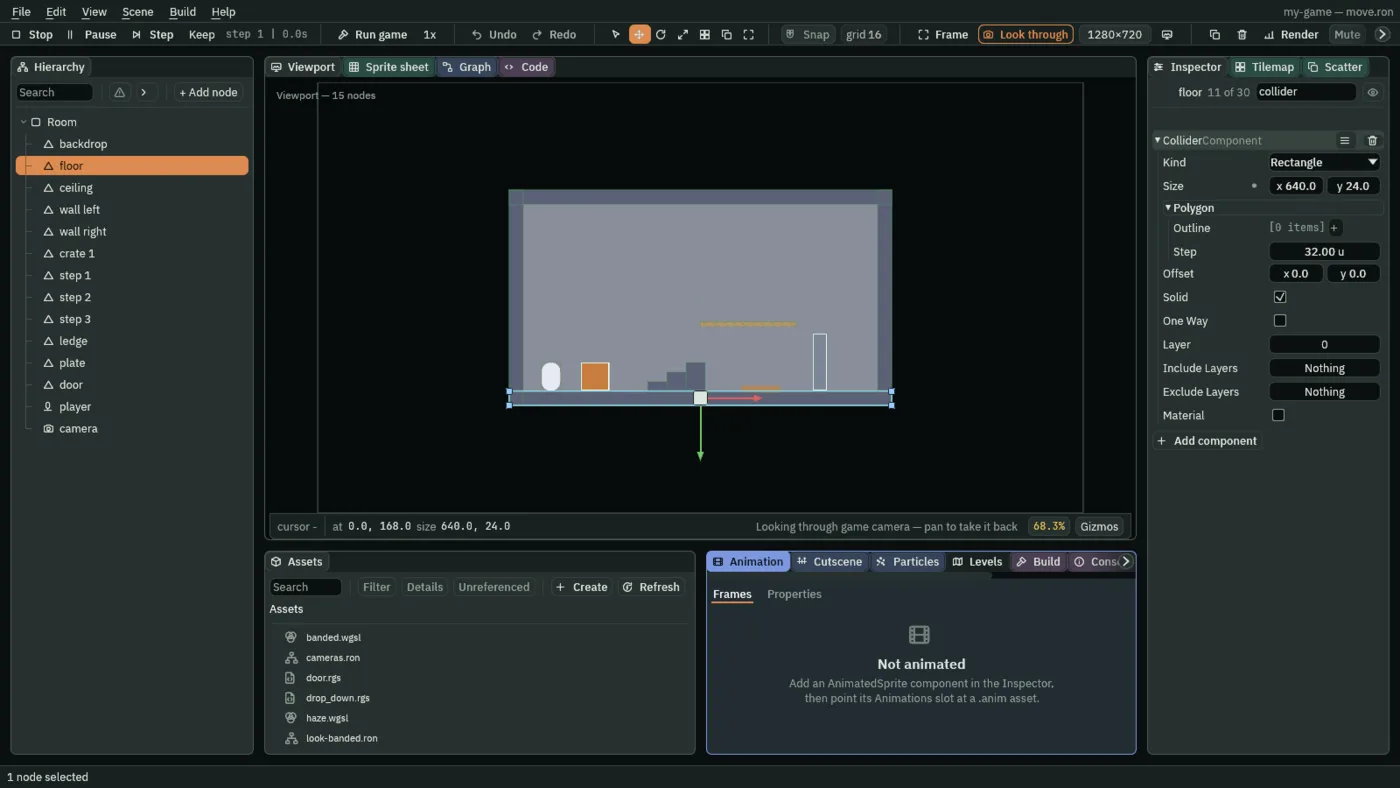
- Kind
- Rectangle, Circle or Capsule. A rectangle blocks as its box. A solid circle or capsule blocks along its curve: it is cut into boxes, each as long as the Collider’s Step, so a character stands on the round of it and not on the corner of a square. A shorter Step follows the curve more closely and costs more boxes. At
0nothing is cut and a round Collider blocks as its box again. Step is in the Polygon fold and starts at32. - Size
- The box, in world units, centred on the node. It does not scale with the node.
- Outline and Step
- Points that replace the box, for a shape a box cannot make. A slanted edge in the outline becomes a staircase of boxes, each Step long. The next sections say how a character climbs one.
- Offset
- Moves the box off the node’s centre.
- Solid
- Whether it blocks at all. Untick it and it stops nothing, and it notices nothing either: a character passes through and no script hears it. If you come from Unity, Solid off is not
isTrigger, which notices: what notices here is an Area, below, as in Godot. - One Way
- Blocks a character only as it comes down onto it. See below.
- Layer, Include Layers and Exclude Layers
- Layer is what the Collider is on: a row of boxes behind a button, one for each collision layer the project names. Which layers meet is the Collision matrix on the Physics tab of File → Project settings…: a pair ticked meets, a pair unticked passes through each other, and every pair comes ticked, so a project that never opens it has every character meet every Collider. Include Layers and Exclude Layers override the matrix for this one Collider, whichever of the two Colliders in a contact carries them. A body on an included layer meets it whatever the matrix says, a body on an excluded layer passes through it, and Exclude wins. Neither changes what the Collider is on. Tiles answer to the matrix alone, so neither reaches them. A Collider with no layer ticked is on none, and the matrix lets nothing meet it, so leave all three as they start. Crates puts a project’s layers to work.
- Material
- Tick it for Friction and Bounce. Bounce throws a character that lands on it back up: at
1it rises nearly as high as it fell from, and at0it stops dead. Friction is felt. Under1, the keys bring a character up to its walking speed, and back down to a stop, a little each step, so a low Friction is ice: at0.1it takes a second to reach its walk and a second to stop.1or more is plain ground, where the keys have it at once. Ice and bounce lays a strip of ice.
Tiles can be solid with no Collider to place: a tilemap layer marked Solid is solid to a character, as Tilemaps shows. So is a Sprite Shape with Collide ticked: see Terrain and shapes.
A character that walks
A Character Body makes a node a character: a box that falls, walks, jumps, and stops against anything solid.
- Select
Roomand press + Add node → Character. The new node carries a Character Body, and a Shape to see it by. Name itplayer. - Set its Position to
-250and156: the left of the room, with its feet on the floor. - Make the Shape match the body. Set its Kind to Capsule, its Size to
32and48, its Anchor to0.5and1, and its Sort Layer to10, so the character draws in front ofcrate 1. - Press F5. Walk with A and D, or Left and Right, and jump with Space or W. The character stops at the walls and at
crate 1, and jumps up onto it.
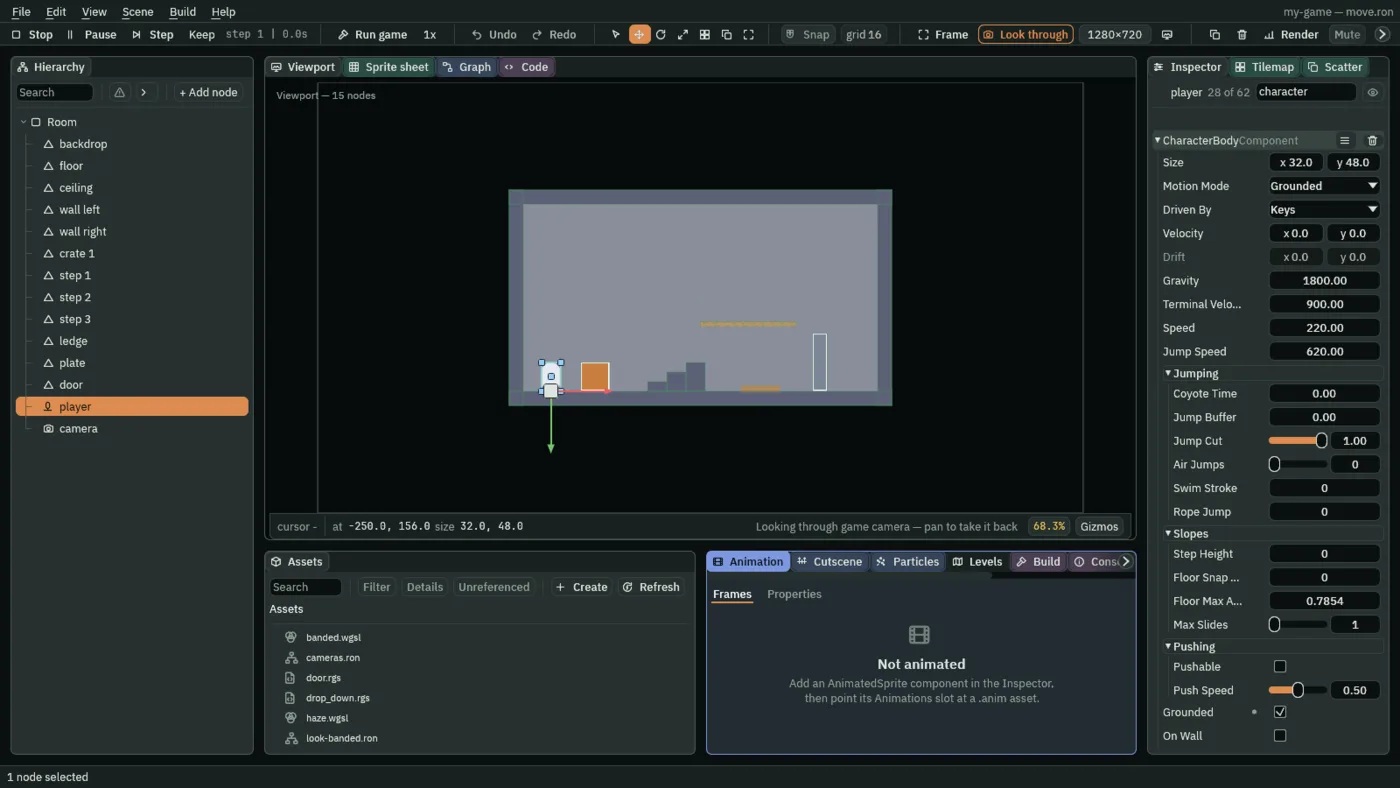
A character stands on its node. The body is a box 32 wide and 48 tall whose bottom edge is the node’s position, so the Position you type is where its feet go. A new Character’s Shape is a 64 by 64 square centred on the node instead, which draws half of it below the feet. An Anchor of 0.5 and 1 puts the Shape’s bottom middle on the node too. The Viewport outlines each body’s box in green, so you can see where a body really is, and a selected body has a small square grab on its two top corners for its Size. Render → Debug draw fills each box as well.
It walks on your controls
Nothing had to be written for that. In the editor’s Play and in an exported game alike, A or Left and D or Right walk every Character Body in the scene that is driven by the keys, which is the default, and Space, W or Up makes each one that is standing jump. A Grounded one also turns to face the way it walks. Save with Ctrl+S, then press Run game, and the character walks the same way in a window of its own.
Those keys are your project’s controls: its left, right and jump actions, the ones a script reads too. Bind other keys to them in View → Input map… and every body the keys drive follows, as Reading the controls below explains. A body that is driven by its script ignores them: see Driven By, below.
- Size
- The box it collides as, in world units, standing on the node.
- Motion Mode
- Grounded falls, stands on floors and jumps. Floating has no down: no gravity, no jumping, and one-way platforms do not stop it. The keys walk a floating body four ways:
leftandrightacross,upanddownup and down, which are A, D, W and S, or the arrows, until you bind others. - Velocity
- How fast it is moving, in units per second, with down positive. The keys set its left-right part every step.
- Drift
- What the world adds to its own Velocity, in units per second: a wind, a belt, a magnet, water, a shove, a swing. The body moves by the two together. You cannot type it: the world writes it, so the row is dim. The keys set Velocity every step and never touch Drift, so a gust is not undone a step later. A Godot CharacterBody2D or a Unity Rigidbody2D has one velocity, which the next line that sets it wipes; this body keeps the two apart. The updraft shows it live.
- Gravity
- How quickly it speeds up as it falls.
- Terminal Velocity
- The fastest it falls.
- Speed
- How fast it walks, in units per second.
- Driven By
- Who walks it and makes it jump. Keys, the default, walks it on your controls, as above, and every body in this guide is one. A Grounded body the keys walk also turns to face its walk: walking left mirrors the Flip X of the Sprite on its node, walking right puts it back, and standing, or holding both keys, keeps the way it last faced. So draw its art facing right. A Floating body is not turned, and neither is one driven by a script. Script leaves both to the body’s own script: it writes the body’s sideways speed with
set_number("CharacterBodyComponent", "velocity.x", …)and asks for a jump with jump, and the keys leave it alone. Gravity, floors, walls and ledges work the same either way. The knight, the patrolling enemies and the boss of Crypt Knight are bodies driven by a script. - Jump Speed
- The upward speed a jump starts with. At the defaults, 620 against a Gravity of 1800, a jump rises about 100 units.
- Coyote Time
- Seconds after it runs off a ledge in which a jump still counts, as if from the ground. At the default, 0, there is no grace. About a tenth of a second forgives a jump that comes a hair late.
- Jump Buffer
- Seconds a jump asked for just before landing waits to happen on landing. At 0, a jump asked for in the air is lost; about a tenth of a second makes a press that comes a moment early still a jump.
- Jump Cut
- How much of the upward speed is kept when the jump is let go early, from 0 to 1. At the default, 1, all of it: a tap rises as far as a held jump. At 0.5 a tap rises about a quarter as high. A body driven by the keys is cut by letting go of the jump key; one driven by a script calls cut_jump.
- Air Jumps
- How many more jumps it may make in the air before it lands again, each a fresh press. At the default, 0, a body jumps only from the ground. A script may write it: Crypt Knight’s double jump is a relic that sets it to 1.
- Swim Stroke
- In the Jumping fold: the upward speed a press of jump gives it in water, in units per second. While the middle of its box is under the waterline of a Buoyancy effector, and it is neither on the ground nor within its Coyote Time, a press sets its upward speed to this, once for each press. At the default, 0, it cannot swim. The flooded cellar floats a knight and gives him a stroke.
- Rope Jump
- In the Jumping fold: the upward speed a press of jump gives it while it hangs on a rope, in units per second: held by an enabled Joint, off the ground and outside its Coyote Time. It does not let go of the rope: the script that holds the Joint does. At the default, 0, a press on a rope does nothing. The grapple swings a knight on one.
- Pushable
- In the Pushing fold. Ticked, a body that walks into this one shoves it along instead of stopping at it: a crate. It needs a solid Collider of its own to be walked into. Crates builds three.
- Push Speed
- In the Pushing fold: how much of the pusher’s walk a shove gives this body, from
0to1. At1it keeps pace with the pusher; at0.5, the default, it moves at half its speed, and the pusher with it. - Grounded, On Wall and On Ceiling
- What the last step found: something solid underfoot, something in the way to the side, something overhead. The engine sets them, and you can watch them change in the Inspector while the room plays.
- Shoving
- Ticked on a step this body shoved a Pushable body along. It is not ticked when it walks free, nor when what it walks into will not give way: then it is On Wall instead. The engine sets it, as it sets On Wall. Crates reads it live.
- Drop Through
- On while it drops through a one-way platform, which then holds it up no more, and off again by itself once its feet are below the platform’s top. That is the same step it leaves the platform, so you will seldom see it ticked. The keys turn it on for a body they drive when
down, S or Down, is held asjump, Space, is pressed on a one-way platform, and a script’sdrop_down()turns it on for any body. See below. - Layer
- Which collision layers the body is on, a row of boxes behind a button, ticked by name like a Collider’s Layer. It meets the Colliders and the tiles its layers meet in the Collision matrix, except where a Collider’s Include Layers or Exclude Layers say otherwise. A new body is on the first layer, as a new Collider is, and every pair of layers meets until you untick one, so a project that never touches layers sees no difference.
- Debug Color
- The colour Debug draw fills its box with.
Steps and slopes
A character collides as a box, and so does everything it walks into, so to a character a slope is a staircase. Steps made of Colliders, a slope painted in tiles, a Sprite Shape’s collision and a Collider’s slanted Outline are all staircases. At the defaults a character stops at every step as if it were a wall.
Build three steps to the right of crate 1, each 16 units higher than the last:
- Select
Room, add a node with + Add node → Shape, name itstep 1, and give it a Collider as in the first section. - Press Ctrl+D twice, and name the copies
step 2andstep 3. - Set all three from the table below, typing each size into both the Shape’s Size and the Collider’s.
- Press F5, jump
crate 1, and walk right into the steps. Each one stops the character like a wall, and it has to jump them.
| Name | Size | Position |
|---|---|---|
step 1 | 32 × 16 | -72, 148 |
step 2 | 32 × 32 | -40, 140 |
step 3 | 32 × 48 | -8, 132 |
Two numbers in the Character Body’s Slopes fold make a staircase something it walks up and down.
- Select
player. In its Character Body’s Slopes fold, set Step Height and Floor Snap Length to18, a little over the 16 each step rises. - Press F5 and walk right. The character walks up the steps without jumping. Walk back left, and it walks down them without leaving the ground.
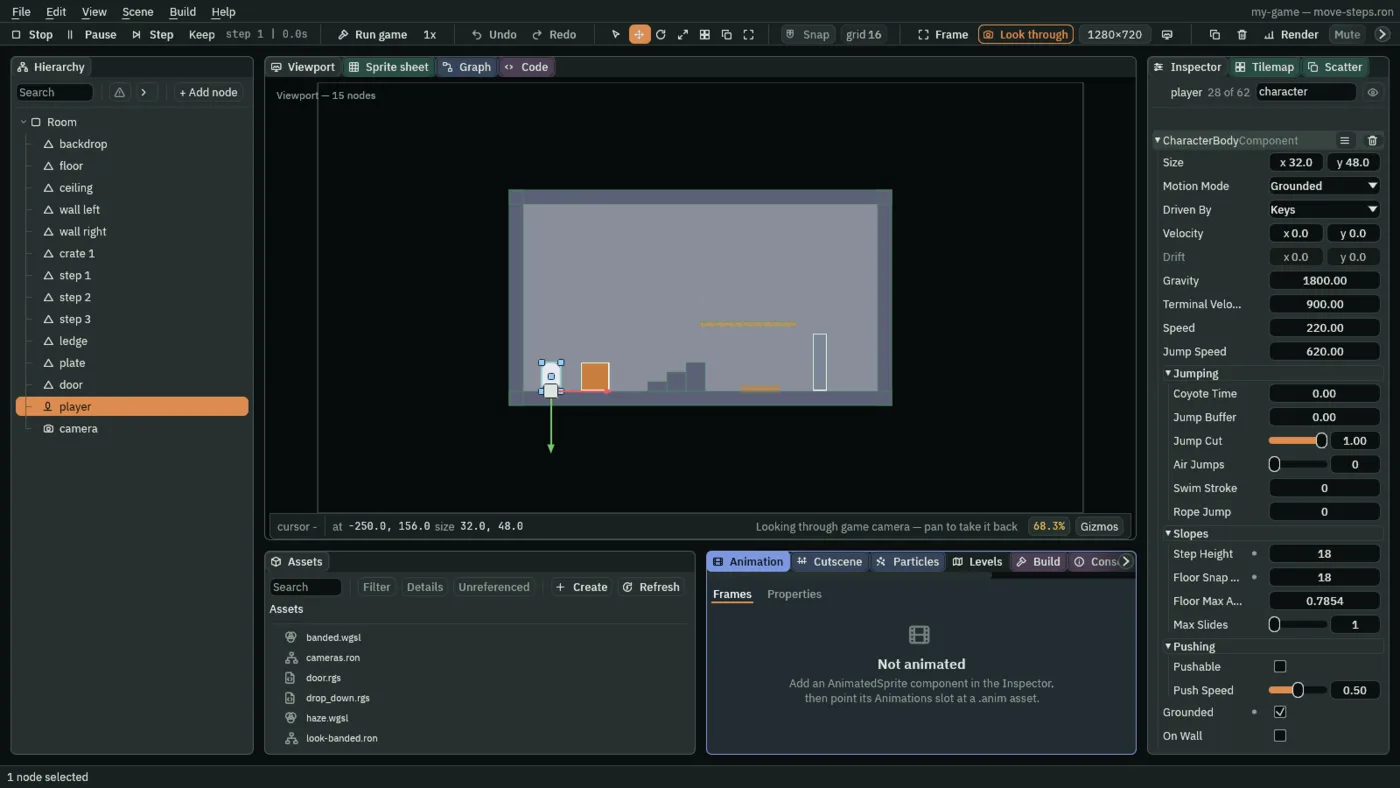
18, a little over the 16-unit rise of each step.- Step Height
- The tallest step it walks up without jumping. At
0, the default, it stops at every one. - Floor Snap Length
- How far down it reaches to stay on the ground as it walks downhill. At
0it leaves the ground at the edge of every step on the way down, and lands again on the next. - Floor Max Angle
- In radians. A staircase steeper than this is a wall. The default,
0.7854, is 45°. The steepness is measured from how far the character has walked since it last stepped up, so a character that starts right against a step, with no room to walk into it, does not climb it. - Max Slides
- How many times in one step a move that ran into something tries again with what is left of it. Raise it to
2or3if the character catches on corners that look smooth.
A ledge you jump up through
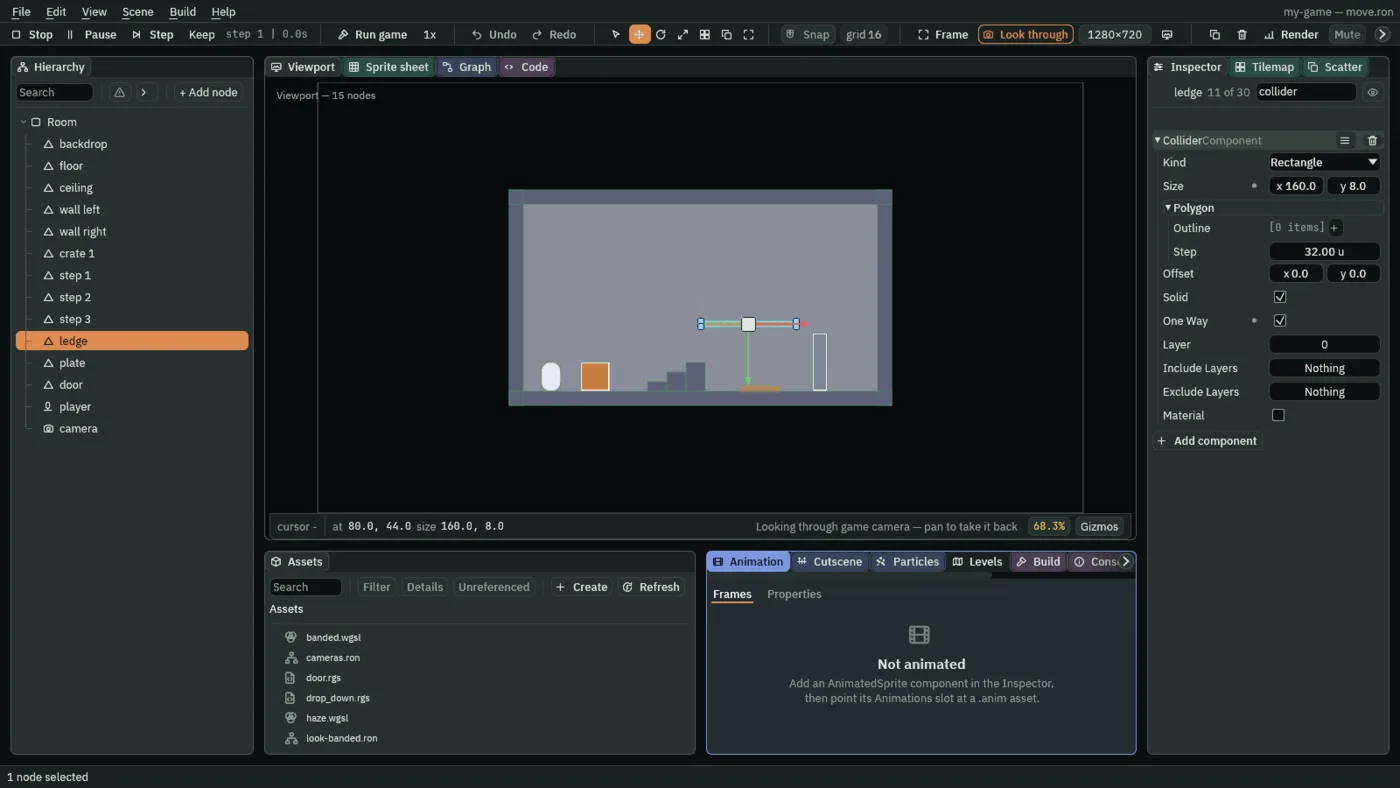
Tick One Way on a Collider and it stops a character only as the character comes down onto it. From below and from the side the character passes through, so it can jump up through a ledge and land on top.
- Select
Room, add a node with + Add node → Collider, name itledge, and set its Position to80and44: high over the right half of the room, just past the top step. - Set its Collider’s Size to
160and8, and tick One Way. - A Collider draws nothing in the game. Press Add component, choose ShapeComponent and give the Shape the same Size, so there is a ledge to see.
- Press F5, walk up the steps and jump from the top one. The character rises through the ledge and lands on top. From the floor it is out of reach.
Dropping back down
The way back down is the Character Body’s Drop Through: while it is on, one-way platforms do not hold the character up. A body the keys drive turns it on itself. Hold S or Down and press Space while it stands on a one-way ledge, and it drops through. On solid ground the same press is a jump. Those are your down and jump controls: bind other keys to them and the drop follows.
- Press F5, get onto the ledge, hold S and press Space. The character drops through to the floor, and the ledge holds it again the next time it jumps up onto it.
Many games drop on down alone, and a script gives the character that: it calls drop_down when the player presses down. A body that is driven by its script has no keys at all, so a call to drop_down() is how its script drops it.
- In Assets, choose Create → New script, type
drop_downand press Create. - In the Code panel, click
drop_down.rgsin its Scripts list, replace its text with the script below, and press Ctrl+S. - Select
player, press Add component, typedropand choose DropDown. - Press F5, get onto the ledge, and press S or Down. The character drops through to the floor, and the ledge holds it again the next time it jumps up onto it.
/// Press down to drop through the one-way platform underneath.
component DropDown : Body {
    fn loop() {
        if pressed("down") {
            drop_down();
        }
    }
}
component DropDown : Body- The
: Bodysays the script belongs on a node with a Character Body, and gives it the hooks a body has, which come further down. See Body. fn loop()- Runs every step. A hook may leave out a parameter it does not use: this one’s is
dt. pressed("down")- True on the one step the player presses down: S or Down. See pressed.
drop_down()- Asks the Character Body on the same node to drop through the one-way ledge it stands on. On solid ground, or in the air, it does nothing. See drop_down.
One call drops the character through the one ledge it stands on. The drop ends by itself once its feet are below that ledge, so a second ledge under the first holds it up again.
Reading the controls
A script reads the player’s controls by action name, never by key. A project with no controls of its own has these:
| Action | Keys |
|---|---|
left | Left or A |
right | Right or D |
up | Up or W |
down | Down or S |
jump | Space, W or Up |
action | E or Enter |
A project that saves controls of its own, from View → Input map…, has those instead, in the editor’s Play and in an exported game. They change what scripts read, and what walks a character the keys drive: it walks on left and right, jumps on jump, drops on down with jump, and floats up and down on up and down, on whatever keys your controls bind them to. If your controls leave one of those five out, that one stays on its keys from the table above.
held(action)- True on every step the action is held down. See held.
pressed(action)- True only on the step it goes down. A tap is one
pressed, however long the key stays down. See pressed. direction(action)- A two-way action, made of four keys or a stick, as a
Vec2: right minus left across, down minus up. The default controls have no two-way action, so it answers zero until your project’s controls define one. See direction.
This one lets the player run. Make it the way you made drop_down.rgs, as sprint, and put it on player:
/// Runs while the action key is held.
component Sprint : Body {
    walk: f32 = 220.0,
    run: f32 = 400.0,

    fn loop() {
        if held("action") {
            set_number("CharacterBodyComponent", "speed", run);
        } else {
            set_number("CharacterBodyComponent", "speed", walk);
        }
    }
}
Hold E as you walk and the character runs. set_number writes the Character Body’s Speed, and the built-in walking reads it on the next step. Keep Walk the same as the body’s Speed, or the first step of the game changes it.
When a character lands
A script with : Body also hears what happens to the body, on the step it happens:
on_land()- It touches the ground after being in the air. See on_land.
on_leave_ground()- It leaves the ground: a jump, or a walk off an edge. See on_leave_ground.
on_hit_wall()- Something stops it moving sideways. See on_hit_wall.
on_hit_ceiling()- Something stops it moving up. See on_hit_ceiling.
Each runs once when it happens, not on every step it stays true: a character standing still on the floor has not landed again.
/// Squashes the character for a moment each time it lands.
component Squash : Body {
    fn on_land() {
        await anneal_scale(vec2(1.3, 0.7), 0.05, .OutQuad);
        anneal_scale(vec2(1.0, 1.0), 0.15, .OutBack);
    }
}
Put it on player and jump. The character lands wide and flat, and springs back. anneal_scale scales the node over a number of seconds, and await holds the hook at the first one until it finishes. The Shape stands on the node, so it squashes down onto its feet. Only the picture scales: the body’s box stays the size it is.
Areas that notice
A Collider stops things. An Area stops nothing, and notices: a script on it hears when another Area comes into it and when it leaves. A pressure plate, a pickup, a checkpoint, the reach of a sword: each is an Area.
Areas notice only other Areas. A Character Body is not one, so the character needs an Area of its own before a plate can notice it.
- Select
player, press Add component and choose AreaComponent. In its Shape, set Size to32and48and Offset to0and-24. An Area is centred on its node, and the Offset lifts this one over the body, which stands on the node. - Select
Room, add a node with + Add node → Area and name itplate. Set its Position to100and152, on the floor under the ledge, and its Shape’s Size to64and12. - An Area draws nothing in the game either. Give
platea Shape too,64by8, so there is a plate to see.
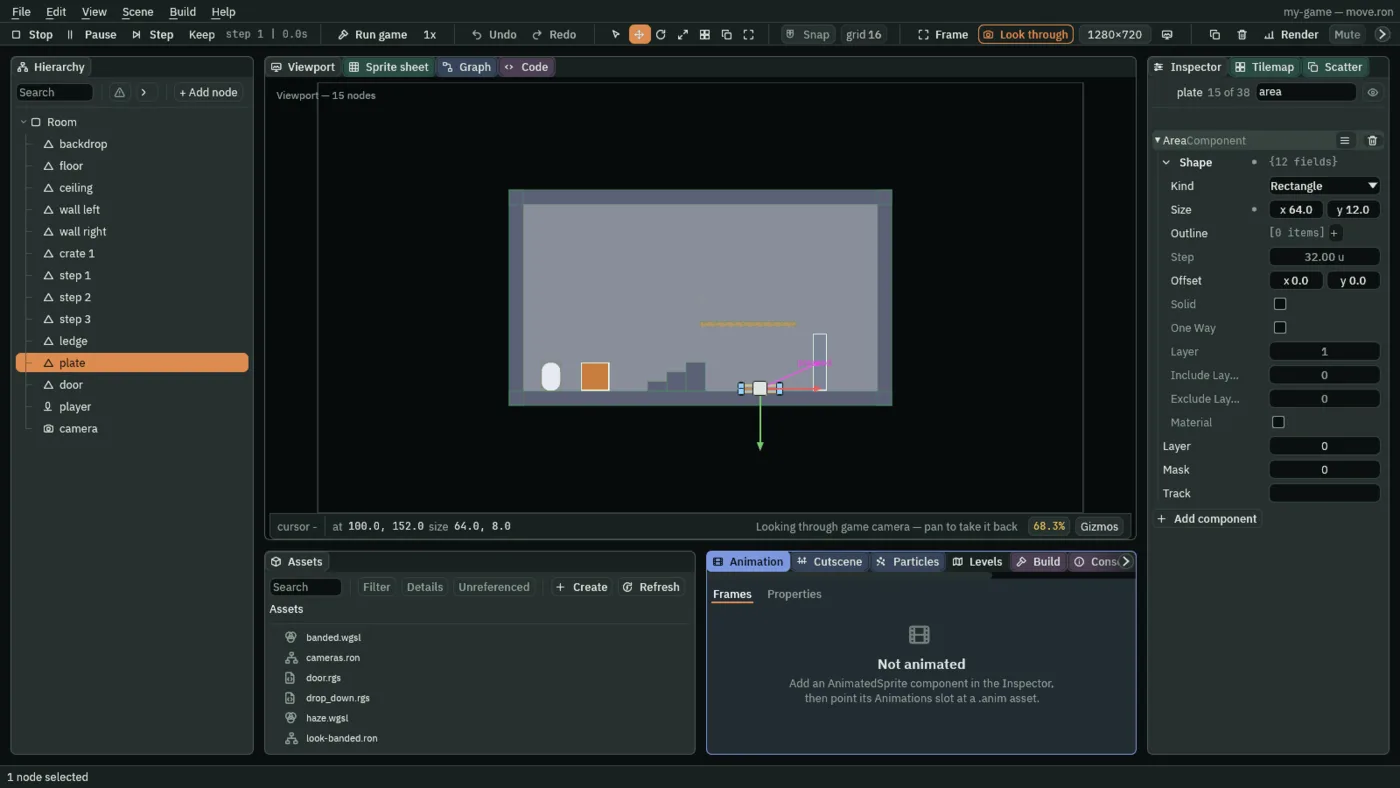
0: the first layer, which every Area starts on.- Shape
- The volume, centred on the node. Only its Kind, Size, Outline and Offset count. Its other rows are a Collider’s, and an Area never blocks anything.
- Layer
- Which layers this Area is on.
- Mask
- Which layers it looks for. An Area notices another when its Mask shares a layer with the other’s Layer. Every Area starts on the first layer and looking for it, so every Area notices every other until you change them.
- Track
- Leave it empty. A Track switches the Area on only while an Animated Sprite on its node shows a frame that track marks, in the editor and in an exported game: an attack’s hitbox, live for the frames of the swing.
Click Layer or Mask to tick layers in a list. The list’s Name layers… fold names them for the whole project, and every mask reads by name from then on.
A script on the plate
Make this script the same way, as plate, and put it on the plate node:
/// Tells the nodes it is wired to when something steps on it.
component Plate : Area {
    fn on_enter() {
        emit("pressed");
    }
}
: Area gives a script the hooks an Area has. on_enter runs when another Area starts overlapping this one, on_exit when it stops, and while_in on every step in between. Each is handed the other Area’s node as other, which this plate has no use for. Who hears pressed is the next section.
Wire the plate to a door
The plate does not know what it opens. It emits a signal, which is only a name, and a Signal on the plate says which nodes hear it. The door can be moved, renamed or swapped for another without touching the plate’s script.
- Select
Room, add a node with + Add node → Shape and name itdoor. Set its Position to200and108, and its Shape’s Size to24and96: a tall bar standing on the floor, between the plate and the right wall. - Give it a Collider of the same size, as in the first section. Press F5: the door stops the character.
- Select
plate, press Add component and choose SignalComponent. Press + beside Connections, and open the new [0] row. - Type
pressedinto Signal, spelled exactly as the script emits it. Click To and choosedoor.
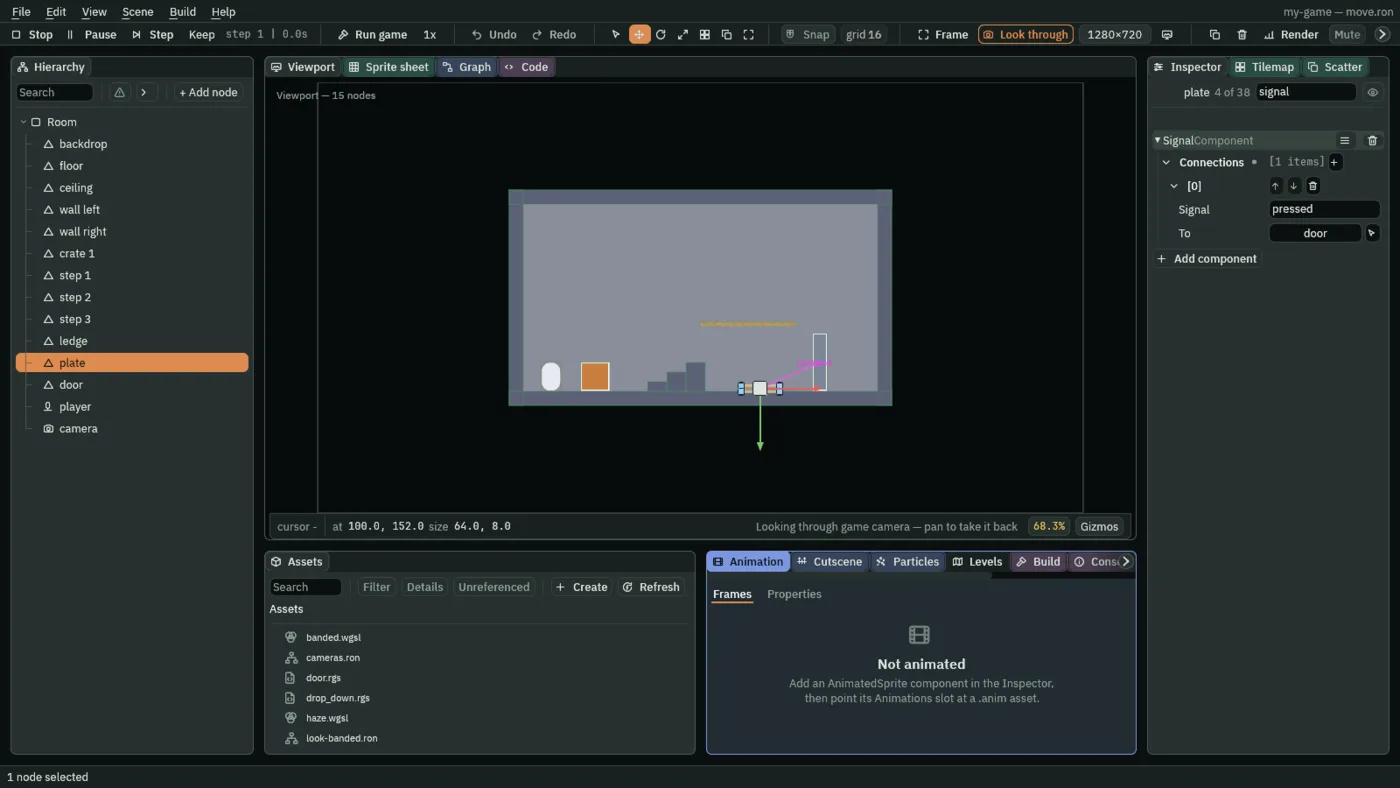
pressed goes to the door.Now the door needs a script that listens.
- Make a script called
doorthe way you madedrop_down.rgs, and replace its text with the one below. - Select
door, press Add component, typedoorand choose Door. - Press F5 and walk onto the plate. The door disappears, and the character walks on through where it stood.
/// Opens when a plate wired to it is pressed.
component Door {
    fn on_signal() {
        if heard("pressed") {
            hide();
        }
    }
}
emit sends the signal, and every node wired to it hears it on the next step. on_signal runs on a step when a signal has reached the node, and heard says which one: a node wired to several things tells them apart by name. To open two doors, add a second row to the plate’s Connections.
hide makes the node invisible, and a hidden node’s Collider blocks nothing, just as a hidden Area notices nothing. That is what opens the door.
Next
- Cameras: a camera that follows the character around the room.
- Tilemaps: a room painted in tiles that are already solid.
- Terrain and shapes: ledges and slopes drawn as one line, with the art and the collision together.
Rengy Script covers what a script can do beyond this guide, and Input how to make the controls your scripts read. The script reference lists every hook and builtin.