Docs · Make it look right
Effects and shaders
By the end
- A sprite that ripples, through a shader you wrote
- A haze that bends the room behind it
- A lamp with banded, toon-style light
- A picture cut to its frame, and a minimap drawn from the room
On this page
A shader is a text file
A shader changes how a sprite is drawn, pixel by pixel: a ripple, a shimmer, a colour that drifts. You write it as shader code, in WGSL, the language graphics cards read, and save it as a .wgsl file in your project. The editor and your exported game compile it when they load it, so there is nothing to build.
Rengy writes everything around your code. You write one function, shade, which runs for every pixel of the sprite and returns that pixel’s colour.
- In Assets, press Create, choose New shader, type
rippleand press Enter. The editor writesripple.wgslin the folder Assets is showing, with a small shader to start from. - Double-click
ripple.wgslto open it in the Code panel, replace everything in it with the text below, and press Ctrl+S.
//! param tint: color = (0.6, 0.8, 1.0, 1.0)
//! param speed: float = 2.0 range 0 8

fn shade(frag: Fragment) -> vec4<f32> {
    let wobble = sin(frag.uv.y * 30.0 + time() * speed()) * 0.03;
    let uv = region_clamp(frag, vec2<f32>(frag.uv.x + wobble, frag.uv.y));
    return texel(uv) * frag.color * tint();
}
//! param speed: float = 2.0 range 0 8- A parameter: a value each sprite using the shader can set for itself, as a row in the Inspector. A parameter is a
float,vec2,vec4orcolor, andrangeafter afloatmakes its row a slider. A shader has at most eight. Lines starting//!go at the top of the file. fn shade(frag: Fragment) -> vec4<f32>- The function you write. It is handed the pixel being drawn, and returns its colour as red, green, blue and alpha, with the alpha already multiplied in: red at half strength is
(0.5, 0.0, 0.0, 0.5). speed(),tint()- A parameter is read by calling it by its name.
frag.uv- Where the pixel is on the picture, from
0to1across and down. For a sprite cut from a sheet that is across the whole sheet, andregion_uv(frag)gives the same for the sprite’s own part. texel(uv)- The picture’s colour at a point.
frag.color- The Sprite’s Color, or a particle’s colour at its age.
frag.custom- Four numbers this particular picture carries. Zero for a sprite; for a particle, its emitter’s Custom Data, one set for each particle: a hue, a phase, a brightness of its own. Light, glow and your own look gives every firework spark its own colour this way.
time()- Seconds since the game started.
region_clamp(frag, uv)- Keeps a point you have moved inside the sprite’s own picture, so a sprite cut from a sheet never shows its neighbour at its edge.
One more //! line changes how the result lands on what is behind it. //! blend add, multiply, screen and sub work as a Sprite’s Blend of Add, Multiply, Screen and Subtract do, and //! blend opaque draws it without blending. Without the line, it blends as an ordinary sprite does.
//! include noise pastes the file noise.wgsl, from any folder of your project, in front of your code, so a function you write once can be used by every shader that includes it. Edit noise.wgsl and the shaders that include it compile again; a mistake inside it is reported with its file name.
Put a shader on a sprite
- Add a node with + Add node → Shader Material. It comes with a Sprite: click the Sprite’s Texture slot and give it a picture.
- Click the ShaderMaterial’s Shader slot and pick
ripple.wgsl. The shader’s parameters appear as rows under Values, a tint swatch and a speed slider, each marked unset. - Press Play. The picture ripples.
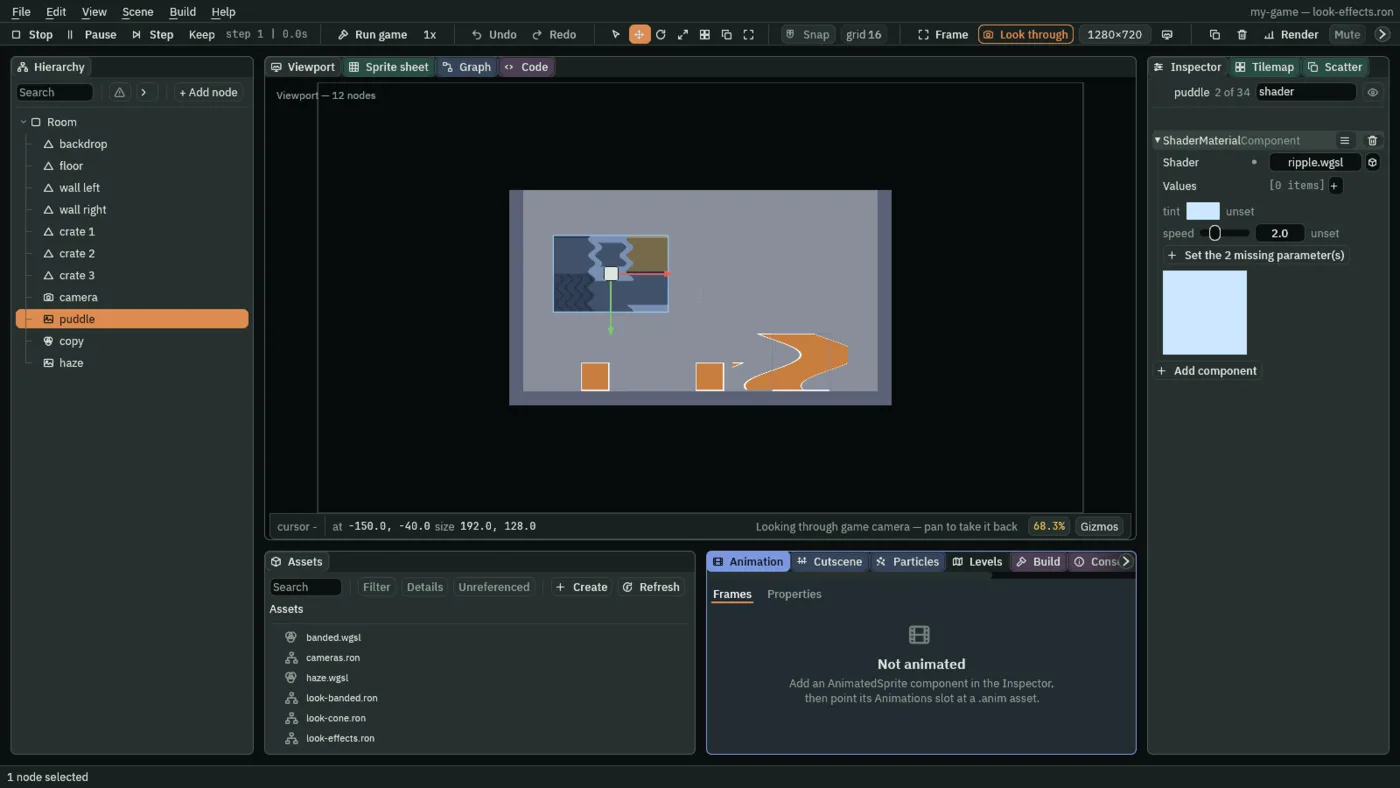
//! param lines. Unset means the sprite is using the shader’s own default.To shade a Sprite you already have, select its node, press Add component, type shader and choose ShaderMaterialComponent.
Change a value and the sprite keeps its own; the bin beside the row gives it back to the shader’s default. Set the 2 missing parameter(s) stores every unset one at its default.
A script sets a value by its name, whether or not the Inspector has set it yet: set_colour("ShaderMaterialComponent", "values.tint.value", colour) for a colour, and set_number or set_point the same way for a parameter of one or two numbers.
Changing a shader
Press Ctrl+S in the Code panel and the editor compiles the scene’s shaders again, in the viewport and while the game plays; no build starts. A .wgsl you change or add in another program is picked up and compiled within a second. If a shader does not compile, the Console says why, and its sprites keep the last version that did, or draw plain if none has.
An exported game carries your .wgsl files and compiles them when it starts, as the editor does.
Reading what is behind a sprite
Heat haze, the wobble through water, glass that bends the room: each is a sprite that draws what is behind it, moved a little. A shader reads what is behind with screen(uv), but only once the scene has a Screen Copy, which copies what has been drawn so far. Without one, screen reads white.
- Add a node with + Add node → Screen Copy.
- Set its Below Layer to
10, in the number beside the list of layer names. Everything on a lower Sort Layer goes into the copy. - Choose Create → New shader in Assets and name it
haze. Double-clickhaze.wgsl, replace everything in it with the text below, and press Ctrl+S. - Give the haze a node of its own, with a Sprite on Sort Layer
20and a ShaderMaterial usinghaze.wgsl. The Sprite needs a picture: a Sprite without one is not drawn, and the picture’s shape is the haze’s shape.
//! param strength: float = 0.01 range 0 0.05

fn shade(frag: Fragment) -> vec4<f32> {
    let wave = sin(frag.screen_uv.y * 80.0 + time() * 6.0) * strength();
    let behind = screen(frag.screen_uv + vec2<f32>(wave, 0.0));
    return behind * texel(frag.uv).a;
}
frag.screen_uv is where the pixel is, from 0 to 1: across the window, or, while a Post Volume is drawing, across the picture inside the window’s bars. The shader reads the screen a little to one side of it, by a different amount on each line, and uses the Sprite’s picture only for its shape: texel(frag.uv).a is how solid the picture is at that pixel.
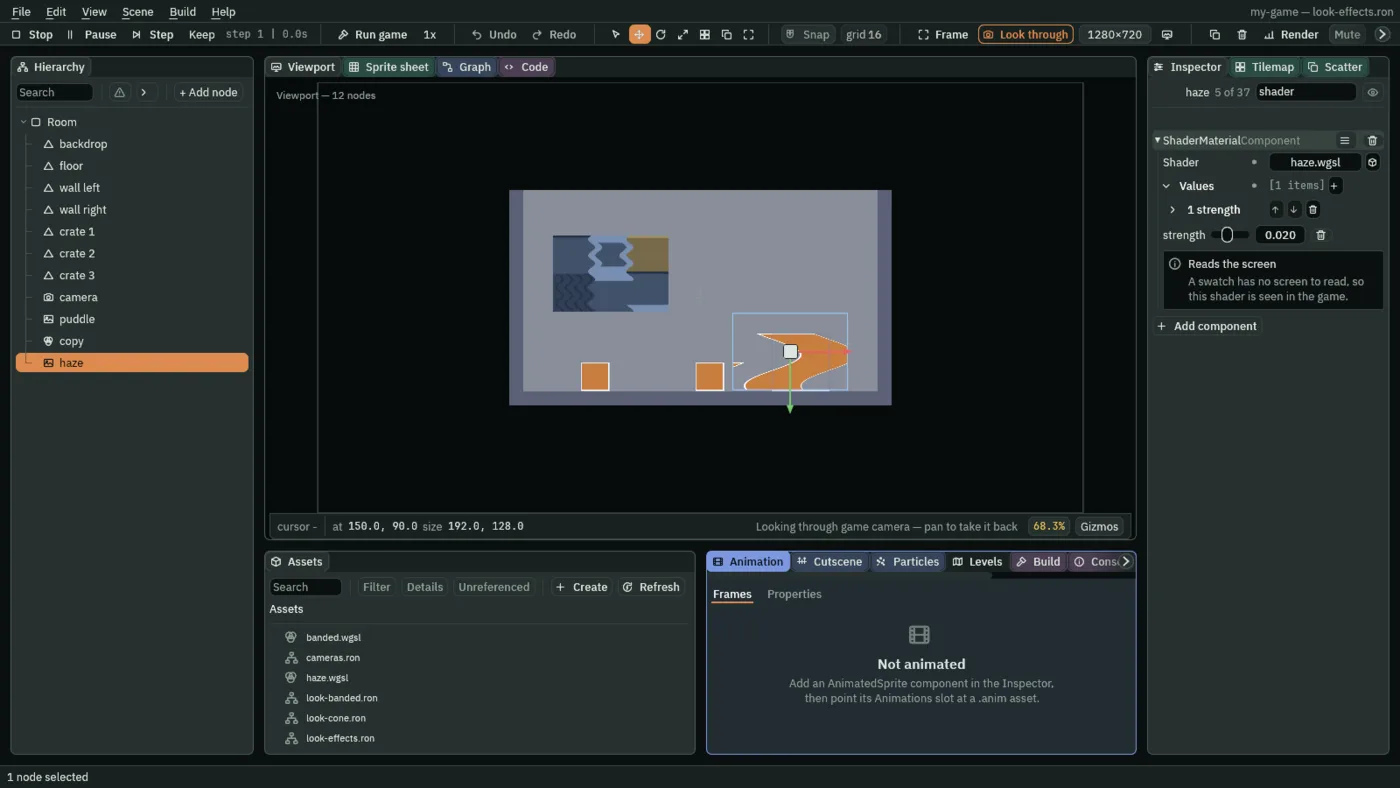
- The copy holds the room’s own colours, without its lighting.
- A scene uses one Screen Copy: the first in the Hierarchy that is enabled and visible. With none,
screenreads white again.
Through the glass sets a Screen Copy’s Below Layer to a layer called Glass, and puts on that layer the water of a cistern, whose shader wobbles whatever lies beneath it, and hot air over a fire, which shimmers and whose strength a script sets by name.
A shader for one light
A light shader changes how one Light fades out from its middle. It is shader code too, with the same //! lines, but its function is light rather than shade, and it shapes the light rather than the sprites it falls on. Lighting and shadows covers the Light itself. Your own falloff writes one, a candle with a wavering ring.
- Choose Create → New shader in Assets and name it
soft. Double-clicksoft.wgsl, replace everything in it with the text below, and press Ctrl+S. - Add a node with + Add node → Light Shader. It carries a Light and a Light Shader.
- Click the Light Shader’s Shader slot and pick
soft.wgsl.
fn light(l: Light) -> vec4<f32> {
    return vec4<f32>(l.color * l.energy * l.attenuation, 1.0);
}
This is close to the light as Rengy draws it anyway: its colour, times its brightness, times how far it has faded. One thing differs. The fade it is handed, l.attenuation, is zero outside a Cone’s angle with a hard edge, where Rengy’s own Cone fades its edge over the outer fifth of each side. A Directional light, which does not fade, lights the whole view evenly with or without it.
Rounding the fade to whole steps gives the hard-edged rings of toon lighting. Make banded.wgsl beside it, and pick it in the Shader slot instead:
//! param bands: float = 3.0 range 1 8

fn light(l: Light) -> vec4<f32> {
    let stepped = ceil(l.attenuation * bands()) / bands();
    return vec4<f32>(l.color * l.energy * stepped, 1.0);
}
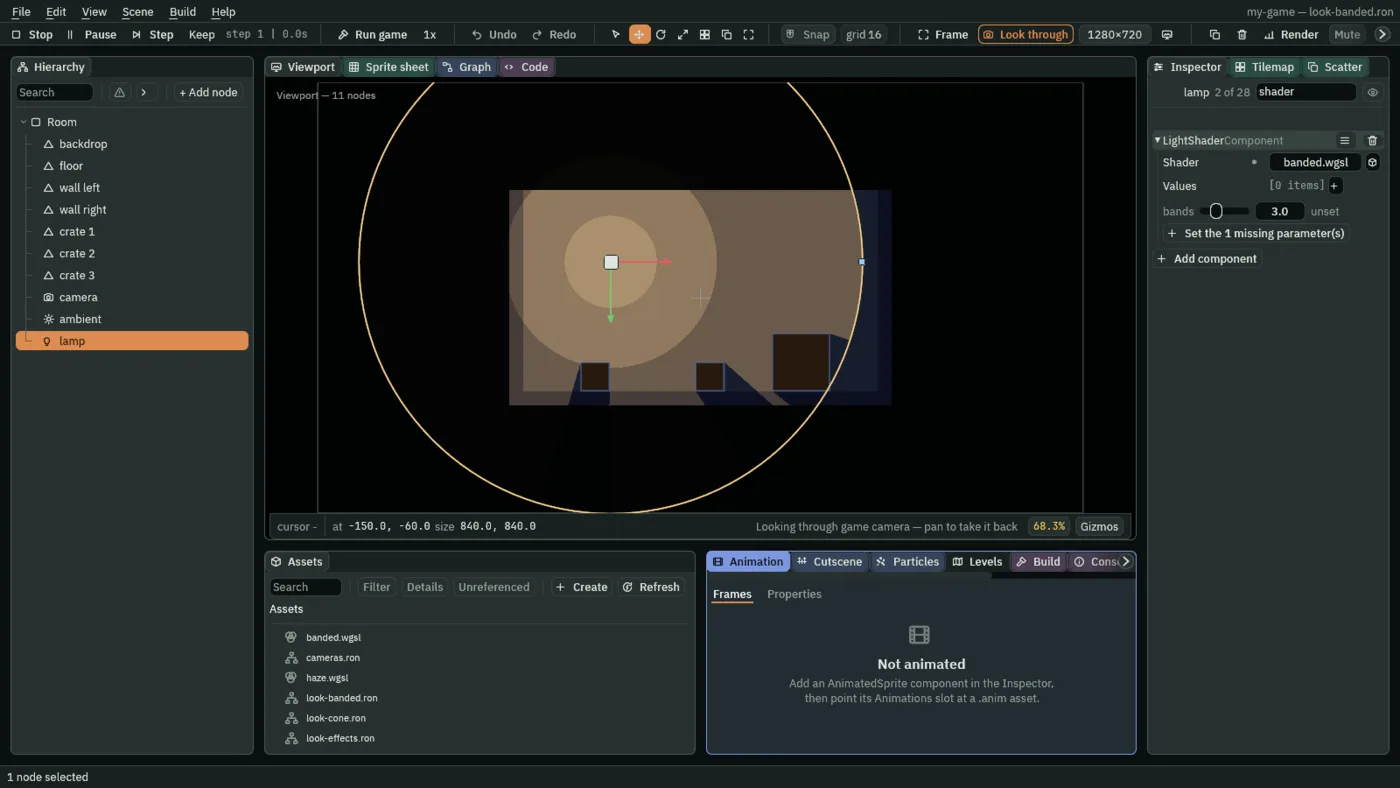
bands is a parameter, so each lamp using the shader can have its own count.l.attenuation- How much of the light reaches this point:
1at the light’s middle, falling to0at its Radius, and0outside a Cone’s angle. l.color,l.energy- The Light’s Color, and its Intensity.
l.distance,l.radius- How far this point is from the light, and the light’s Radius, in world units.
l.world- Where this point is in the room.
time()- Seconds since the game started, as in a sprite shader.
Cut to a rectangle
A Clip cuts the Sprites, Shapes, Lines and world text under its node to a rectangle: a portrait cropped to its frame, a bar that fills.
- Add a node with + Add node → Clip.
- Put what it should cut under it, as its children.
- Set its Size. The parts of those Sprites, Shapes, Lines and text that fall outside the rectangle are not drawn.
- Size
- The rectangle, in the node’s own units.
- Anchor
- Which point of the rectangle sits on the node:
0.5,0.5is its middle and0,0its top-left corner. - Enabled
- Whether it cuts at all.
Tiles, Polygons and Sprite Shapes are not cut yet: they draw whole, inside a Clip or not. A turned Clip cuts to the upright box around it, not to its turned shape. For a cut that is not a rectangle, use a Sprite Mask: see Terrain and shapes.
The room, drawn again into a picture
A Viewport draws the scene a second time into a picture of its own, and a Sprite can show that picture: a minimap, a monitor on a wall, a portrait beside a line of dialogue. The Viewport’s node is its camera: move the node, and the view moves; turn it, and the view turns with it.
- Add a node with + Add node → Viewport, and put it where the view should look from.
- Click its Texture slot and choose New render target. That gives the view a picture of its own.
- Set its Size, the picture’s size in pixels, and its Zoom, which works as a Camera’s does:
2is twice as close, and0.5shows twice as much. - Add a Sprite where the picture should appear. Click its Texture slot: the Viewport is listed by its node’s name, as a render target. Pick it, and set the Sprite’s Size.
- Update: Always
- Draws the view again every frame. The default.
- Update: Once, Never
- Both draw only while Drawn is unticked, and tick it once they have, so both draw once when the room starts. Untick Drawn for one more: in the Inspector, or from a script with
set_flag("ViewportComponent", "drawn", false). A Never view whose Drawn is ticked before it has drawn shows its Clear Colour until Drawn is unticked. - Update: WhenVisible
- Draws only on frames where something on screen shows the picture: a Sprite in view, or a Panel on the HUD. A monitor in a room nobody is looking at costs nothing.
- Subtree
- Draws only this node’s children instead of the whole scene: their tiles, animations, labels and particles as well as their sprites and shapes.
- Layers
- The sort layers the view draws, each picked by name like a Sprite’s Sort Layer. Empty, the default, draws them all, so a map can draw the ground and the figures and leave out the sky and the fog. A Sorting Group counts by its own layer, so a character is drawn whole or not at all.
- Clear Colour
- What the picture starts as, before anything is drawn into it. Transparent by default, so a view of one thing has nothing around it.
- A view sees for itself: it shows what is in front of its own node, whether the game camera can see it or not, so a minimap can show past the edges of the screen and a monitor can watch another room.
- A view is drawn without lighting.
A map in the corner shows a Viewport round the watchman as a minimap in a HUD panel. The lens puts one on a wall to watch a square nobody can walk to, drawn only while it is on the screen, and paints a portrait with another, once, and again when a script says: Update set to WhenVisible, Once and Never. Both are chapters of Cameras and Framing.
Colour grades
A Post Volume grades how the scene looks: its exposure, tint, saturation and vignette, and its bloom, a glow on whatever is brightest. It is drawn in Play and in an exported game, at the quality tier the project names, or the desktop’s when it names none. Its Area is Global, for the whole scene, or Box, for one part of it. Ship Evader’s bloom is a Global one. Its bloom’s Spread widens the glow without drawing more: see Glow.
What effects cost
Every effect here draws something more. Render → View → Overdraw shows how much: each pixel is lighter the more times it was drawn, so stacked see-through layers stand out. It is easiest to read in a room with no Light in it.